Softlok Dongles
- Support for 64-bit platforms and future options for non-Windows platforms;
- Network licence manager runs as a service (ie. the computer with the network dongle needs to be on, but no one needs to be logged in);
- Much more flexible licensing options (for example, it is now possible to have a Network 10 TUFLOW licence with a Network 5 Multiple 2D Domains Module licence – with the SoftLok dongles a Network 10 Multiple 2D Domains Module would have to have been purchased);
- Multiple WIBU dongles (local and/or network licensed) are accessible together (ie. if all licences from one dongle are taken, licences from other dongles are automatically checked and taken);
- No network ghost licences (thus far!); and
- No need for TUFLOW to control limiting of local licences (TUFLOW’s run key is not used if the number of CPUs/cores exceeds the local licence limit).
- To allow access to a SoftLok dongle the computer’s operating system requires a device driver that interfaces between TUFLOW and the dongle. Install the device driver by running sl2inst.exe found in the Dongle\Drivers\Install folder. Depending on your permissions, you may need to be logged in as an Administrator. The following dialogue appears:
- Click on “Install” to install the drivers. “Uninstall” is used to remove the drivers if you need to at a later date. Alternatively, a command line version drvinst.exe is also provided. Type drvinst install from a DOS window to install, or drvinst uninstall to remove the drivers. Please note if you move either of these programs to a different folder ensure to copy both of the driver files windrvr.vxd and windrvr.sys to the same folder. It is not necessary to reboot the computer – the drivers are available for use immediately.
- Insert the TUFLOW SoftLok standalone dongle in the USB port. This allows you to initiate several TUFLOW processes from this computer (subject to the licensing of your Standalone dongle, and computer hardware and processor limitations). If a TUFLOW SoftLok network dongle is also available across your network, the standalone dongle takes precedence. That is, running TUFLOW from a computer with a standalone dongle does not take up a TUFLOW network dongle user site.
Introduction
This page provides information pertaining to the Softlok (blue) dongles. These dongles are no longer issued as of August 2010 as the vendor after several requests could not provide 64-bit support, however they continue to be supported by future 32-bit versions of TUFLOW. SoftLok dongles can be exchanged for a new WIBU (metal) dongle for a nominal fee (please contact sales@tuflow.com).
The WIBU (metal) dongles have several advantages over the Softlok dongles:
Installation
Installing a Softlok Standalone (Local) Dongle
To install the SoftLok software drivers that TUFLOW uses to access the dongles, download the latest drivers from http://www.tuflow.com/Tuflow%20Latest%20Release.aspx. Make sure that “Dongle Drivers.003.zip” or later is used as there are known problems with earlier drivers. Unzip the file and follow the steps below:

- Install the dongle security server software by running setup.exe in the Dongle\Server folder and follow the on screen prompts. If you are running Windows NT or 2000, you must be logged in as Administrator. The required device drivers as described in the previous section are automatically installed. Connect the TUFLOW network dongle to the USB port and start the dongle driver by selecting it from the Start menu (Start/Programs/Security Server/Security Server). The following dialog box appears.
- The first time the dongle security server software is run the program attempts to start for a few seconds and then fails because it has not yet been set up. Click the Set up button and enter the server name or IP address (IP address is preferred as problems with server names that start with a number have been experienced), usually leave the port as 6666 (see note below) and click Apply and Close. Note: Some System Administrators have discovered that particular firewall and anti-virus software block port 6666 (popular amongst hackers apparently!). If problems occur in accessing a network dongle, try using another port number. The port number may also need to be freed by your organisation’s IT department.
- Now click the Retry to start server button, which should successfully start the server. (Note: there seems to be a problem with starting the server on machines with a name starting with a number. Therefore, avoid these names or use the IP address.) Don’t worry about the message “IP Security not loaded” as this is set up later if required. Now click OK to place the Security server in the system tray (icons at bottom right of taskbar).
You can at any time double click the Security Server icon to either change the settings or to view the current status as shown below. Note that if the below is opened before any TUFLOW processes have been initiated, the Security Server shows no active keys (ie. the below is blank). In this case, to check if the Security Server is working double click on TUFLOW.exe and one License in use should eventually appear along with the maximum number of licenses available.
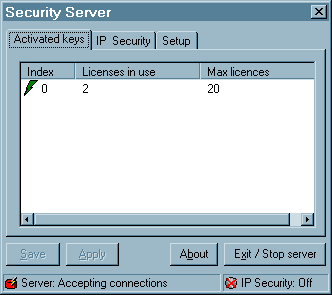
- To close the dialog box and return it to the system tray click the close dialog button in the top right. To stop the server click the Exit/Stop Server button. The Activated keys tab shows the current activity of the Security Server. The ‘Index’ column indicates whether the dongle is being accessed. The ‘Licenses in use’ column indicates how many TUFLOW processes are currently using the network dongle. The ‘Max Licenses’ column shows the maximum number of licenses that can be allocated by the dongle. As of Build 2007-07-AA, the Security Server can be exited and restarted while there are simulations (of this build or later) underway. This allows any ghost licences to be cleared (ghost licences are unreleased licences that occur on some networks when the network is disconnected from a computer running a TUFLOW simulation). TUFLOW Build 2007-07-AA or later enters a 3 minute holding pattern until a spare network licence becomes available. By default when first installed the dongle security server accepts TUFLOW processes from any other computer (or IP address). If you wish to control which computers can run TUFLOW this can be set up from the IP Security tab. Further documentation on this feature can be supplied upon request.
- The Setup tab allows you to change the IP address or name of the TUFLOW dongle server and also the port. Normally port 6666 is used, but other ports may need to be tried as noted previously. If the server name or port is changed, all computers that run TUFLOW also need to be changed as described in the following section.
- Checking the Run in system tray box allows the security server to run in the system tray.
- Checking the Show starting Window box displays a dialog box when the server starts. The usual procedure is to set the dongle security server to start automatically by placing it in the startup folder of the server. This ensures that the dongle security server is always started in case the server is rebooted. In this case you can clear ‘Show starting Window’ checkbox to cause it to run in the system tray only.
- Click Apply and/or Save for any changes you make on the Setup tab. The Security Server may need to be exited and restarted to effect the changes.
Installing a Softlok Network Dongle
Note: For the computer with the network dongle attached and for all computers accessing the network licence, first install the device drivers as described above.
Note: If setting up a computer on the network to act as the host or server for the network dongle refer to SoftLok Dongle Security Server. If setting up a computer that wishes to access the network dongle on the dongle server refer to Client Computers.
SoftLok Dongle Security Server
Installation of a network dongle requires one computer on your network to be designated as the dongle security server. This computer does not have to be the network server, but must be accessible by any other computer you plan to run TUFLOW on, and must be running Windows 95, 98, NT or 2000. It must remain on and connected to the network at all times you wish to run TUFLOW, and have a parallel port.


- Follow the steps outlined for a Standalone Dongle (if not already done) as described above in Installing a Softlok Standalone (Local) Dongle.
- Run nsl2set.exe under Dongle\Drivers\NetSet to display the dialogue below.
- Enter the name or IP address of the dongle server and the Port (this must be the same as set for the server – default is 6666).
- Click Apply and Exit. You are now ready to access the network dongle from your computer. To test if the network licence is working, double click on TUFLOW.exe. The console window displays whether or not it can find a Standalone or Network dongle, and the modules valid for the licence.
Client Computers
For the server or any other computer on the network to access the network dongle, the following steps are required: