Difference between revisions of "Excel Tips"
Jump to navigation
Jump to search
| Line 17: | Line 17: | ||
</ol> | </ol> | ||
=TUFLOW Add-ins= | =TUFLOW Add-ins= | ||
| − | ==Plot 1D Results== | + | As per the image above, the following three |
| − | ==Plot PO Results== | + | ==ESTRY Tools== |
| − | ==csv | + | ===Plot 1D Results=== |
| + | When you have 1D results open, select the '''Plot 1D Results''' option.<br> | ||
| + | You will be asked to input the number of series that you wish to plot simultaneously. | ||
| + | ==TUFLOW Tools== | ||
| + | ===Plot PO Results=== | ||
| + | ===Export Active Chart=== | ||
| + | ==dbase Tools== | ||
| + | ===Active Sheet to csv=== | ||
| + | ===Entire Workbook to csv=== | ||
Revision as of 13:25, 13 September 2011
Introduction
This page describes the tips and tools for setting up and reviewing TUFLOW models. If you have any suggestions to be included in these pages, please add them to the discussion page. Please add Excel Suggestions Here!.
Adding an Add-in
-
To add the Excel TUFLOW Tools to your Excel. Follow the process outlined below, which should work for both Excel 2007 and Excel 2010:
- Download the TUFLOW Tools Excel Add-in (TUFLOW_Tools_v2.0.xlam) this is available from the downloads section of the TUFLOW website.
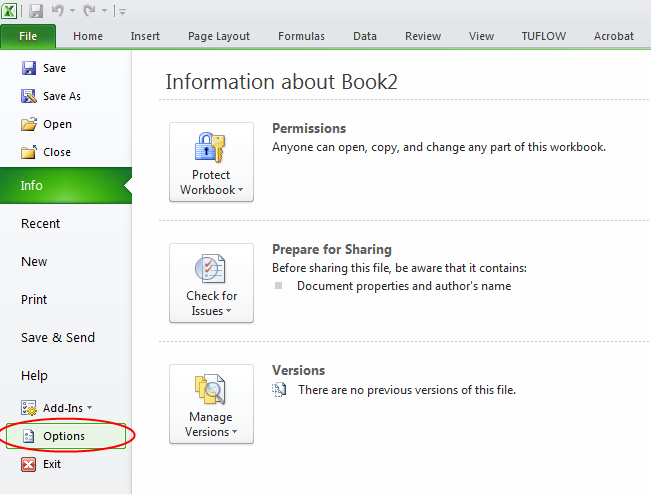
- Go to the File tab and select Options.
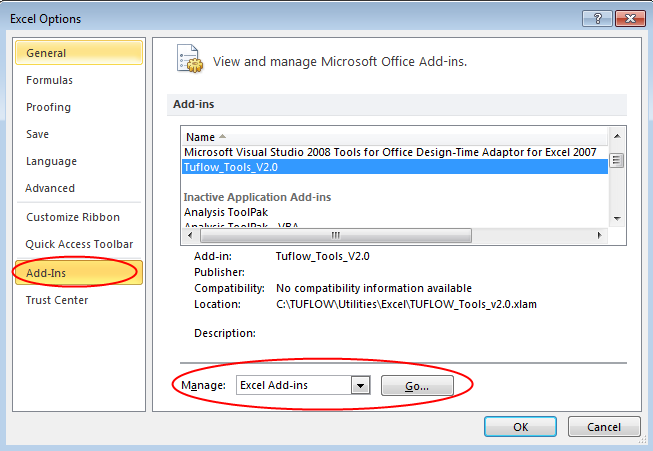
- Navigate to the Add-Ins section. In the Manage Section, select Excel Add-Ins from the drop-box and then hit the Go... button.
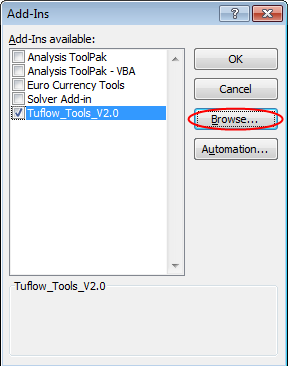
- In the Add-Ins dialogue, select Browse... and navigate to the "TUFLOW_Tools_v2.0.xlam" file downloaded from the TUFLOW website.
- Ensure the tick box next the TUFLOW_Tools_v2.0 is selected and hit OK.
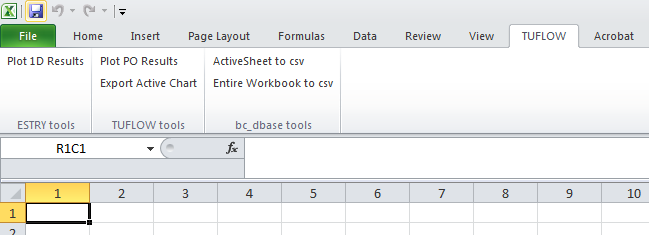
- The TUFLOW Tools Add-Ins should now be loaded every time Excel is started. A new menu item should be visible, as per the image below.
TUFLOW Add-ins
As per the image above, the following three
ESTRY Tools
Plot 1D Results
When you have 1D results open, select the Plot 1D Results option.
You will be asked to input the number of series that you wish to plot simultaneously.


