Tute M01 Inspect Zpts SAGA
- Open the blank Zpt layer 2d_zpt_M01_5m_002_P.shp, this was written in the TUFLOW\Model\saga\ directory. The Zpts will appear as a mass of points when zoomed to the full extent.
- In the Workspace section of the interface (this can be toggled by using Window >> Show Workspace), navigate to the Data tab (tab located at the bottom of the window). Right click on the 2d_zpt_M01_5m_002_P.shp and select Save As. Save a copy of the table as 2d_zpt_M01_5m_003_P.shp. This is done for version control, we will edit the version 003 of the table as the input will be used in model run 003.
- Open the newly created layer 2d_zpt_M01_5m_003_P.shp and close the previous version 2d_zpt_M01_5m_002_P.shp.
- Ensure the Object Properties (Windows >> Show Object Properties) windows is visible, navigate to the Attributes tab. Select the Action cursor, and select a 2d_zpt. The attributes for the selected zpt will be shown, the SAGA window should look like the below:
- Navigate to the Modules tab in the Workspace Window, expand the Shapes - Grid entry and right click on the Add Grid Values to Points and select Execute.
- Points to 2d_zpt_M01_5m_003_P
- Result to 2d_zpt_M01_5m_003_P
- Grids to DEM_M01
- In the Modules option select Shapes - Tools >> Select by Attributes... (Numerical Expression)
- Set the following:
- Shapes to 2d_zpt_M01_5m_003_P
- Attribute to DEM_M01
- Expression to "eq(a,-99999)" (without the quotes)
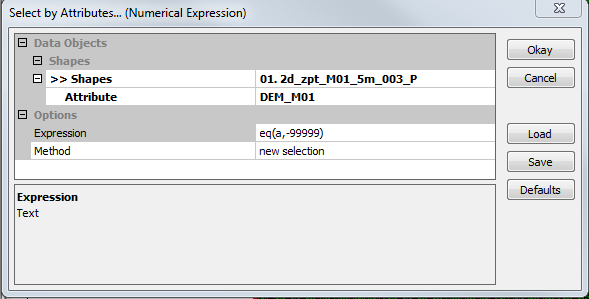 Select by Attribute
 - Navigate to the Data tab in the Workspace window. The Zpts outside of the DEM should be highlighted. To delete these, right click on the 2d_zpt_M01_5m_003_P item and select Edit >> Delete Selected Shapes. The map window should look like the below:
- Updating the fourth (elevation) attribute column to have the values of the newly created (RASTERVALU) attribute.
- Remove the elevation column, so that the RASTERVALU column becomes the fourth column.
- In the Data tab, right-click on the 2d_zpt_M01_5m_003_P item and select Attributes >> Show. This should bring up a tabular view of the data:
- Select the Delete Field icon (highlighted above)
- In the dialogue, check the elevation check box and select Okay
- In the Data tab, right click on the 2d_zpt_M01_5m_003_P item and select Save We have now updated the GIS layer, the next step is to modify the TUFLOW geometry control file to read the new shapefile.
- Save the current TGC file as M01_5m_003.tgc. Comment out or delete the Write MI and Stop lines entered previously (these are no longer needed).
- Add the following lines to the TGC file and save. Set Zpts == 75
Introduction
In this page we look at the process on assigning elevations to the TUFLOW Zpts that define the elevations in the model using SAGA GIS. Ensure that SAGA is open, and open the DEM, which is provided as part of the Module Data and is named DEM_M01.sgrd.
Method


As can be seen the elevation for all zpts is a nuyll value of 99,999. The next step is to assign values based on the DEM.


In the map window, if you select a point with the Action cursor and navigate to the Attributes tab in the Objects Properties window, a new data attribute DEM_M01. This field should have an elevation assigned:

If you select a Zpt outside the DEM area the value that has been assigned to this attribute is -99,999. We will remove any Zpts that have this elevation.


TUFLOW requires the elevation data to be in the fourth column and the inspection has added a fifth column with the DEM values. There are two ways of overcoming this:
We will demonstrate the second option, the first option will results in the same data being stored twice in the shapefile, which will mean bigger file sizes.


By deleting the Elevation field we have promoted the DEM_M01 field to the fourth position and will be used by TUFLOW. In the map window, if you select a point with the Action cursor and navigate to the Attributes tab in the Objects Properties window, the output should look like this:

Read RowCol Zpts == ..\model\saga\2d_zpt_M01_5m_003_P.shp
Conclusion
The Zpts have been inspected from the DEM, the geometry control file (.tgc) updated to use the inspected Zpts. Please return to the tutorial model module 1 page where the next step is to define the active areas.