Difference between revisions of "TUFLOW Training"
| (44 intermediate revisions by 2 users not shown) | |||
| Line 1: | Line 1: | ||
| − | |||
==Welcome== | ==Welcome== | ||
| − | Thanks for | + | Thanks for attending our TUFLOW training days. This Wiki page will help you get setup with the software you need. |
| − | Both days are computer based training that require the use of freely available software: | + | Both days are computer based training that require the use of the following freely available software: |
<li> QGIS and plugins Crayfish and TuPlot | <li> QGIS and plugins Crayfish and TuPlot | ||
<li> Python | <li> Python | ||
| − | <li> The Notepad++ Text Editor </li> | + | <li> The Notepad++ Text Editor |
| + | <li> The latest TUFLOW Release </li> | ||
This page provides instructions on how to install the software and prepare your computer for the training day. | This page provides instructions on how to install the software and prepare your computer for the training day. | ||
==QGIS Install== | ==QGIS Install== | ||
| − | We are going to install QGIS through the OSGeo4W installer package that will also install | + | We are going to install QGIS through the OSGeo4W installer package that will also install the Python libraries we will need for viewing results during our training session. |
Please click [http://download.osgeo.org/osgeo4w/osgeo4w-setup-x86_64.exe here] to download the installer and save to your preferred download location.<br> | Please click [http://download.osgeo.org/osgeo4w/osgeo4w-setup-x86_64.exe here] to download the installer and save to your preferred download location.<br> | ||
| − | Once downloaded, locate run the installer package osgeo4w-setup-x86_64.exe which will open the install wizard.<br> | + | Once downloaded, locate and run the installer package osgeo4w-setup-x86_64.exe which will open the install wizard.<br> |
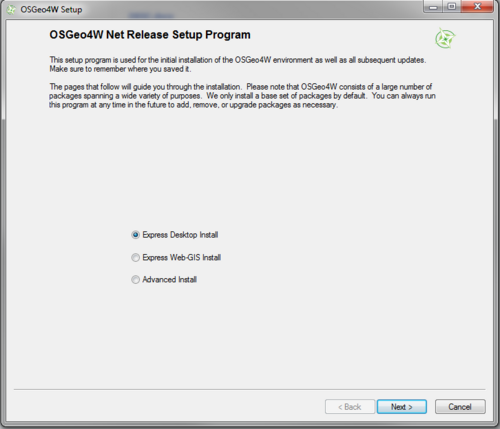
Select 'Express Desktop Install' as per the below image and click next:<br> | Select 'Express Desktop Install' as per the below image and click next:<br> | ||
[[File: OsGeo_Express_Desktop.png | 500px]] | [[File: OsGeo_Express_Desktop.png | 500px]] | ||
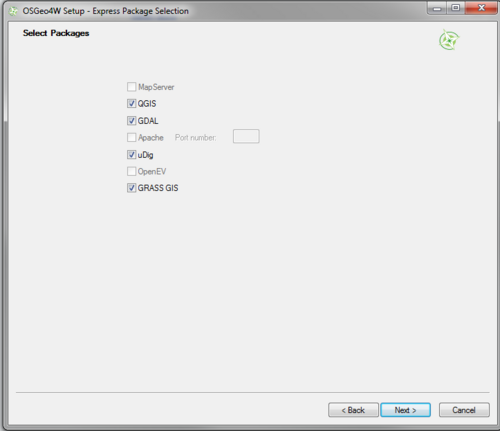
| − | Keep the default packages selected as follows and click next | + | Keep the default packages selected as follows and click next. Don't worry if uDig isn't present.<br> |
[[File: OsGeo_Packages.png | 500px]] | [[File: OsGeo_Packages.png | 500px]] | ||
| − | QGIS will then start to download all the required packages | + | QGIS will then start to download all the required packages off the web. Depending on your computer and internet connection this may take several minutes. <br> |
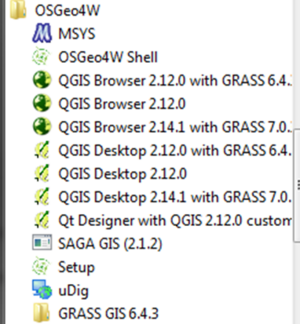
| − | + | Once the installer has completed, you should then get a new Start menu item 'OSGeo4w' with QGIS Desktop ''(as of February 2018, the latest version is 2.18)'' as one of the installed programs as per the below. We only need the QGIS Desktop so don't worry if all programs as per the picture are not installed. <br> | |
| − | + | [[File: OSGeo_StartMenu.png | 300px]]<br> | |
| + | Using the installer in this way will automatically download the latest version of QGIS. Although not required for the training, if you wish to use the long term release simply re-run the installer wizard, choose Advanced Install and select qgis-ltr-full from the Desktop tab within 'Select Packages'. | ||
| + | ===Adding QGIS Plugins=== | ||
| + | We are going to make use of two QGIS plugins for the training session, Crayfish (developed by Lutra Consulting) and the TUFLOW QGIS Plugin. | ||
| + | Both Plugins can be installed via the QGIS Plugin repository. | ||
| + | Open QGIS and navigate to the plugins dropdown menu and click on 'Manage and Install Plugins' as per the below:<br> | ||
| + | [[File:pluginMenu.png]]<br> | ||
| + | |||
| + | The QGIS Plugin Manager will now fetch all plugins that are available for QGIS. | ||
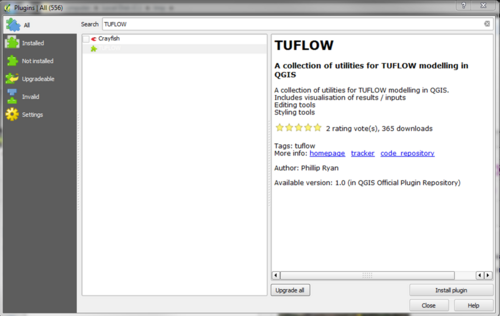
| + | To install the Crayfish and TUFLOW Plugins type 'TUFLOW' into the search box of the plugin manager. This should return both the TUFLOW and Crayfish Plugins. Click TUFLOW and click Install Plugin as per the below:<br> | ||
| + | [[File:InstallTuPLot.png | 500px]]<br> | ||
| + | Repeat this process for Crayfish. | ||
| + | Once both Plugins have been successfully added they should be ticked within the Plugin Manager as per the below:<br> | ||
| + | [[File:pluginsuccess.png | 500px]]<br> | ||
| − | + | There is more information on useful QGIS plugins [[QGIS_Useful_Plugins | here]]. | |
| + | You should now have a successful install of QGIS, the required Python Libraries and Plugins for your training. | ||
==Notepad++ Setup== | ==Notepad++ Setup== | ||
| + | If you already have a text editor available on your computer such as Ultra Edit, TextPad or your preferred text editor than this step is optional. If you don't have a text editor then please download and setup Notepad++ via the following [[NotepadPlusPlus_Tips | link]]. Please note that the default notepad provided with Windows is not ideal for developing TUFLOW models and you will gain a much better experience by using one of the aforementioned text editors. | ||
| + | |||
| + | If you could please configure Notepad++ for [[NotepadPlusPlus_Highlighting | Syntax Highlighting]] and [[NotepadPlusPlus_File_Navigation | File Navigation]] as outlined in the linked wiki pages. | ||
| + | ==Download TUFLOW== | ||
| + | Could please download the latest TUFLOW Executables from [http://tuflow.com/TUFLOW%20Download.aspx here] and save locally to your laptop. | ||
| − | ==Further Questions | + | ==Further Questions== |
| + | Should you have any further questions regarding the training please send us an email at [mailto:training@tuflow.com training@tuflow.com] and we will be in touch as soon as possible. | ||
| + | We look forward to seeing you at the training. | ||
Latest revision as of 15:26, 8 February 2018
Welcome
Thanks for attending our TUFLOW training days. This Wiki page will help you get setup with the software you need. Both days are computer based training that require the use of the following freely available software:
This page provides instructions on how to install the software and prepare your computer for the training day.
QGIS Install
We are going to install QGIS through the OSGeo4W installer package that will also install the Python libraries we will need for viewing results during our training session.
Please click here to download the installer and save to your preferred download location.
Once downloaded, locate and run the installer package osgeo4w-setup-x86_64.exe which will open the install wizard.
Select 'Express Desktop Install' as per the below image and click next:
Keep the default packages selected as follows and click next. Don't worry if uDig isn't present.
QGIS will then start to download all the required packages off the web. Depending on your computer and internet connection this may take several minutes.
Once the installer has completed, you should then get a new Start menu item 'OSGeo4w' with QGIS Desktop (as of February 2018, the latest version is 2.18) as one of the installed programs as per the below. We only need the QGIS Desktop so don't worry if all programs as per the picture are not installed.
Using the installer in this way will automatically download the latest version of QGIS. Although not required for the training, if you wish to use the long term release simply re-run the installer wizard, choose Advanced Install and select qgis-ltr-full from the Desktop tab within 'Select Packages'.
Adding QGIS Plugins
We are going to make use of two QGIS plugins for the training session, Crayfish (developed by Lutra Consulting) and the TUFLOW QGIS Plugin.
Both Plugins can be installed via the QGIS Plugin repository.
Open QGIS and navigate to the plugins dropdown menu and click on 'Manage and Install Plugins' as per the below:

The QGIS Plugin Manager will now fetch all plugins that are available for QGIS.
To install the Crayfish and TUFLOW Plugins type 'TUFLOW' into the search box of the plugin manager. This should return both the TUFLOW and Crayfish Plugins. Click TUFLOW and click Install Plugin as per the below:
Repeat this process for Crayfish.
Once both Plugins have been successfully added they should be ticked within the Plugin Manager as per the below:
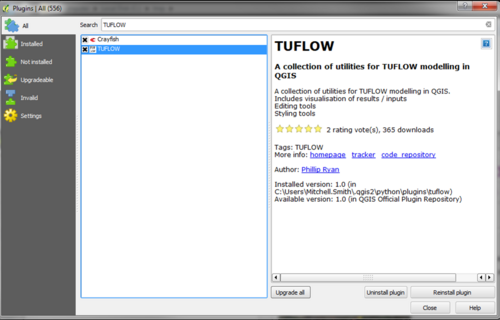
There is more information on useful QGIS plugins here. You should now have a successful install of QGIS, the required Python Libraries and Plugins for your training.
Notepad++ Setup
If you already have a text editor available on your computer such as Ultra Edit, TextPad or your preferred text editor than this step is optional. If you don't have a text editor then please download and setup Notepad++ via the following link. Please note that the default notepad provided with Windows is not ideal for developing TUFLOW models and you will gain a much better experience by using one of the aforementioned text editors.
If you could please configure Notepad++ for Syntax Highlighting and File Navigation as outlined in the linked wiki pages.
Download TUFLOW
Could please download the latest TUFLOW Executables from here and save locally to your laptop.
Further Questions
Should you have any further questions regarding the training please send us an email at training@tuflow.com and we will be in touch as soon as possible. We look forward to seeing you at the training.