MI Layer Control: Difference between revisions
Created page with 'In MapInfo the ''Layer Control'' controls which layers are: * Visible * Editable (only one layer can be editable) * Labelled It also controls the priority of the layers. [[File...' |
No edit summary |
||
| (6 intermediate revisions by the same user not shown) | |||
| Line 1: | Line 1: | ||
==Introduction== |
|||
This page describes the ''Layer Control'' window in MapInfo 10, whilst the layer control is similar in previous versions of MapInfo there are some subtly differences.<br> |
|||
In MapInfo the ''Layer Control'' controls which layers are: |
In MapInfo the ''Layer Control'' controls which layers are: |
||
* Visible |
* Visible |
||
| Line 4: | Line 6: | ||
* Labelled |
* Labelled |
||
It also controls the priority of the layers. |
It also controls the priority of the layers. There are a number of ways of opening the ''Layer Control'' window: |
||
[[File:LayerControl Icon.png|100px|frame|right]] |
|||
* Right Click in the Map Window area and select ''Layer Control. |
|||
* Select the Layer Control icon in the tool bar (see image to the right). |
|||
* Use the short-cut key - Control + "L" |
|||
<br> |
|||
Once open the ''Layer Control'' window should appear to the left of the screen (in MapInfo 10 or later):<br> |
|||
[[File:LayerControl Example.png|400px]] |
[[File:LayerControl Example.png|400px]] |
||
<br><br> |
|||
==Adding and Removing Layers== |
|||
In the example above there are five layers are in the layer control. Additional layers (if they are open) can be added using the green plus at the top left of screen. To be added to a map window layer control, the table must be open in the MapInfo session, if the table is not open, it must be opened with the ''File >> Open'' dialogue (or dragged onto the MapInfo session. Layers can be removed from the ''Layer Control'' by selecting the layer and using the Red Arrow at the top left. Removing a layer does not close the file, it simple removes the layer from the active Map Window, to close a table, use the ''File >> Close'' dialogue.<br> |
|||
==Order of Tables== |
|||
The order is important in the ''Layer Control'', as this controls the drawing order. In the ''Layer Control'' above, the '''2d_mat_M01_003''' is above the '''Aerial_Photo_M01''', and in the map window the '''2d_mat_M01_003''' will be visible on top of the aerial photo. To change the priority of the layers, simply select a layer to move and either drag and drop the layer, within the layer control, or use the blue up and down arrow at the top of the ''Layer Control''. |
|||
==Cosmetic Layer== |
|||
Each layer control always includes a '''Cosmetic Layer'', this layer cannot be turned off, although the editable and selectable status can be toggled on or off. The cosmetic layer has no data attributes and so cannot be labelled. It can be useful to add objects to the cosmetic if the are not going to be saved. To clear the cosmetic layer, navigate to the ''Map >> Clear Cosmetic Layer'' menu item. |
|||
==Turning Layers On and Off== |
|||
The left hand check box (highlighted in red in the image below), can be used to turn a layer on and off. When turned off, the layer is not, visible, editable or selectable. |
|||
[[File:LayerControl OnOff.png]] |
|||
==Display Overwrite== |
|||
Progressing left to right, the next display (highlighted in red below), displays the type of content in the table (points, lines, regions or gridded). By clicking on the greyed out symbol a style override can be added for this object type. For example all lines, can be set to a thick red line to make these more visible. This is a display change only, to permanently change the style, the table will need to be made editable, all objects selected and the style changed. The style override function can also be accessed, by right clicking on the table and selecting ''Layer Properties''. |
|||
[[File:LayerControl StyleOverride.png]] |
|||
==Editable== |
|||
To the immediate right of the table name, is the editable toggle (see image below). Only one table can be editable at any given time. For more details on editing a MapInfo table, please see [[MI_Table_Editing | editing a MapInfo Table]]. |
|||
[[File:LayerControl Editable.png]] |
|||
==Selectable== |
|||
Continuing the progression from left to right, the next check box, toggles whether the table is ''Selectable'' or not. At times, it is beneficial for a table to be visible but not selectable, for example when digitising materials, it maybe useful to see the code (active model area) polygon. This can avoid spending time digitising the land use outside the model area, however you may not want to inadvertently snap to the model boundary.<br> |
|||
Making a table editable will also make the layer selectable.<br> |
|||
[[File:LayerControl Selectable.png]] |
|||
==Labelled== |
|||
The final check box toggles labelling on and off for the layer, this button is highlighted in the image below. The label properties and style can be controlled by right-clicking on the table and selecting ''Layer Properties''. The labelling options are contained in the ''Label Display'' and ''Labelling Rules'' tabs. See also the page on <u>[[MI_Label_Format_Number | changing the label format]]</u>.<br> |
|||
[[File:LayerControl Labelled.png]]<br> |
|||
{{Tips Navigation |
|||
|uplink=[[MapInfo_Tips | Back to MapInfo Tips And Tricks]] |
|||
}} |
|||
Latest revision as of 15:31, 9 September 2011
Introduction
This page describes the Layer Control window in MapInfo 10, whilst the layer control is similar in previous versions of MapInfo there are some subtly differences.
In MapInfo the Layer Control controls which layers are:
- Visible
- Editable (only one layer can be editable)
- Labelled
It also controls the priority of the layers. There are a number of ways of opening the Layer Control window:

- Right Click in the Map Window area and select Layer Control.
- Select the Layer Control icon in the tool bar (see image to the right).
- Use the short-cut key - Control + "L"
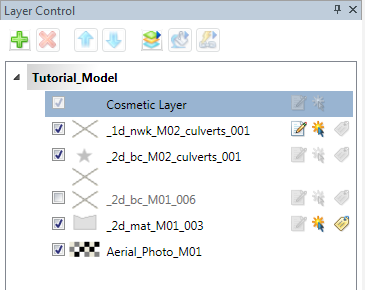
Once open the Layer Control window should appear to the left of the screen (in MapInfo 10 or later):
Adding and Removing Layers
In the example above there are five layers are in the layer control. Additional layers (if they are open) can be added using the green plus at the top left of screen. To be added to a map window layer control, the table must be open in the MapInfo session, if the table is not open, it must be opened with the File >> Open dialogue (or dragged onto the MapInfo session. Layers can be removed from the Layer Control by selecting the layer and using the Red Arrow at the top left. Removing a layer does not close the file, it simple removes the layer from the active Map Window, to close a table, use the File >> Close dialogue.
Order of Tables
The order is important in the Layer Control, as this controls the drawing order. In the Layer Control above, the 2d_mat_M01_003 is above the Aerial_Photo_M01, and in the map window the 2d_mat_M01_003 will be visible on top of the aerial photo. To change the priority of the layers, simply select a layer to move and either drag and drop the layer, within the layer control, or use the blue up and down arrow at the top of the Layer Control.
Cosmetic Layer
Each layer control always includes a 'Cosmetic Layer, this layer cannot be turned off, although the editable and selectable status can be toggled on or off. The cosmetic layer has no data attributes and so cannot be labelled. It can be useful to add objects to the cosmetic if the are not going to be saved. To clear the cosmetic layer, navigate to the Map >> Clear Cosmetic Layer menu item.
Turning Layers On and Off
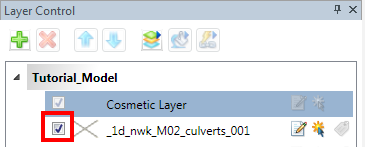
The left hand check box (highlighted in red in the image below), can be used to turn a layer on and off. When turned off, the layer is not, visible, editable or selectable.
Display Overwrite
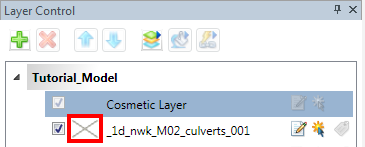
Progressing left to right, the next display (highlighted in red below), displays the type of content in the table (points, lines, regions or gridded). By clicking on the greyed out symbol a style override can be added for this object type. For example all lines, can be set to a thick red line to make these more visible. This is a display change only, to permanently change the style, the table will need to be made editable, all objects selected and the style changed. The style override function can also be accessed, by right clicking on the table and selecting Layer Properties.
Editable
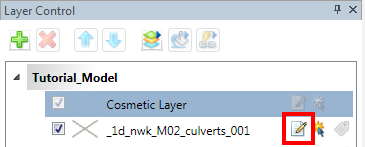
To the immediate right of the table name, is the editable toggle (see image below). Only one table can be editable at any given time. For more details on editing a MapInfo table, please see editing a MapInfo Table.
Selectable
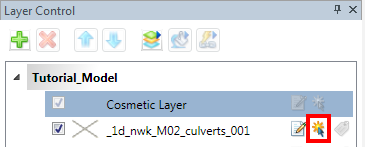
Continuing the progression from left to right, the next check box, toggles whether the table is Selectable or not. At times, it is beneficial for a table to be visible but not selectable, for example when digitising materials, it maybe useful to see the code (active model area) polygon. This can avoid spending time digitising the land use outside the model area, however you may not want to inadvertently snap to the model boundary.
Making a table editable will also make the layer selectable.
Labelled
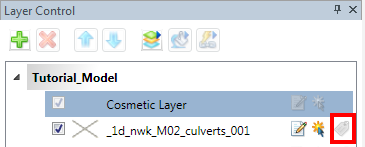
The final check box toggles labelling on and off for the layer, this button is highlighted in the image below. The label properties and style can be controlled by right-clicking on the table and selecting Layer Properties. The labelling options are contained in the Label Display and Labelling Rules tabs. See also the page on changing the label format.
| Up |
|---|
