QGIS Extract Ground Elevation: Difference between revisions
Jump to navigation
Jump to search
Content deleted Content added
Chris Huxley (talk | contribs) |
No edit summary |
||
| (One intermediate revision by one other user not shown) | |||
| Line 4: | Line 4: | ||
* Define ground elevation at 1D nodes/pits snapped to 1D channel/pipes |
* Define ground elevation at 1D nodes/pits snapped to 1D channel/pipes |
||
* etc... |
* etc... |
||
In the example below, the "Z" attribute (ground elevation) of the 2d_zsh point layer in the [[ |
In the example below, the "Z" attribute (ground elevation) of the 2d_zsh point layer in the [[Tutorial_M11 | TUFLOW Tutorial 11]] is extracted from DEM file. |
||
=Method= |
=Method= |
||
<ol> |
<ol> |
||
<li>Ensure that DEM and 2d_zsh line layer files are opened, and the Point Sampling Tool plugin has been installed (Plugins >> Manage and Install Plugins >> Point Sampling Tool) </li> |
<li>Ensure that DEM and 2d_zsh line layer files are opened, and the Point Sampling Tool plugin has been installed (Plugins >> Manage and Install Plugins >> Point Sampling Tool) </li> |
||
<li>Convert line |
<li>Convert line vertices to points, using the preferred method described in the [[QGIS_Convert_Lines_to_Points | QGIS Convert Lines to Points]] page</li> |
||
<li>Open the Point Sampling Tool</li> |
<li>Open the Point Sampling Tool</li> |
||
[[File:QGIS Extract Ground Elevation 001.png|700px]] |
[[File:QGIS Extract Ground Elevation 001.png|700px]] |
||
| Line 19: | Line 19: | ||
<li>Open the Attribute Table of the newly created layar. Toggle editing and update "Z" attribute with "dem_m01" as shown in the image below</li> |
<li>Open the Attribute Table of the newly created layar. Toggle editing and update "Z" attribute with "dem_m01" as shown in the image below</li> |
||
[[File:QGIS Extract Ground Elevation 002.png|600px]]<br> |
[[File:QGIS Extract Ground Elevation 002.png|600px]]<br> |
||
This point layer is now ready to be input with the 2d_zsh line layer into the TUFLOW model. |
|||
</ol> |
</ol> |
||
Latest revision as of 15:26, 6 January 2023
Introduction
This page describes the method for extracting ground elevation (or any other variable) from raster files or polygon attribute using "Point Sampling Tool". This method is useful when you want to:
- Extract ground elevation at points snapped to breaklines
- Define ground elevation at 1D nodes/pits snapped to 1D channel/pipes
- etc...
In the example below, the "Z" attribute (ground elevation) of the 2d_zsh point layer in the TUFLOW Tutorial 11 is extracted from DEM file.
Method
- Ensure that DEM and 2d_zsh line layer files are opened, and the Point Sampling Tool plugin has been installed (Plugins >> Manage and Install Plugins >> Point Sampling Tool)
- Convert line vertices to points, using the preferred method described in the QGIS Convert Lines to Points page
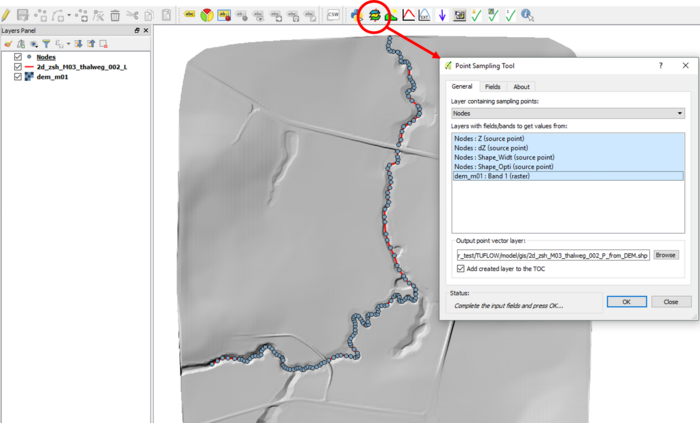
- Open the Point Sampling Tool
- Set the following:
- Select the point layer converted at step 2 as the "Layer containing sampling points"
- Select all the attribute in the point layer as well as the DEM as the "Layers to get value from"
- Set the output layer file name
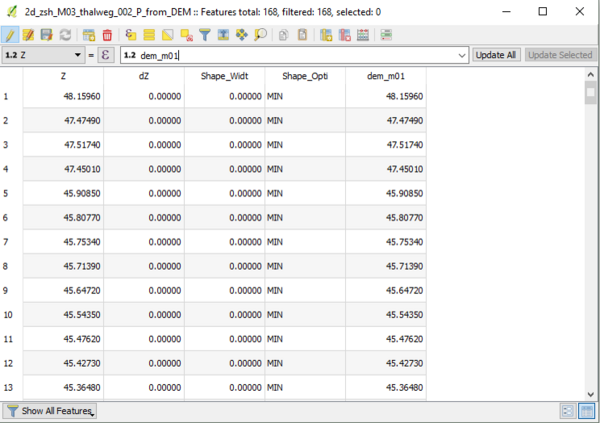
- Open the Attribute Table of the newly created layar. Toggle editing and update "Z" attribute with "dem_m01" as shown in the image below


This point layer is now ready to be input with the 2d_zsh line layer into the TUFLOW model.