Difference between revisions of "ArcTUFLOW Toolbox and Toolbar"
Ellis Symons (talk | contribs) (→TUPLOT) |
|||
| (16 intermediate revisions by 2 users not shown) | |||
| Line 1: | Line 1: | ||
| − | |||
| − | |||
=Introduction= | =Introduction= | ||
A TUFLOW toolbox is available for ArcMap 10.1 and newer. This toolbox helps with streamlining the process of creating and editing a TUFLOW model in ArcMap. A Toolbar has also been developed to accompany the toolbox to further increase efficiency and workflow. The toolbar shortcuts the opening of the toolbox utilities to a single click on an easily accessible toolbar. | A TUFLOW toolbox is available for ArcMap 10.1 and newer. This toolbox helps with streamlining the process of creating and editing a TUFLOW model in ArcMap. A Toolbar has also been developed to accompany the toolbox to further increase efficiency and workflow. The toolbar shortcuts the opening of the toolbox utilities to a single click on an easily accessible toolbar. | ||
| − | These utilities can be downloaded from the TUFLOW website: | + | These utilities can be downloaded from the TUFLOW website: |
| + | * [https://www.tuflow.com/downloads/#utilities Download Link] | ||
| + | |||
| + | The download contains both the .esriaddin and the ArcTUFLOW Toolbox. The .esriaddin is a stand alone toolbar add-in to ArcMap and (as suggested) is a stand alone item that does not need to be kept with the other contents of the download. The .tbx is the ArcTUFLOW Toolbox and should be kept with the other folders contained in the download. | ||
=Installation= | =Installation= | ||
| Line 10: | Line 11: | ||
* [[TUFLOW_ArcGIS_Toolbox_and_Toolbar_Installation | How to install ArcTUFLOW Toolbox and Toolbar]]<br><br> | * [[TUFLOW_ArcGIS_Toolbox_and_Toolbar_Installation | How to install ArcTUFLOW Toolbox and Toolbar]]<br><br> | ||
| − | =The Utilities: What are they | + | =The Utilities: What are they and How to use them= |
| − | The | + | The ArcTUFLOW Tools are intended to help the user with model initiation, setup and development, running, and checking and viewing results: |
[[File: ArcTUFLOW_Toolbox_Toolbar_comb.PNG]]<br> | [[File: ArcTUFLOW_Toolbox_Toolbar_comb.PNG]]<br> | ||
| Line 18: | Line 19: | ||
{| class="wikitable" | {| class="wikitable" | ||
| − | ! style="background-color:#005581; font-weight:bold; color:white;" width= | + | ! style="background-color:#005581; font-weight:bold; color:white;" width=2% | Model Stage |
! style="background-color:#005581; font-weight:bold; color:white;" width=10% | Utilities | ! style="background-color:#005581; font-weight:bold; color:white;" width=10% | Utilities | ||
| − | |||
|- | |- | ||
|Start Model Build || 1. [[#Configure_TUFLOW | Configure TUFLOW (Required Initialization Step)]] | |Start Model Build || 1. [[#Configure_TUFLOW | Configure TUFLOW (Required Initialization Step)]] | ||
2. [[#Create_TUFLOW_Folders | Create TUFLOW Folders]]<br> | 2. [[#Create_TUFLOW_Folders | Create TUFLOW Folders]]<br> | ||
| − | |||
|- | |- | ||
|Model Build and Development || 3. [[#Import_Empty_(template)_TUFLOW_Files| Import Empty (template) TUFLOW Files]]<br> | |Model Build and Development || 3. [[#Import_Empty_(template)_TUFLOW_Files| Import Empty (template) TUFLOW Files]]<br> | ||
| Line 34: | Line 33: | ||
9. [[#Change_Attribute_Data_Type | Change Attribute Data Type]]<br> | 9. [[#Change_Attribute_Data_Type | Change Attribute Data Type]]<br> | ||
10. [[#Correct_Pipe_Direction | Correct Pipe Direction]]<br> | 10. [[#Correct_Pipe_Direction | Correct Pipe Direction]]<br> | ||
| − | |||
| − | |||
|- | |- | ||
| − | |Running TUFLOW || 11. [[#Run_TUFLOW_Simulation | Run TUFLOW Simulation]]<br> | + | |Running TUFLOW || 11. [[#Run_TUFLOW_Simulation | Run TUFLOW Simulation]]<br> |
|- | |- | ||
|Loading and Viewing Results || 12. [[#Load_Simulation_Input_Files | Load Simulation Input Files]]<br> | |Loading and Viewing Results || 12. [[#Load_Simulation_Input_Files | Load Simulation Input Files]]<br> | ||
| − | 13. [[# | + | 13. [[#Label_Selected_Layer | Label Selected Layer]] - Toolbar only<br> |
| − | | | + | 14. [[#TUPLOT | TUPLOT]] - Toolbar only |
|- | |- | ||
| − | |Miscellaneous || | + | |Miscellaneous || 15. [[#About | About]] |
|}<br> | |}<br> | ||
| Line 118: | Line 115: | ||
* Specify a search radius for considering neighbouring elevation values if using a statistical approach to elevation extraction - leave blank to extract elevation from immediate cell | * Specify a search radius for considering neighbouring elevation values if using a statistical approach to elevation extraction - leave blank to extract elevation from immediate cell | ||
* Specify a statistical operation (must be coupled with a search radius). Options include: | * Specify a statistical operation (must be coupled with a search radius). Options include: | ||
| − | ** ' | + | ** 'MAXIMUM' |
| − | ** ' | + | ** 'MINIMUM' |
** 'MEAN' | ** 'MEAN' | ||
| Line 145: | Line 142: | ||
[[File: ArcTUFLOW_CorrectPipeDir.PNG]] | [[File: ArcTUFLOW_CorrectPipeDir.PNG]] | ||
| − | |||
| − | |||
| − | |||
==Run TUFLOW Simulation== | ==Run TUFLOW Simulation== | ||
| Line 169: | Line 163: | ||
<br><br> | <br><br> | ||
This tool is courtesy of Wood Rodgers, Inc. (www.woodrodgers.com) | This tool is courtesy of Wood Rodgers, Inc. (www.woodrodgers.com) | ||
| + | |||
| + | ==Label Selected Layer== | ||
| + | |||
| + | This tool will auto label the selected layer in the TOC. If the selected layer is a TUFLOW layer (e.g. 1d_nwk) the tool will automatically apply an expression, displaying useful information about the layer. It can also be used on non-TUFLOW layers, however will only label the first attribute. The user also has the option of changing the label colour from the adjacent drop down box (default is black if no colour is selected). | ||
| + | |||
| + | This tool is useful for reviewing models as well as building. | ||
==TUPLOT== | ==TUPLOT== | ||
Latest revision as of 15:17, 18 July 2024
Introduction
A TUFLOW toolbox is available for ArcMap 10.1 and newer. This toolbox helps with streamlining the process of creating and editing a TUFLOW model in ArcMap. A Toolbar has also been developed to accompany the toolbox to further increase efficiency and workflow. The toolbar shortcuts the opening of the toolbox utilities to a single click on an easily accessible toolbar.
These utilities can be downloaded from the TUFLOW website:
The download contains both the .esriaddin and the ArcTUFLOW Toolbox. The .esriaddin is a stand alone toolbar add-in to ArcMap and (as suggested) is a stand alone item that does not need to be kept with the other contents of the download. The .tbx is the ArcTUFLOW Toolbox and should be kept with the other folders contained in the download.
Installation
For instructions on how to install ArcTUFLOW Toolbox and Toolbar into ArcMap please see the following link:
The Utilities: What are they and How to use them
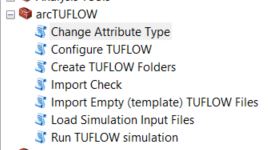
The ArcTUFLOW Tools are intended to help the user with model initiation, setup and development, running, and checking and viewing results:
| Model Stage | Utilities |
|---|---|
| Start Model Build | 1. Configure TUFLOW (Required Initialization Step) |
| Model Build and Development | 3. Import Empty (template) TUFLOW Files 4. Insert TUFLOW Attributes |
| Running TUFLOW | 11. Run TUFLOW Simulation |
| Loading and Viewing Results | 12. Load Simulation Input Files 13. Label Selected Layer - Toolbar only |
| Miscellaneous | 15. About |
Configure TUFLOW
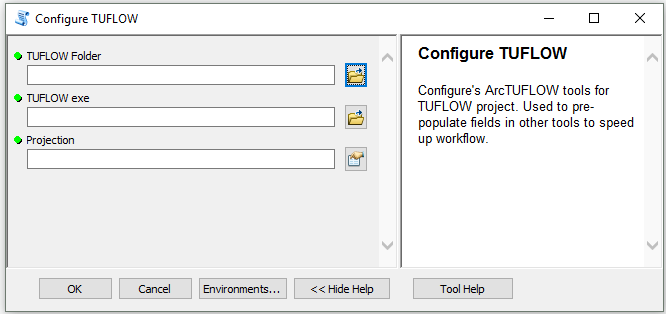
The first item, “Configure TUFLOW”, creates a configuration file that will pre-populate items in other ArcTUFLOW tools based on the map document. The steps for running the configuration tool are outlined below:
- Open or save a map document before running.
- Select a TUFLOW folder for your model. This can be either the folder that contains the entire TUFLOW model folder structure or the folder that contains the TUFLOW subdirectories. For example, it can be either "D:\projects\Example\TUFLOW" or “D:\projects\Example\”. All of the following tools will use this location.
- Enter the file path to the TUFLOW executable
- Select the projection for the TUFLOW model
Create TUFLOW Folders
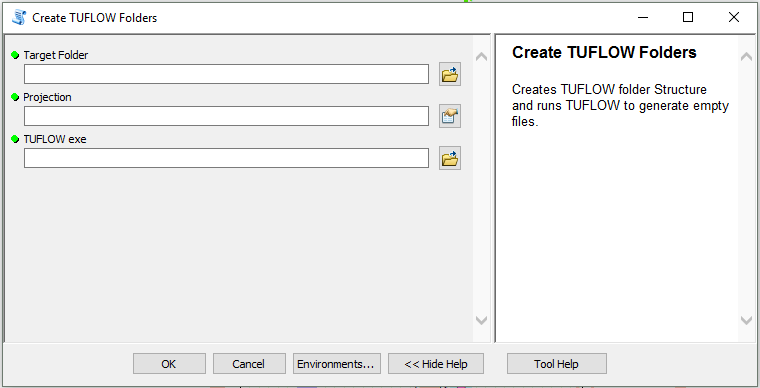
The tool "Create TUFLOW Folders" will create the standard TUFLOW folder structure and generate empty TUFLOW template files.
This tool is best used if Configure TUFLOW has been run prior.
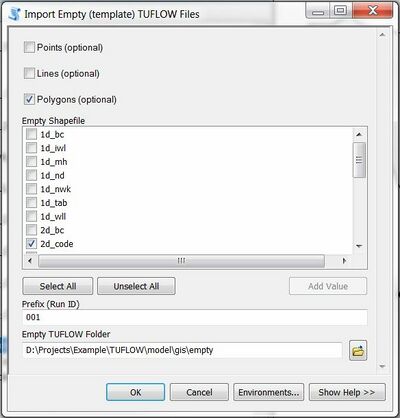
Import Empty (template) TUFLOW Files
"Import Empty Template Files" can be used to import new shp files for editing. This tool will automatically delete the dummy "null" entry which otherwise requires manual deletion if an empty file loaded from the catalog.
- Select the object type (point, line or region)
- Select the desired template file
- Specify the run ID for the file. This will be added to the file name as a suffix.
The ArcTUFLOW toolbox requires configuring prior to using this tool. Refer to Configure TUFLOW for more instructions.
Insert TUFLOW Attributes
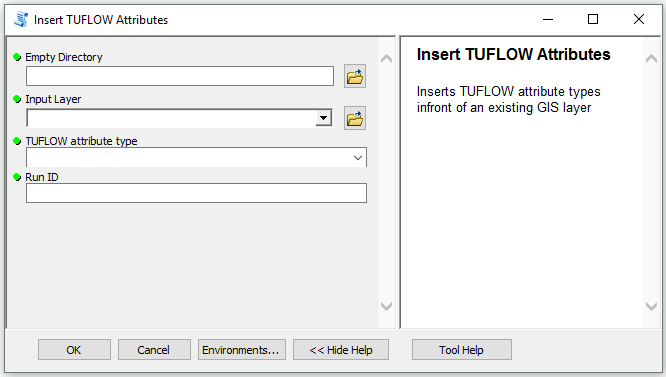
"Insert TUFLOW Attributes" will insert a TUFLOW attribute template in front of an existing GIS layer. This is useful when transferring data from a database (e.g. council stormwater network) to TUFLOW format.
The steps are:
- Select the input file (the file to have TUFLOW attribues inserted into)
- Select the TUFLOW file format
- Specify a run ID for the file. This will be added to the name as a suffix
This tool is best used if Configure TUFLOW has been run prior.
Increment Layer
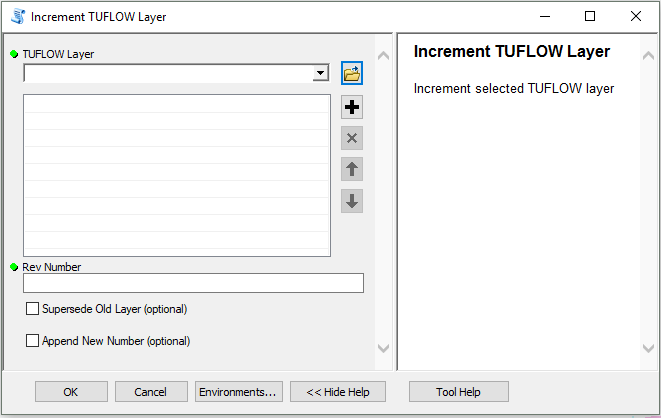
The tool "Increment Layer" will increment up one or more TUFLOW layers to a new revision number and replace he existing layer in ArcMAP with the same style. Currently the limitation of the tool requires revision numbers to be 3 digits longs e.g. 001.
The steps are:
- Select desired TUFLOW layer to be incremented (these can be dragged and dropped from the TOC into the tool window)
- Specify the new revision number
- Choose to supersede the old layers (these will be placed in a 'SS' folder in the same directory as the model layer)
- Choose to append revision number if none already exists
Style All TUFLOW Layers
This button will apply TUFLOW stylings onto all TUFLOW related layers in the TOC.
Style Selected TUFLOW Layers
This button will apply TUFLOW stylings to the selected layer in the TOC.
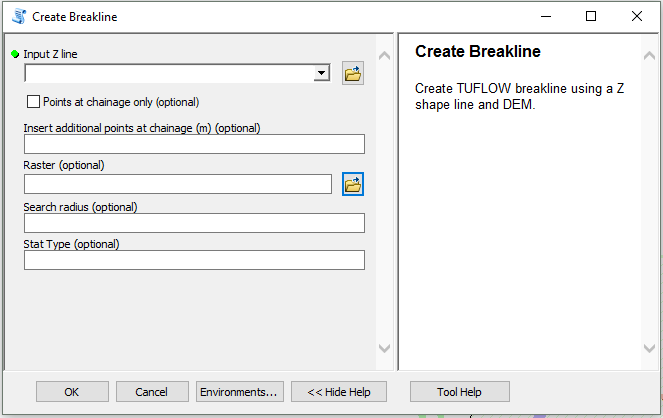
Create Breakline
The "Create Breakline" tool will create a 2d_zsh breakline from a user input polyline and DEM. The user has a number of options, such as:
- Vertice placement along line - the user can specify additional intervals at which to extract elevations, or use only the line vertices
- Elevation extraction - extract straight from DEM, or use a statistical approach by looking at surrounding elevation values
The steps are:
- Specify the input polyline from which a breakline will be created from
- Select if the user only wants to extract points at a specified chainage (ignore line vertices) - otherwise points will be extracted at defined chainage and vertices
- Specify an interval at which to insert additional elevation extraction points along line - leave blank to output at line vertices only
- Specify the underlying DEM to use to for elevation extraction
- Specify a search radius for considering neighbouring elevation values if using a statistical approach to elevation extraction - leave blank to extract elevation from immediate cell
- Specify a statistical operation (must be coupled with a search radius). Options include:
- 'MAXIMUM'
- 'MINIMUM'
- 'MEAN'
Change Attribute Data Type
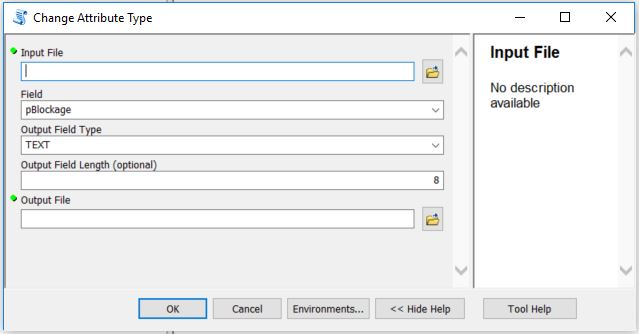
This tool allows you to modify a shapefile attribute (field) type whist keeping the attribute order intact. An example of its use is the modification of the pBlockage attribute in a 1d_nwk layer from 'double' to 'text' for the new Australian Rainfall and Runoff blockage scenarios. Please note that at present the script only allows for the change of attributes to type text.
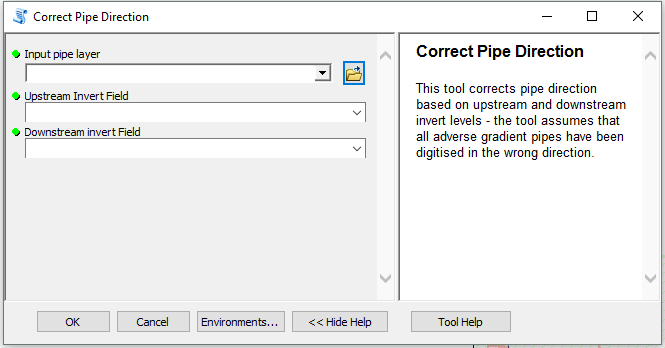
Correct Pipe Direction
The "Correct Pipe Direction" tool will reverse the direction of all lines within a layer based on the upstream and downstream invert levels. Based on the invert levels, the tool will reverse any line that has an adverse gradient, with the assumption that the line has been digitised in the wrong direction. It will also switch the upstream and downstream invert attributes to correct them after reversing the line direction.
The steps are:
- Select an input pipe layer
- Select the fields which represent the upstream and downstream invert levels
Run TUFLOW Simulation
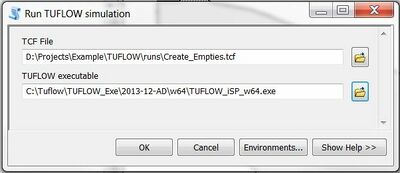
- Enter the simulation tcf reference
- Define the path to the TUFLOW executable
The ArcTUFLOW toolbox requires configuring prior to using this tool. Refer to Configure TUFLOW for more instructions.
Load Simulation Input Files
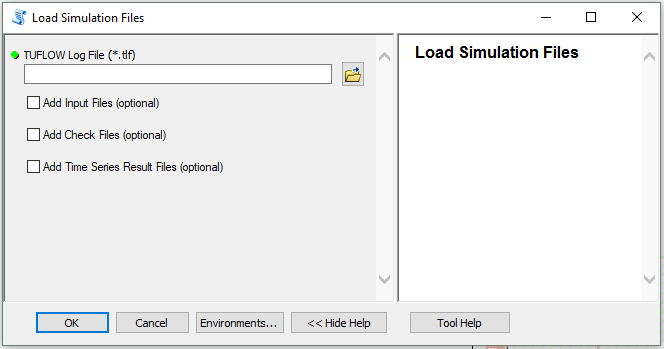
This tool loads all input shp files from a model simulation into a common ArcGIS Map window.
The user has the option of which files to import from the simulation.
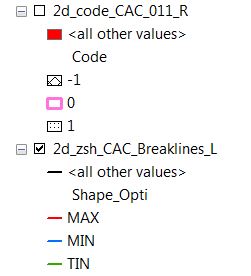
The shp files will be loaded using a predefined symbology for common TUFLOW input file types. This is determined based on the prefix of the file name. For example, the symbology for 2d_code and 2d_zsh files are shown below.
This tool is courtesy of Wood Rodgers, Inc. (www.woodrodgers.com)
Label Selected Layer
This tool will auto label the selected layer in the TOC. If the selected layer is a TUFLOW layer (e.g. 1d_nwk) the tool will automatically apply an expression, displaying useful information about the layer. It can also be used on non-TUFLOW layers, however will only label the first attribute. The user also has the option of changing the label colour from the adjacent drop down box (default is black if no colour is selected).
This tool is useful for reviewing models as well as building.
TUPLOT
TUPLOT is a 1D and 2D time series results viewer. A full description on how to use it is below:
About
Displays version of ArcTUFLOW.
| Up |
|---|

