Difference between revisions of "ArcGIS TUFLOW Toolbar"
| (20 intermediate revisions by one other user not shown) | |||
| Line 1: | Line 1: | ||
| − | |||
| − | |||
=Introduction= | =Introduction= | ||
| − | A TUFLOW toolbar is available for ArcGIS | + | A TUFLOW toolbar is available for ArcGIS Pro 3.0 and newer. This toolbar helps with streamlining the process of creating and editing a TUFLOW model in ArcGIS. |
The ArcGIS toolbar can be downloaded from the TUFLOW website: | The ArcGIS toolbar can be downloaded from the TUFLOW website: | ||
| − | * [https://tuflow.com/downloads/# | + | * [https://tuflow.com/downloads/#gis_tools Download Link] |
| − | The download | + | The download contains the .esriAddinX, a stand alone toolbar add-in to ArcGIS. |
=Installation= | =Installation= | ||
For instructions on how to install the ArcGIS Toolbar please see the following link: | For instructions on how to install the ArcGIS Toolbar please see the following link: | ||
| − | * [[ | + | * [[TUFLOW_ArcGIS_Toolbox_and_Toolbar_Installation#ArcTUFLOW_Toolbar | How to install ArcTUFLOW Toolbar]]<br><br> |
=The Utilities: What are they and How to use them= | =The Utilities: What are they and How to use them= | ||
| Line 24: | Line 22: | ||
! style="background-color:#005581; font-weight:bold; color:white;" width=10% | Utilities | ! style="background-color:#005581; font-weight:bold; color:white;" width=10% | Utilities | ||
|- | |- | ||
| − | |Start Model Build || 1. [[#Configure_TUFLOW | Configure TUFLOW (Required Initialization Step)]] | + | |Start Model Build || |
| − | 2. [[#Create_TUFLOW_Folders | Create TUFLOW Folders]] | + | 1. [[#Configure_TUFLOW | Configure TUFLOW (Required Initialization Step)]] <br> |
| + | 2. [[#Create_TUFLOW_Folders | Create TUFLOW Folders]] | ||
|- | |- | ||
| − | |Model Build and Development || 3. [[#Import_Empty_(template)_TUFLOW_Files| Import Empty (template) TUFLOW Files]]<br> | + | |Model Build and Development || |
| + | 3. [[#Import_Empty_(template)_TUFLOW_Files| Import Empty (template) TUFLOW Files]]<br> | ||
4. [[#Insert_TUFLOW_Attributes | Insert TUFLOW Attributes]]<br> | 4. [[#Insert_TUFLOW_Attributes | Insert TUFLOW Attributes]]<br> | ||
5. [[#Increment_Layer | Increment Layer]]<br> | 5. [[#Increment_Layer | Increment Layer]]<br> | ||
6. [[#Style_All_TUFLOW_Layers | Style All TUFLOW Layers]] <br> | 6. [[#Style_All_TUFLOW_Layers | Style All TUFLOW Layers]] <br> | ||
| − | 7. [[#Style_Selected_TUFLOW_Layers | Style Selected TUFLOW Layers]] | + | 7. [[#Style_Selected_TUFLOW_Layers | Style Selected TUFLOW Layers]] |
|- | |- | ||
| − | |Running TUFLOW || 8. [[#Run_TUFLOW_Simulation | Run TUFLOW Simulation]]<br> | + | |Running TUFLOW || |
| + | 8. [[#Run_TUFLOW_Simulation | Run TUFLOW Simulation]]<br> | ||
|- | |- | ||
| − | |Loading and Viewing Results || 9. [[#Load_Simulation_Input_Files | Load Simulation Input Files]]<br> | + | |Loading and Viewing Results || |
| + | 9. [[#Load_Simulation_Input_Files | Load Simulation Input Files]]<br> | ||
10. [[#Label_Selected_Layer | Label Selected Layer]] <br> | 10. [[#Label_Selected_Layer | Label Selected Layer]] <br> | ||
11. [[#Apply GPKG Layer Names | Apply GPKG Layer Names]]<br> | 11. [[#Apply GPKG Layer Names | Apply GPKG Layer Names]]<br> | ||
| Line 44: | Line 46: | ||
==Configure TUFLOW== | ==Configure TUFLOW== | ||
| − | + | [[File:ArcGIS Configure.png|thumb|right]] | |
| − | The “Configure TUFLOW” tool creates a configuration file that will pre-populate items in other | + | The “Configure TUFLOW” tool creates a configuration file that will pre-populate items in other ArcGIS tools based on the project. The steps for running the configuration tool are outlined below: |
| − | * Open or | + | * Open or create a project with a map. |
* Select a TUFLOW Model folder for your model. This can be either the folder that contains the entire TUFLOW model folder structure or the folder that contains the TUFLOW subdirectories. For example, it can be either "D:\projects\Example\TUFLOW" or “D:\projects\Example\”. All of the following tools will use this location. | * Select a TUFLOW Model folder for your model. This can be either the folder that contains the entire TUFLOW model folder structure or the folder that contains the TUFLOW subdirectories. For example, it can be either "D:\projects\Example\TUFLOW" or “D:\projects\Example\”. All of the following tools will use this location. | ||
* Enter the file path to the TUFLOW executable. | * Enter the file path to the TUFLOW executable. | ||
| Line 54: | Line 56: | ||
* If the "Tutorial Model" check-box is enabled, the Create_Empties.tcf will run with the "Tutorial Model == ON" command. | * If the "Tutorial Model" check-box is enabled, the Create_Empties.tcf will run with the "Tutorial Model == ON" command. | ||
* Select the default GIS format used in the TUFLOW model. If creating empty files, the empty files will be output in this format along with the projection file. The GPKG format is compatible with the TUFLOW 2023-03 Release or later. | * Select the default GIS format used in the TUFLOW model. If creating empty files, the empty files will be output in this format along with the projection file. The GPKG format is compatible with the TUFLOW 2023-03 Release or later. | ||
| − | + | ||
| − | + | ||
| − | + | ||
==Import Empty (template) TUFLOW Files== | ==Import Empty (template) TUFLOW Files== | ||
| − | + | [[File:ArcGIS ImportEmpty.png|thumb|right]] | |
The "Import Empty" tool can be used to import new SHP or GPKG files for editing. | The "Import Empty" tool can be used to import new SHP or GPKG files for editing. | ||
* Ensure the Empty Directory location is correct. | * Ensure the Empty Directory location is correct. | ||
| − | * Select the desired Empty Type (e.g. 2d_code, 2d_bc). A list and description of available types can be found in Table 2-4 of the | + | * Select the desired Empty Type (e.g. 2d_code, 2d_bc). A list and description of available types can be found in Table 2-4 of the <u>[https://downloads.tuflow.com/TUFLOW/Releases/Latest/TUFLOW%20Manual.pdf 2018 TUFLOW Manual]</u>. |
* Specify the run ID for the file. This will be added to the file name as a suffix. | * Specify the run ID for the file. This will be added to the file name as a suffix. | ||
*Select the object type (points, lines or regions). | *Select the object type (points, lines or regions). | ||
<br> | <br> | ||
| − | The | + | The example shown in the image will create a new layer called "2d_code_M01_001_R.shp". This layer will be automatically saved into the '''TUFLOW\model\gis''' folder. |
| − | |||
| + | The ArcGIS toolbar requires configuring prior to using this tool. Refer to [[#Configure_TUFLOW | Configure TUFLOW]] for more instructions. <br><br> | ||
| + | <br> | ||
| + | <br> | ||
| + | <br> | ||
| + | <br> | ||
| + | <br> | ||
| + | <br> | ||
| + | <br> | ||
==Insert TUFLOW Attributes== | ==Insert TUFLOW Attributes== | ||
| − | + | [[File:ArcGIS ImportAttributes.png|thumb|right]] | |
| − | The "Insert TUFLOW Attributes" tool will insert a TUFLOW attribute template in front of an existing GIS layer. This is useful when transferring data from a database (e.g. | + | The "Insert TUFLOW Attributes" tool will insert a TUFLOW attribute template in front of an existing GIS layer. This is useful when transferring data from a database (e.g. GIS stormwater network) to TUFLOW format. |
The steps are: | The steps are: | ||
| Line 79: | Line 88: | ||
This tool is best used if [[#Configure_TUFLOW | Configure TUFLOW]] has been run prior. | This tool is best used if [[#Configure_TUFLOW | Configure TUFLOW]] has been run prior. | ||
| − | + | <br> | |
| − | + | <br> | |
| + | <br> | ||
| + | <br> | ||
| + | <br> | ||
| + | <br> | ||
| + | <br> | ||
==Increment Layer== | ==Increment Layer== | ||
| − | + | [[File:ArcGIS_Increment.png|thumb|right]] | |
| − | The tool "Increment Layer" will increment up one or more TUFLOW layers to a new revision number and replace | + | The tool "Increment Layer" will increment up one or more TUFLOW layers to a new revision number and replace the existing layer in ArcGIS with the same style. Currently the limitation of the tool requires revision numbers to be 3 digits longs e.g. 001. |
The steps are: | The steps are: | ||
| − | * Select desired TUFLOW layer to be incremented (these can be dragged and dropped from the TOC into the tool window) | + | * Select the "Source Layer" - the desired TUFLOW layer to be incremented (these can be dragged and dropped from the TOC into the tool window). |
| − | * Specify the new revision number | + | * Select the "Output Folder" - the desired folder for incremented layer to be saved. |
| − | * Choose to supersede the old layers (these will be placed in a 'SS' folder in the same directory as the model layer) | + | * Specify the "Output Name" - new revision number. |
| − | * Choose to | + | * Choose to supersede the old layers (these will be placed in a 'SS' folder in the same directory as the model layer). |
| − | + | * Choose whether to keep the source layer open. | |
| − | + | <br> | |
| + | <br> | ||
| + | <br> | ||
| + | <br> | ||
| + | <br> | ||
==Style All TUFLOW Layers== | ==Style All TUFLOW Layers== | ||
| Line 103: | Line 121: | ||
==Run TUFLOW Simulation== | ==Run TUFLOW Simulation== | ||
| − | + | [[File:ArcGIS_Run_v2.png|thumb|right]] | |
* Enter the simulation tcf reference | * Enter the simulation tcf reference | ||
* Define the path to the TUFLOW executable | * Define the path to the TUFLOW executable | ||
<br> | <br> | ||
The ArcTUFLOW toolbox requires configuring prior to using this tool. Refer to [[Configure_TUFLOW | Configure TUFLOW]] for more instructions. <br><br> | The ArcTUFLOW toolbox requires configuring prior to using this tool. Refer to [[Configure_TUFLOW | Configure TUFLOW]] for more instructions. <br><br> | ||
| − | + | <br> | |
| − | + | <br> | |
| + | <br> | ||
| + | <br> | ||
==Load Simulation Input Files== | ==Load Simulation Input Files== | ||
| − | + | [[File:ArcGIS_Load.png|thumb|right]] | |
| − | This tool loads all input | + | This tool loads all input files from a model simulation into the active Map.<br> |
| − | |||
| − | |||
| − | |||
| − | <br> | ||
<br> | <br> | ||
| − | The | + | The files will be loaded using a predefined symbology for common TUFLOW input file types. This is determined based on the prefix of the file name. For example, the symbology for 2d_code and 2d_zsh files are shown below.<br><br> |
[[File:arcTUFLOW_Load_Simulation_File_Symbology.JPG|200px]] | [[File:arcTUFLOW_Load_Simulation_File_Symbology.JPG|200px]] | ||
<br><br> | <br><br> | ||
Revision as of 14:58, 16 September 2024
Introduction
A TUFLOW toolbar is available for ArcGIS Pro 3.0 and newer. This toolbar helps with streamlining the process of creating and editing a TUFLOW model in ArcGIS.
The ArcGIS toolbar can be downloaded from the TUFLOW website:
The download contains the .esriAddinX, a stand alone toolbar add-in to ArcGIS.
Installation
For instructions on how to install the ArcGIS Toolbar please see the following link:
The Utilities: What are they and How to use them
The ArcTUFLOW Tools are intended to help the user with model initiation, setup and development, running, and checking and viewing results:
| Model Stage | Utilities |
|---|---|
| Start Model Build |
1. Configure TUFLOW (Required Initialization Step) |
| Model Build and Development |
3. Import Empty (template) TUFLOW Files |
| Running TUFLOW | |
| Loading and Viewing Results |
9. Load Simulation Input Files |
| Miscellaneous | 13. About |
Configure TUFLOW
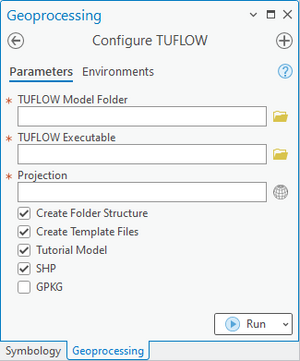
The “Configure TUFLOW” tool creates a configuration file that will pre-populate items in other ArcGIS tools based on the project. The steps for running the configuration tool are outlined below:
- Open or create a project with a map.
- Select a TUFLOW Model folder for your model. This can be either the folder that contains the entire TUFLOW model folder structure or the folder that contains the TUFLOW subdirectories. For example, it can be either "D:\projects\Example\TUFLOW" or “D:\projects\Example\”. All of the following tools will use this location.
- Enter the file path to the TUFLOW executable.
- Select the projection for the TUFLOW model.
- If the "Create Folder Structure" check-box is enabled when the tool is run, the standard TUFLOW folder structure is created. A projection layer is saved inside the TUFLOW\model\gis folder and a simple TUFLOW control file (.tcf) is created. This .tcf file is in the TUFLOW\runs folder and is named Create_Empties.tcf.
- If the "Create Template Files" check-box is enabled a TUFLOW simulation is started with the Create_Empties.tcf as in the input file. This simulation creates a series of template files in the TUFLOW\model\gis\empty folder. All of these template files have projection (CRS) as defined and have the correct GIS attributes for use in TUFLOW modelling. This can be brought into ArcGIS using the Import Empty tool.
- If the "Tutorial Model" check-box is enabled, the Create_Empties.tcf will run with the "Tutorial Model == ON" command.
- Select the default GIS format used in the TUFLOW model. If creating empty files, the empty files will be output in this format along with the projection file. The GPKG format is compatible with the TUFLOW 2023-03 Release or later.
Import Empty (template) TUFLOW Files
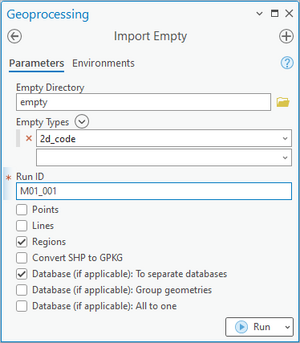
The "Import Empty" tool can be used to import new SHP or GPKG files for editing.
- Ensure the Empty Directory location is correct.
- Select the desired Empty Type (e.g. 2d_code, 2d_bc). A list and description of available types can be found in Table 2-4 of the 2018 TUFLOW Manual.
- Specify the run ID for the file. This will be added to the file name as a suffix.
- Select the object type (points, lines or regions).
The example shown in the image will create a new layer called "2d_code_M01_001_R.shp". This layer will be automatically saved into the TUFLOW\model\gis folder.
The ArcGIS toolbar requires configuring prior to using this tool. Refer to Configure TUFLOW for more instructions.
Insert TUFLOW Attributes
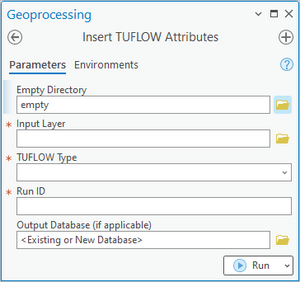
The "Insert TUFLOW Attributes" tool will insert a TUFLOW attribute template in front of an existing GIS layer. This is useful when transferring data from a database (e.g. GIS stormwater network) to TUFLOW format.
The steps are:
- Select the input file (the file to have TUFLOW attributes inserted into).
- Select the TUFLOW file format.
- Specify a run ID for the file. This will be added to the name as a suffix.
This tool is best used if Configure TUFLOW has been run prior.
Increment Layer
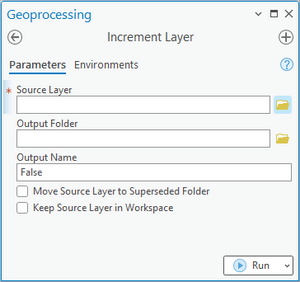
The tool "Increment Layer" will increment up one or more TUFLOW layers to a new revision number and replace the existing layer in ArcGIS with the same style. Currently the limitation of the tool requires revision numbers to be 3 digits longs e.g. 001.
The steps are:
- Select the "Source Layer" - the desired TUFLOW layer to be incremented (these can be dragged and dropped from the TOC into the tool window).
- Select the "Output Folder" - the desired folder for incremented layer to be saved.
- Specify the "Output Name" - new revision number.
- Choose to supersede the old layers (these will be placed in a 'SS' folder in the same directory as the model layer).
- Choose whether to keep the source layer open.
Style All TUFLOW Layers
This button will apply TUFLOW stylings onto all TUFLOW related layers in the TOC.
Style Selected TUFLOW Layers
This button will apply TUFLOW stylings to the selected layer in the TOC.
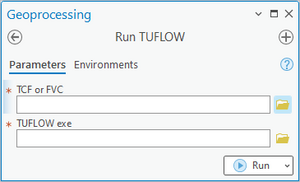
Run TUFLOW Simulation
- Enter the simulation tcf reference
- Define the path to the TUFLOW executable
The ArcTUFLOW toolbox requires configuring prior to using this tool. Refer to Configure TUFLOW for more instructions.
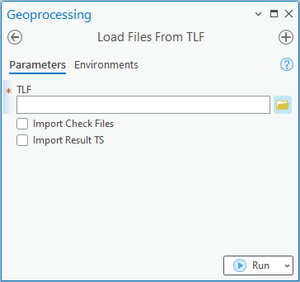
Load Simulation Input Files
This tool loads all input files from a model simulation into the active Map.
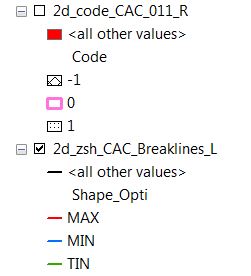
The files will be loaded using a predefined symbology for common TUFLOW input file types. This is determined based on the prefix of the file name. For example, the symbology for 2d_code and 2d_zsh files are shown below.
This tool is courtesy of Wood Rodgers, Inc. (www.woodrodgers.com)
Label Selected Layer
This tool will auto label the selected layer in the TOC. If the selected layer is a TUFLOW layer (e.g. 1d_nwk) the tool will automatically apply an expression, displaying useful information about the layer. It can also be used on non-TUFLOW layers, however will only label the first attribute. The user also has the option of changing the label colour from the adjacent drop down box (default is black if no colour is selected).
This tool is useful for reviewing models as well as building.
Apply GPKG Layer Names
This tool will change the layer name to be the same as the layer name within the GPKG database to every open GPKG layer in the workspace. This tool is useful as sometimes when GPKG layers are opened in ArcGIS (depending on how they are opened) they will contain both the database name and layer name e.g. "database - layername". This tool strips the database name from the layer name in the Layers Panel.
If there are open layers that are not GPKG, then it will have no affect of these layer names.
TUPLOT
TUPLOT is a 1D and 2D time series results viewer. A full description on how to use it is below:
About
Displays version of ArcGIS Pro Toolbar.

