FM Tutorial M02 QGIS SHP Boundary Conditions: Difference between revisions
Jump to navigation
Jump to search
Content deleted Content added
No edit summary |
|||
| (3 intermediate revisions by the same user not shown) | |||
| Line 17: | Line 17: | ||
<li>Copy the layer '''2d_sa_FMT_M02_001_R.shp''' within the '''Module_data\Module_02\Inflow''' folder into the '''TUFLOW\model\gis''' folder. |
<li>Copy the layer '''2d_sa_FMT_M02_001_R.shp''' within the '''Module_data\Module_02\Inflow''' folder into the '''TUFLOW\model\gis''' folder. |
||
<li>Open the layer in QGIS. Four polygons have been digitised over the location of the proposed development. Each polygon represents a sub-catchment to which different inflow boundaries will be associated. |
<li>Open the layer in QGIS. Four polygons have been digitised over the location of the proposed development. Each polygon represents a sub-catchment to which different inflow boundaries will be associated. |
||
<li>Turn on Toggle Editing mode. Populate the first and only attribute of each polygon with the name of the inflow boundary as in the image below. |
<li>Turn on Toggle Editing mode. Populate the first and only attribute of each polygon with the name of the inflow boundary as in the image below. These boundary names will be linked to those specified in the steps above using the bc_dbase located in '''TUFLOW\bc_dbase''' . <br> |
||
<br> |
<br> |
||
[[File:M07 SA polygons QGIS.png|700px]] |
[[File:M07 SA polygons QGIS.png|700px]] |
||
| Line 27: | Line 27: | ||
=Conclusion= |
=Conclusion= |
||
A GIS layer has been created containing four polygons in a 2d_sa layer over the location of the proposed development. The existing boundary conditions database (bc_dbase) has been modified to link these four GIS objects to hydrographs within an external csv file. |
<br>A GIS layer has been created containing four polygons in a 2d_sa layer over the location of the proposed development. The existing boundary conditions database (bc_dbase) has been modified to link these four GIS objects to hydrographs within an external csv file. |
||
{{Tips Navigation |
<br>{{Tips Navigation |
||
|uplink=[[Flood_Modeller_Tutorial_Module02_Provisional| Back to Tutorial Module 02 Main Page]] |
|uplink=[[Flood_Modeller_Tutorial_Module02_Provisional#Flood Modeller 1D/ESTRY 1D Link| Back to Tutorial Module 02 Main Page]] |
||
}} |
}} |
||
Latest revision as of 01:07, 8 October 2025
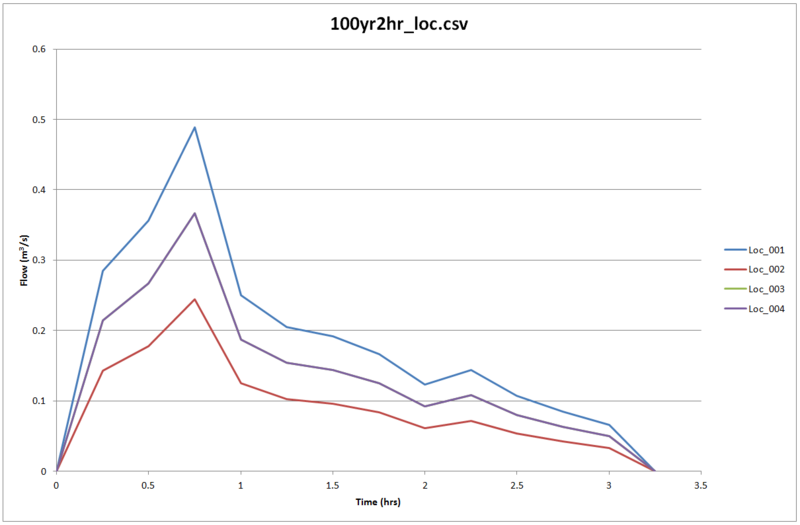
- Copy the file 100yr2hr_loc.csv from Module_data\Module_02\Inflow and place it into the TUFLOW\bc_dbase folder. This file contains the four hydrographs that will be used.
- Open up the latest version of the boundary condition database. This is located within the TUFLOW\bc_dbase folder and is called bc_dbase_FMT_M01.csv.
- We need to add four additional rows to the file which reference four additional inflows. The revised bc_dbase should look like the figure below:
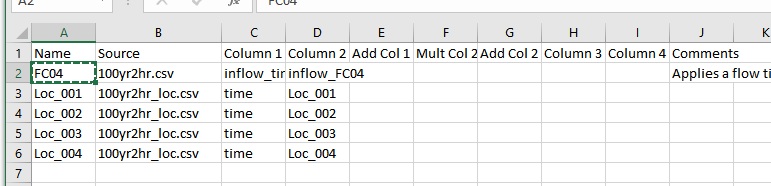
The hydrographs applied to each of the 2d_sa polygons are contained within the source file 100yr2hr_loc.csv.
- Save the bc_dbase as bc_dbase_FMT_M02.csv. It is now ready to be used within the model.
- Copy the layer 2d_sa_FMT_M02_001_R.shp within the Module_data\Module_02\Inflow folder into the TUFLOW\model\gis folder.
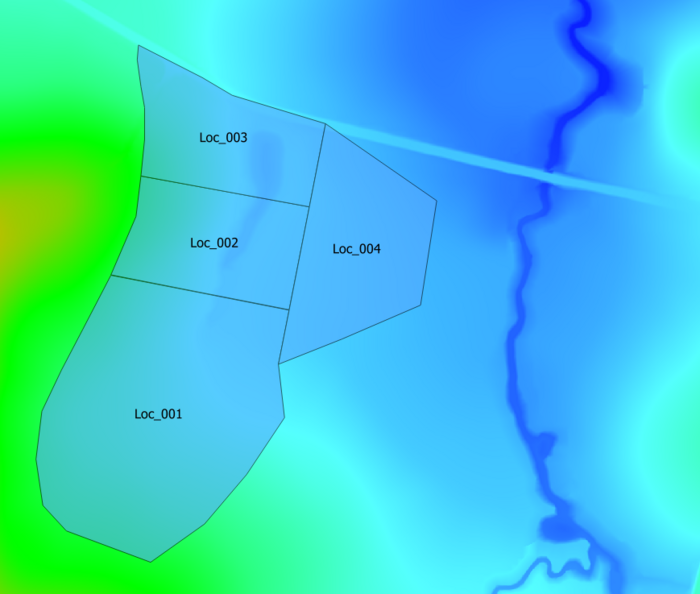
- Open the layer in QGIS. Four polygons have been digitised over the location of the proposed development. Each polygon represents a sub-catchment to which different inflow boundaries will be associated.
- Turn on Toggle Editing mode. Populate the first and only attribute of each polygon with the name of the inflow boundary as in the image below. These boundary names will be linked to those specified in the steps above using the bc_dbase located in TUFLOW\bc_dbase .
- Save the layer 2d_sa_FMT_M02_001_R.
Conclusion
A GIS layer has been created containing four polygons in a 2d_sa layer over the location of the proposed development. The existing boundary conditions database (bc_dbase) has been modified to link these four GIS objects to hydrographs within an external csv file.
Up  Back to Tutorial Module 02 Main Page
Introduction
This page details the method for using QGIS to create the GIS based boundary layer. The layer will be populated with the name of each inflow boundary which will be linked to the boundary database in the following steps of this module. The created boundary will be applied as a source-area boundary in a 2d_sa layer.
Method
Boundary Condition Database


