Arc Label Messages: Difference between revisions
Jump to navigation
Jump to search
Content deleted Content added
Created page with "=Introduction= In this page we will look at labelling the messages layer outputted by TUFLOW, to help in identify issues with a TUFLOW model. The messages_P.shp file is written ..." |
Chris Huxley (talk | contribs) No edit summary |
||
| (7 intermediate revisions by 2 users not shown) | |||
| Line 1: | Line 1: | ||
=Introduction= |
=Introduction= |
||
In this page we will look at labelling the messages layer outputted by TUFLOW, to help |
In this page we will look at labelling the messages layer outputted by TUFLOW, to help identify issues with a TUFLOW model. The messages_P.shp file is written to the log directory. If this is not defined using the .tcf command <font color="blue"><tt>Log Folder </tt></font> <font color="red"><tt>==</tt></font><tt> <folder name></tt>, this will be in the same directory as the .tcf (typically TUFLOW\runs\).<br> |
||
In this page we cover labelling the messages in two different ways: |
|||
* A single label style |
|||
* Using classes which allows the check, warning and error messages to be labelled separately and with different label styles. |
|||
=Basic= |
=Basic= |
||
To label the entire layer including all check, warning and error messages |
To label the entire layer including all check, warning and error messages:<br> |
||
<ol> |
<ol> |
||
<li>Ensure you have a messages_P.shp file open (and the layer contains messages).</li> |
<li>Ensure you have a messages_P.shp file open (and the layer contains messages).</li> |
||
| Line 10: | Line 13: | ||
<br> |
<br> |
||
<li>Open the layer properties, by right clicking on the layer in the table of contents and selecting properties. Navigate to the '''Labels''' Tab, set the desired label style and placement.<br> |
<li>Open the layer properties, by right clicking on the layer in the table of contents and selecting properties. Navigate to the '''Labels''' Tab, set the desired label style and placement.<br> |
||
''Tip:'' It may be necessary to allow overlapping labels in the placement properties to ensure that you can see all messages.</li> |
'''Tip:''' It may be necessary to allow overlapping labels in the placement properties to ensure that you can see all messages.</li> |
||
[[File:Arc Label Basic2.jpg|600px]] |
[[File:Arc Label Basic2.jpg|600px]] |
||
<br> |
<br> |
||
| Line 22: | Line 25: | ||
To label these differently in ArcMap the following process can be used. |
To label these differently in ArcMap the following process can be used. |
||
<li>Ensure you have a messages_P.shp file open (and the layer contains messages).</li> |
<li>Ensure you have a messages_P.shp file open (and the layer contains messages).</li> |
||
<li>Right click on the layer in the table of contents and select '''Label'''</li> |
<li>Right click on the layer in the table of contents and select '''Label'''.</li> |
||
<br> |
<br> |
||
[[File:Arc Label Basic1.jpg|350px]] |
[[File:Arc Label Basic1.jpg|350px]] |
||
| Line 28: | Line 31: | ||
<li>Open the layer properties, by right clicking on the layer in the table of contents and selecting properties. Navigate to the '''Labels''' Tab. In the Method Option, from the drop box select '''Define Classes of features and label each class differently'''.</li> |
<li>Open the layer properties, by right clicking on the layer in the table of contents and selecting properties. Navigate to the '''Labels''' Tab. In the Method Option, from the drop box select '''Define Classes of features and label each class differently'''.</li> |
||
<li>In the '''Class''' section select the '''Add...''' option.</li> |
<li>In the '''Class''' section select the '''Add...''' option.</li> |
||
<li>Add a class with name "CHECK"</li> |
<li>Add a class with name "CHECK".</li> |
||
| ⚫ | |||
| ⚫ | |||
[[File:Arc Label Adv01.jpg|600px]] |
[[File:Arc Label Adv01.jpg|600px]] |
||
<br><br> |
|||
| ⚫ | |||
| ⚫ | |||
This is shown in the image below. |
|||
<br> |
<br> |
||
| ⚫ | |||
| ⚫ | |||
<br><br> |
|||
| ⚫ | |||
< |
</li> |
||
| ⚫ | |||
<li>Repeat the process for WARNING ("Message" like '%WARNING%') and ERROR ("Message" like '%ERROR%') messages, setting different styles for each type of message.</li> |
<li>Repeat the process for WARNING ("Message" like '%WARNING%') and ERROR ("Message" like '%ERROR%') messages, setting different styles for each type of message.</li> |
||
Now when messages are viewed these should be displayed with the styles set for check, warning and error type messages. |
Now when messages are viewed these should be displayed with the styles set for check, warning and error type messages. |
||
| Line 48: | Line 54: | ||
[[File:Arc Label Adv05.jpg|600px]] |
[[File:Arc Label Adv05.jpg|600px]] |
||
<br> |
<br> |
||
<br> |
|||
{{Tips Navigation |
|||
|uplink=[[ArcGis_Tips | Back to ArcGIS]]}} |
|||
Latest revision as of 06:11, 31 January 2015
Introduction
In this page we will look at labelling the messages layer outputted by TUFLOW, to help identify issues with a TUFLOW model. The messages_P.shp file is written to the log directory. If this is not defined using the .tcf command Log Folder == <folder name>, this will be in the same directory as the .tcf (typically TUFLOW\runs\).
In this page we cover labelling the messages in two different ways:
- A single label style
- Using classes which allows the check, warning and error messages to be labelled separately and with different label styles.
Basic
To label the entire layer including all check, warning and error messages:
- Ensure you have a messages_P.shp file open (and the layer contains messages).
- Right click on the layer in the table of contents and select Label
- Open the layer properties, by right clicking on the layer in the table of contents and selecting properties. Navigate to the Labels Tab, set the desired label style and placement.
Tip: It may be necessary to allow overlapping labels in the placement properties to ensure that you can see all messages.


Label by Severity (check, warning, error)
-
When there are numerous messages, it is nice to be able to differentiate the messages based on the the severity. There are three levels of messages outputted by TUFLOW in increasing order of severity these are:
To label these differently in ArcMap the following process can be used.
- Ensure you have a messages_P.shp file open (and the layer contains messages).
- Right click on the layer in the table of contents and select Label.
- Open the layer properties, by right clicking on the layer in the table of contents and selecting properties. Navigate to the Labels Tab. In the Method Option, from the drop box select Define Classes of features and label each class differently.
- In the Class section select the Add... option.
- Add a class with name "CHECK".
- Set the desired display options for "CHECK" type messages.
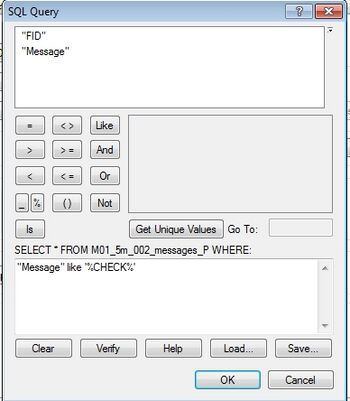
- Select SQL Query... to define the class. In the SQL Query window set the following in the select from dialogue:
"Message" like '%CHECK%'
This is shown in the image below.
- Repeat the process for WARNING ("Message" like '%WARNING%') and ERROR ("Message" like '%ERROR%') messages, setting different styles for each type of message. Now when messages are viewed these should be displayed with the styles set for check, warning and error type messages.
- It is possible to turn off labels for certain classes, for example to see the labels for error messages. To do this in the Labels dialogue, select the classes you wish to hide and uncheck the Label Features in this class option.


In the image below the check and warnings are not labelled, leaving only the error messages.

| Up |
|---|