MI Selecting Subsets: Difference between revisions
Jump to navigation
Jump to search
Content deleted Content added
Ari Craven (talk | contribs) No edit summary |
No edit summary |
||
| (5 intermediate revisions by one other user not shown) | |||
| Line 5: | Line 5: | ||
<li>Import the 1d_nwk_check.mif layer into MapInfo. </li> |
<li>Import the 1d_nwk_check.mif layer into MapInfo. </li> |
||
<li>To select all channels of Type “C” (ie. pipes or circular culverts) go to Query, Select… to display the dialog below. Ensure the correct table is selected in the 'Select Records from Table' drop down box. In the dialogue box type the following: Type = "C". Click 'OK'. |
<li>To select all channels of Type “C” (ie. pipes or circular culverts) go to Query, Select… to display the dialog below. Ensure the correct table is selected in the 'Select Records from Table' drop down box. In the dialogue box type the following: Type = "C". Click 'OK'. |
||
</li> |
|||
[[File:Basic Select.png|frame|none]] |
|||
</ol> |
|||
<br> |
|||
There will now be a temporary table called 'selection' which can be added to a map window opened in a new browser window. |
|||
== SQL Select == |
== SQL Select == |
||
<ol> |
|||
<li>Import the 1d_nwk_check.mif layer into MapInfo. </li> |
|||
<li>To select all channels of Type “C” (ie. pipes or circular culverts) go to Query, SQL Select… to display the dialog below. Click in the “from Tables:” field and use the “Tables” drop down list on the top right to select the 1d_nwk_check layer. Click in the “where Condition:” field and using the Columns drop down list select Type (or Channel_Type for older 1d_nwk_check layers) and complete the expression as per below: <br> |
|||
Type = “C” |
|||
<br> |
|||
ensuring that quotes are placed around the C. Finally, for the “into Table Named:” field, instead of “Selection” enter “Pipes”. Use Verify to check your entries and press OK to select all circular culverts and place them in a virtual table (ie. a subset table of the 1d_nwk_check layer) called Pipes. </li> |
|||
[[File:SQL Select.png|frame|none]] |
|||
{{Tips Navigation |
|||
|uplink=[[MapInfo_Tips| Back to MapInfo Tips]] |
|||
}} |
|||
Latest revision as of 11:42, 8 January 2026
Introduction
MapInfo offers two methods for selecting subsets of other tables; the basic 'Select' tool and the more powerful 'SQL select'. This example illustrates how the pipes (Type = “C”) in a 1d_nwk_check.mif layer are selected.
Basic Select
- Import the 1d_nwk_check.mif layer into MapInfo.
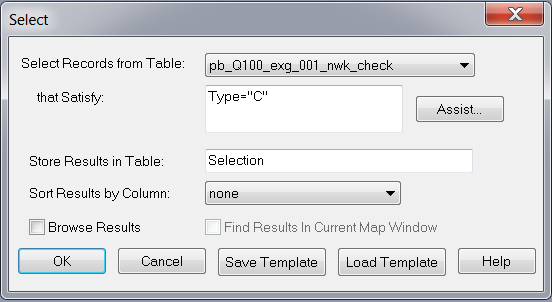
- To select all channels of Type “C” (ie. pipes or circular culverts) go to Query, Select… to display the dialog below. Ensure the correct table is selected in the 'Select Records from Table' drop down box. In the dialogue box type the following: Type = "C". Click 'OK'.

There will now be a temporary table called 'selection' which can be added to a map window opened in a new browser window.
SQL Select
- Import the 1d_nwk_check.mif layer into MapInfo.
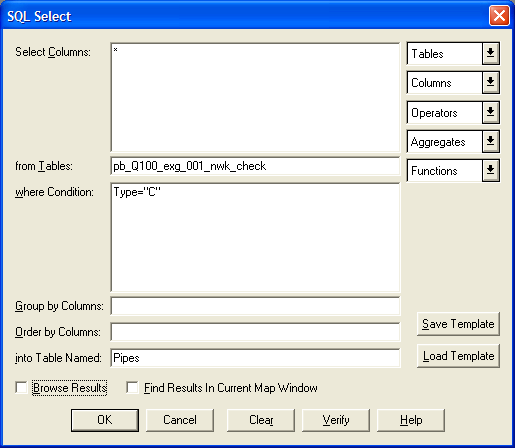
- To select all channels of Type “C” (ie. pipes or circular culverts) go to Query, SQL Select… to display the dialog below. Click in the “from Tables:” field and use the “Tables” drop down list on the top right to select the 1d_nwk_check layer. Click in the “where Condition:” field and using the Columns drop down list select Type (or Channel_Type for older 1d_nwk_check layers) and complete the expression as per below:
Type = “C”
ensuring that quotes are placed around the C. Finally, for the “into Table Named:” field, instead of “Selection” enter “Pipes”. Use Verify to check your entries and press OK to select all circular culverts and place them in a virtual table (ie. a subset table of the 1d_nwk_check layer) called Pipes.

| Up |
|---|