NotepadPlusPlus Highlighting: Difference between revisions
Jump to navigation
Jump to search
Content deleted Content added
No edit summary |
No edit summary |
||
| (7 intermediate revisions by 3 users not shown) | |||
| Line 1: | Line 1: | ||
=Install Syntax Highlighting= |
|||
To enable the colour coding (syntax highlighting) in Notepad++: |
To enable the colour coding (syntax highlighting) in Notepad++: |
||
| ⚫ | |||
| ⚫ | |||
* Select the Language tab - User Defined Dialogue. |
|||
| ⚫ | |||
<ol> |
<ol> |
||
| ⚫ | |||
[[File: UserDefinedLanguage_Import.png|800px]] |
|||
| ⚫ | |||
<li>Import the syntax highlighting by selecting Language > User Defined Language > Define your language... |
|||
| ⚫ | |||
| ⚫ | |||
[[File:dialogue_box_1.png]]<br> |
|||
<br> |
|||
| ⚫ | |||
| ⚫ | |||
| ⚫ | |||
| ⚫ | |||
<br> |
|||
[[File:Syntax comparison 6.png]]<br> |
|||
<br> |
|||
</ol> |
</ol> |
||
| ⚫ | |||
| ⚫ | |||
| ⚫ | |||
| ⚫ | |||
| ⚫ | |||
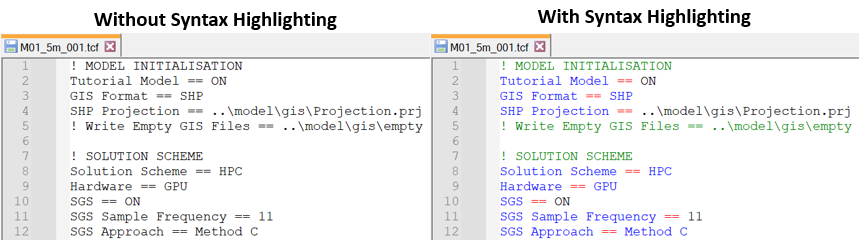
[[File: Syntax_Highlighting_Comparison.png|900px]] |
|||
</ol> |
|||
=Update Syntax Highlighting= |
|||
When updating the syntax highlighting file with a newer version, first remove the existing "TUFLOW" language definition: |
|||
* Select "TUFLOW" for the user language options. |
|||
* Select "Remove". |
|||
| ⚫ | |||
<ol> |
<ol> |
||
<li>Remove the "TUFLOW" language definition by selecting Language > User Defined Language > Define your language... |
|||
| ⚫ | |||
<li>Select "TUFLOW" as the User Language and select "Remove". |
|||
| ⚫ | |||
<br> |
|||
| ⚫ | |||
<br> |
|||
| ⚫ | |||
</ol> |
</ol> |
||
| ⚫ | |||
Latest revision as of 11:17, 23 August 2023
Install Syntax Highlighting
To enable the colour coding (syntax highlighting) in Notepad++:
- Download the Notepad++ Syntax Highlighting File from the TUFLOW website.
- Save the file to a location on your computer.
- Import the syntax highlighting by selecting Language > User Defined Language > Define your language...
- In the dialogue box, select Import:

- Navigate to the Notepad++ syntax highlighting xml file and select it. Click 'Open'.
- Close any open TUFLOW control files (.tcf, .tgc, .tbc, .ecf).
- Restart Notepad++.
- Open any TUFLOW control file (.tcf, .tgc, .tbc, .ecf). The syntax colouring should now be associated with TUFLOW files.


Update Syntax Highlighting
When updating the syntax highlighting file with a newer version, first remove the existing "TUFLOW" language definition:
- Remove the "TUFLOW" language definition by selecting Language > User Defined Language > Define your language...
- Select "TUFLOW" as the User Language and select "Remove".
- Restart Notepad++ before loading the new syntax highlighting file.

- Follow the above listed steps to install the new syntax highlighting file.
