Difference between revisions of "XPSWMM Conversion Reconfigure SWMM Junctions"
Chris Huxley (talk | contribs) |
Chris Huxley (talk | contribs) |
||
| Line 35: | Line 35: | ||
The final step to the set the Junction attributes requires update of the Ymax (maximum depth) attribute to a value of zero (0) for the select Node--Junctions that are '''not connected''' to the 2D surface via a Pipe Network Pit (Inlet Usage) Connection point. Using a value of zero sets the junction’s Ymax to the distance from its invert to the top of the highest connecting link. <br> | The final step to the set the Junction attributes requires update of the Ymax (maximum depth) attribute to a value of zero (0) for the select Node--Junctions that are '''not connected''' to the 2D surface via a Pipe Network Pit (Inlet Usage) Connection point. Using a value of zero sets the junction’s Ymax to the distance from its invert to the top of the highest connecting link. <br> | ||
<br> | <br> | ||
| − | We can make this update using a similar point selection workflow as we described | + | We can make this update using a similar point selection workflow as we described in the "Correct the SWMM Nodes--Junction/Outfall Model Design" Section. |
<ol> | <ol> | ||
<li>In the QGIS Layers panel, select (left click) '''Nodes--Junctions''' and toggle on editing. | <li>In the QGIS Layers panel, select (left click) '''Nodes--Junctions''' and toggle on editing. | ||
| Line 43: | Line 43: | ||
*By comparing to the features from: Click the dropdown menu and select '''Inlet Usage'''. | *By comparing to the features from: Click the dropdown menu and select '''Inlet Usage'''. | ||
*Where the features are within: '0.1 meters' | *Where the features are within: '0.1 meters' | ||
| − | *Modify current selection by: ' | + | *Modify current selection by: 'removing from current selection' |
[[File:XPSWMM_to_TUFLOW_Junction_Ymax_Selection.png|800px]]<br><br> | [[File:XPSWMM_to_TUFLOW_Junction_Ymax_Selection.png|800px]]<br><br> | ||
| + | |||
<li>Click 'Run'. Once the tool is finished, click 'Close'. | <li>Click 'Run'. Once the tool is finished, click 'Close'. | ||
<li>In the QGIS Layers panel, right click '''Nodes--Junctions''' and select 'Open Attribute Table'. | <li>In the QGIS Layers panel, right click '''Nodes--Junctions''' and select 'Open Attribute Table'. | ||
Revision as of 11:43, 26 February 2024
Bulk Update SWMM Nodes--Junctions Attributes
The following GIS feature updates to the Nodes--Junctions attributes will finalize the SWMM portion of the TUFLOW model. This is typically the final step in the model building process, as the recommended attributes for a junction node vary depending on whether the node is associated with inlet usage connections, 1D/2D culvert connections, and SWMM hydrology sub-catchments.
- In the QGIS Layers panel, select (left click) Nodes--Junctions and toggle on editing.
- In the Processing Toolbox, select the 'Edit Features In-Place' tool. This allows the editing of an existing layer, instead of the creation of a new layer.
- Go to TUFLOW >> SWMM in the processing tool list and select the 'Junctions - Set attributes' processing tool. This opens the dialog shown below.
- Input Subcatchment layers: If available, select Hydrology--Subcatchments.
- Input Inlet Usage Layers: If available, select the inlet usage layer (e.g. swmm_iu_XP_001).
- Input BC Connection Layers: If available, select the 2d_bc connection layer (e.g. 1D2D_Urban_001_2d_bc_L).
- General Options:
- Maximum Depth Option (Ymax): 'Leave as is (applies to edit in place only)'
- Nodes receiving subcatchment flows option (if connected to 2D): 'Based on options selected below'
- Nodes connected to 2D without Inlets (through embankment culvert):
- Ysur: 0
- Area of ponding: This value should match the 2D cell area associated with 1D/2D culvert connections (100 in the example dataset).
- Nodes connected to 2D with Inlets (underground pipe network):
- Maximum depth (Ymax) option: 'Use global option'
- Ysur: 0
- Area of ponding: This value should match the 2D cell area associated with the Inlet Usage connections (25 in the example model).
- Nodes without 2D Connection (underground pipe network):
- Surcharge Depth: This value should be a value higher than any expected water level in the model (99 in the example model).
- Area of ponding: 1
- Select 'Modify All Features'. Once the tool has finished, click 'Close'.
- Turn off editing to save the edits.
- View the attributes within Nodes--Junctions to verify the data processing has been completed correctly.
For a summary of the attributes associated with the Nodes--Junctions layer, refer to TUFLOW 2023-03-AD Release Notes (Table A.30) and the SWMM Reference Manual - Volume 2 (Hydraulics).
Selectively Update SWMM Nodes--Junctions Attributes
The final step to the set the Junction attributes requires update of the Ymax (maximum depth) attribute to a value of zero (0) for the select Node--Junctions that are not connected to the 2D surface via a Pipe Network Pit (Inlet Usage) Connection point. Using a value of zero sets the junction’s Ymax to the distance from its invert to the top of the highest connecting link.
We can make this update using a similar point selection workflow as we described in the "Correct the SWMM Nodes--Junction/Outfall Model Design" Section.
- In the QGIS Layers panel, select (left click) Nodes--Junctions and toggle on editing.
- Use the 'Select Features' tool to select all nodes included in the Nodes--Junctions layer. When selected, this will change their color to bright yellow.
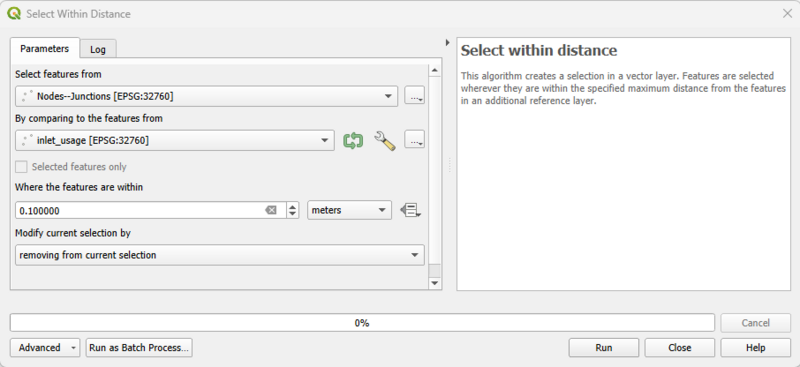
- In the Processing Toolbox, go to 'Vector Selection' and select 'Select within distance'. This opens the dialog shown below.
- Select features from: Nodes--Junctions (this is prepopulated as Nodes--Junctions is the active dataset).
- By comparing to the features from: Click the dropdown menu and select Inlet Usage.
- Where the features are within: '0.1 meters'
- Modify current selection by: 'removing from current selection'

- Click 'Run'. Once the tool is finished, click 'Close'.
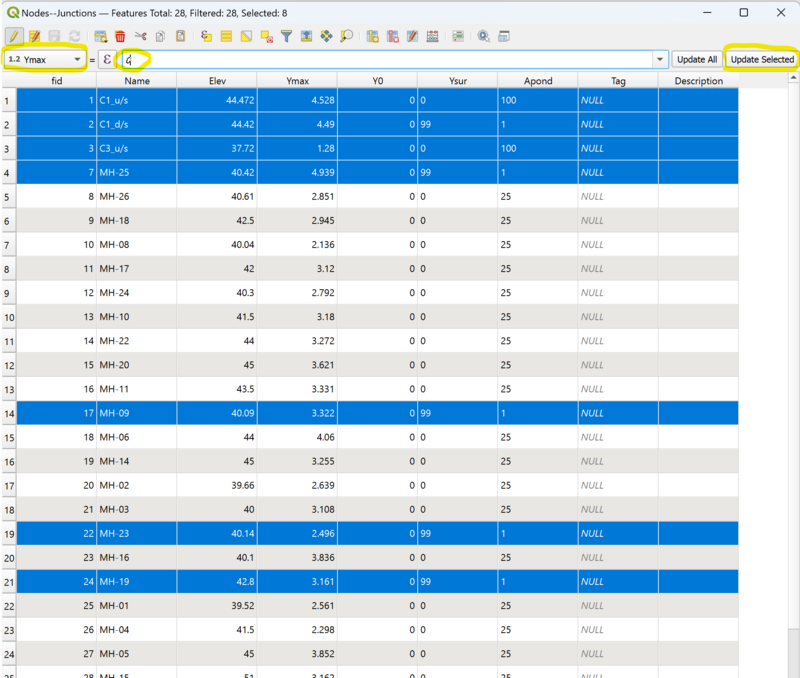
- In the QGIS Layers panel, right click Nodes--Junctions and select 'Open Attribute Table'.
- In the attribute table, only some of the junction nodes will be selected.
- Set the target update column to ‘Ymax”
- Set the update value to 0
- Select Updated Selected

- Toggle editing off to save the edits to Nodes--Junctions.
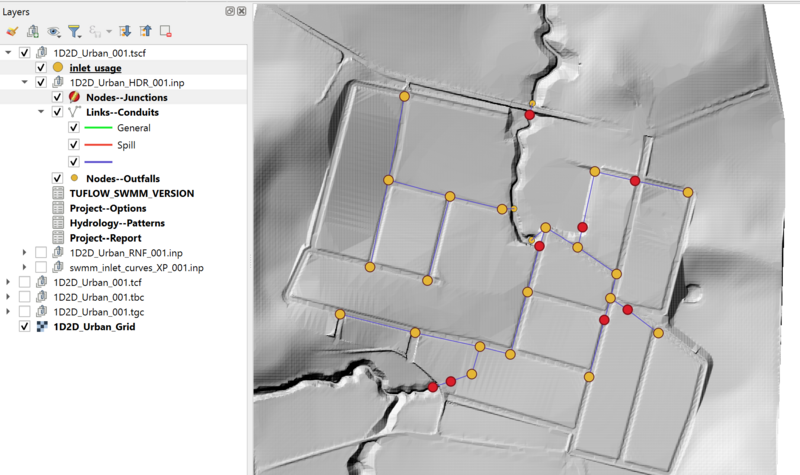
The above workflow should have updated the Ymax value in the Node-Junctions highlighted in red in the below figure.

Save the QGIS Workspace
In preparation for the next steps of the conversion process, ensure your QGIS workspace has been saved.
- In QGIS, go to Project > Save from the top dropdown menu options.
| Up |
|---|
| Up |
|---|