Talk:QGIS Tips: Difference between revisions
No edit summary |
|||
| Line 48: | Line 48: | ||
== Display Elevation Profiles == |
== Display Elevation Profiles == |
||
To display elevation profiles in QGiS you need to install the Terrain Profile Plugin. (QgiS 1.80) |
|||
Simply select a raster that you wish to display (you can add more later) and then draw your line. Finish with a double click. Any intermediate clicks will display on your elevation profile as a vertical black line. |
Simply select a raster that you wish to display (you can add more later) and then draw your line. Finish with a double click. Any intermediate clicks will display on your elevation profile as a vertical black line. |
||
Revision as of 12:32, 7 August 2012
How to Update a Column (Equivalent of MapInfo Update Column)
To quickly enter the "f" (multiplication factor applied to the boundary values) attribute for all CN type boundaries
1. Open Attribute Table
2. Select all CN attributes, this can be achieved if you sort by type so that all CN attributes are grouped,alternatively, for more complex situations, use the Advanced Search tool in the bottom right. This allows you to select using an SQL Query
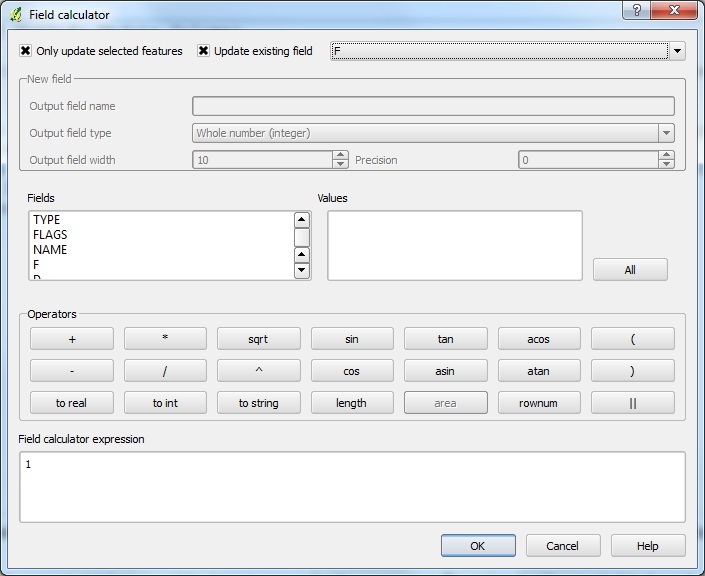
3. From the attribute table, open the field calculator (you need to be editing to open the field calculator)
4. Ensure that "Only update selected features" is turned on, and set the "Update existing field" to "f"
5. Type "1" into the "Field calculator expression" box and hit "OK". Note, if you want to insert a string such as 'S' you need to enter it with the inverted comma.
Done!
You can also use the field calculator for more advanced tasks, for example when naming the Source attribute for XS, the expression
'XSName'||rownum*50-50||'.csv' **NOTE** Do not copy and paste the expression to the left into QGiS - it has to be typed within the QGIS interfac. Do not type the "||" character either, at the time of writing this operator has to be selected from the available operators in the field calculator.
will generate in the source column:
XSName0.csv
XSName50.csv ...etc
Extract Cross-Sections/Elevations from 2-D Domain to .csv format
To use QGIS to extract cross sections from your DEM:
1. Draw your cross sections using the Tuflow 1d_xs file, be sure to fill in the source column.
2. Install the QGIS plug-in "profile from line" (note you may also need to install shapely - see [1]).
3. Run the plugin, it is pretty self explanatory, select your cross sections and dem, choose a suitable sampling interval.
4. Upon running the plugin, QGIGS will add a new points file to the workspace, save this as a .csv. This file will contain the source of every cross section as well as the corresponding chainages and elevations.
5. To split this data into individual .csv files in a format that tuflow can read in, download File:XSExtractor.xls
6. Follow the instructions in the spreadsheet, after exporting to individual worksheets use the Tuflow "Export Entire Workbook to csv" to obtain all the cross sections in a tuflow format.
Done!
Display Elevation Profiles
To display elevation profiles in QGiS you need to install the Terrain Profile Plugin. (QgiS 1.80)
Simply select a raster that you wish to display (you can add more later) and then draw your line. Finish with a double click. Any intermediate clicks will display on your elevation profile as a vertical black line.
Below is a comparison of the 2m grid and the 10m check grid.
