Tute M08 ARC Rainfall Archive
Introduction
This page details the method of using ArcGIS to create the GIS layers that will apply direct rainfall to the entire model extent. Once this layer has been setup, a new boundary conditions database will be created linking the object within the GIS layer to a hyetograph.
Method
GIS Layers
- Open an empty 2d_rf layer from the TUFLOW\model\gis\empty folder and save a copy as 2d_rf_M08_001_R to the TUFLOW\model\gis folder. Close the 2d_rf_empty_R file.
- We will be applying the direct rainfall over the whole 2D model area. To do this, open the 2d_code_M04_001_R layer created in Module 4. Select the code polygon within the 2d_code_M04_001_R layer and copy it. Ensure 2d_rf_M08_001_R is editable and selected, and paste all objects from the 2d_code layer within it.
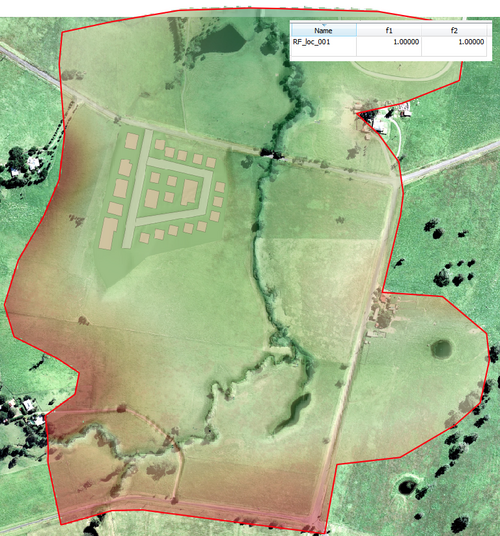
- Open the attribute table of 2d_rf_M08_001_R and populate the polygon with the following data:
Name f1 f2 RF_loc_001 1 1
A detailed description of the attributes of the 2d_RF layer can be found in the 2010 TUFLOW Manual. Using these attributes, we are setting:- The name of the rainfall hyetograph that will be referenced in the boundary conditions database
- A multiplier that adjusts the rainfall due to spatial variations in the total rainfall. Note that specifying a value of zero will cause zero rainfall to be applied to the model.
- A second multiplier that allows for adjusting the rainfall spatially. As for the F1 attribute, a value of zero applies no rainfall to the model.
- Save the layer.

Boundary Condition Database
- Copy the contents of Module_data\Module_08 into the TUFLOW\bcdbase folder.
- Open the existing boundary conditions database bc_dbase_M07.csv within the TUFLOW\bc_dbase folder. Save it as bc_dbase_M08.csv.
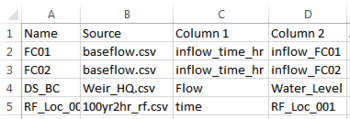
- Delete the four rows referencing the inflow hydrographs from the 2d_sa_M07_001_R layer (inflows called Loc_001, Loc_002, Loc_003 and Loc_004) and the row referencing FC04. Add another row to the bc_dbase with the following information:
Name Source Column 1 Column 2 RF_Loc_001 100yr2hr_rf.csv time RF_Loc_001
- The row we have added links the name of the 2d_rf polygon to the hyetograph stored within the file 100yr2hr_rf.csv. Note that the input data is in mm versus hrs and not mm/hr versus hrs. The new bc_dabase should look like the figure below:
- Now we will change the inflow hydrographs applied to the river to a suitable baseflow amount. For inflows FC01 and FC02, change the source csv file from 100yr2hr.csv to baseflow.csv.
- Save the bc_dbase. It is now ready to be used within the model.

Conclusion
A GIS layer has been created to apply rainfall over the model extent. The existing boundary conditions database has been modified to link the polygon within this GIS layer to a hyetograph stored within an external csv file. The inflow hydrograph previously applied to the river has been substituted with a baseflow. Please return to the main page of module 8.