Difference between revisions of "NotepadPlusPlus Highlighting"
Jump to navigation
Jump to search
Chris Huxley (talk | contribs) |
m |
||
| Line 4: | Line 4: | ||
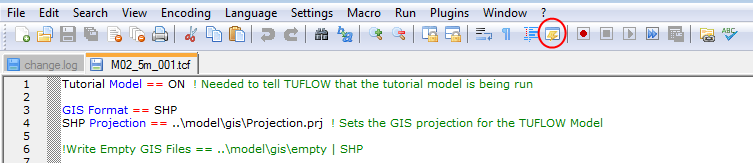
* Select the ''User Defined Dialogue'' (lightning symbol, circled in red below) from the menu toolbars. | * Select the ''User Defined Dialogue'' (lightning symbol, circled in red below) from the menu toolbars. | ||
[[File:NotepadPlusPlus UserDefinedDialogue.png | frame|none]] | [[File:NotepadPlusPlus UserDefinedDialogue.png | frame|none]] | ||
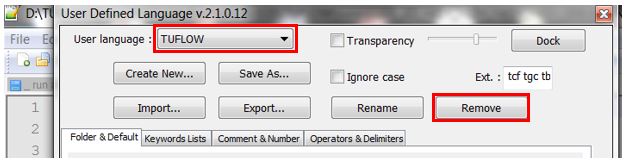
| − | * In the dialogue, select '''Import''' | + | * In the dialogue, select '''Import''' |
* Navigate to and select the Notepad++ syntax highlighting xml file. | * Navigate to and select the Notepad++ syntax highlighting xml file. | ||
* Restart Notepad++. | * Restart Notepad++. | ||
Revision as of 09:40, 12 May 2016
To enable the colour coding (syntax highlighting) in Notepad++:
- Ensure that you have downloaded the Notepad++ Syntax Highlighting File from the TUFLOW website (http://www.tuflow.com/Tuflow%20Utilities.aspx).
- Select the User Defined Dialogue (lightning symbol, circled in red below) from the menu toolbars.

- In the dialogue, select Import
- Navigate to and select the Notepad++ syntax highlighting xml file.
- Restart Notepad++.
- The colouring should now be associated with .tcf, .tgc, .tbc, .tmf and .ecf files.
Note: When updating the syntax highlighting file with a newer version, remember to first remove the existing "TUFLOW" language definition.
- Select "TUFLOW" for the user language options
- Select "Remove"

- Follow the above listed steps to install the new syntax highlighting file