QGIS TUFLOW Arch Bridge Editor
This Page is Currently Under Construction
The Interface
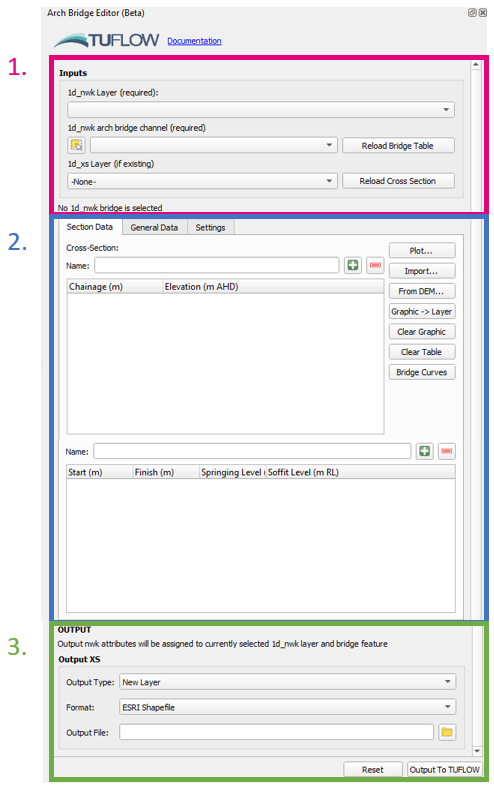
- GIS Inputs
- Location for providing 1d_nwk and 1d_xs inputs. The 1d_nwk layer and the bridge feature must already exist. It is not required that the arch bridge attributes are filled out, however the spatial geometry should be represented already (i.e. the polyline must already be drawn).
- The 1d_nwk layer should be selected in the first dropdown box, and the arch bridge feature in the second dropdown box. The arch bridge can be selected within the map window using the selection tool
(from within the arch bridge editor dock, not the standard QGIS tool). The tool will automatically find any 1d_xs features intersecting the bridge polyline if a 1d_xs layer is selected in the third dropdown box. If "-None" is selected in the third dropdown box, the tool will automatically create a 1d_xs layer.
- The text below the GIS inputs will provide the status on the GIS inputs e.g. Whether the tool has found any 1d_xs intersecting the arch bridge polylline.
- Arch Bridge Tables
- Location for viewing and editing the waterway cross-section and bridge tables. The tables will load automatically (if starting empty) if data is found in the GIS inputs. The tables can also be reloaded from the GIS inputs using the reload buttons next to the relevant GIS inputs.
- A name must be provided for both the cross-section and bridge tables.
- Numerous options are provided for creating/importing/editing/visualising the tables on the right-hand side of the cross-section table (these can be used for both tables).
- The "General Data" tab contains other possible parameters for arch bridge modelling in TUFLOW (see relevant section of the TUFLOW Manual / 2022 Release Notes).
