Difference between revisions of "Tutorial M11 002 GIS Inputs QGIS"
Jump to navigation
Jump to search
(→Method) |
(→Method) |
||
| Line 11: | Line 11: | ||
<ol> | <ol> | ||
<li>Load the the below layers from the '''Module_11\TUFLOW\model\gis''' folder into QGIS: | <li>Load the the below layers from the '''Module_11\TUFLOW\model\gis''' folder into QGIS: | ||
| − | :*1d_nwk_M11_bridges_002_L | + | :*'''1d_nwk_M11_bridges_002_L.shp''' |
| − | :*1d_nwk_M11_weirs_002_L | + | :*'''1d_nwk_M11_weirs_002_L.shp''' |
<li>Use the 'Apply TUFLOW Styles to Open Layers'. | <li>Use the 'Apply TUFLOW Styles to Open Layers'. | ||
<li>The 1d_nwk bridge layer represents a bridge in 1D at the upstream and downstream road crossing. Type attribute ‘BB’ is specified, only pier loss and submerged deck loss coefficients are required, all other losses are automatically calculated. | <li>The 1d_nwk bridge layer represents a bridge in 1D at the upstream and downstream road crossing. Type attribute ‘BB’ is specified, only pier loss and submerged deck loss coefficients are required, all other losses are automatically calculated. | ||
Revision as of 14:01, 21 April 2023
Introduction
QGIS is used to create, import and view input data.
Method
Navigate to the Module_11\Tutorial_Data folder. Copy and save the below layers into the Module_11\TUFLOW\model\gis folder:
- 1d_nwk_M11_bridges_002_L
- 1d_nwk_M11_weirs_002_L
Investigate the supplied files:
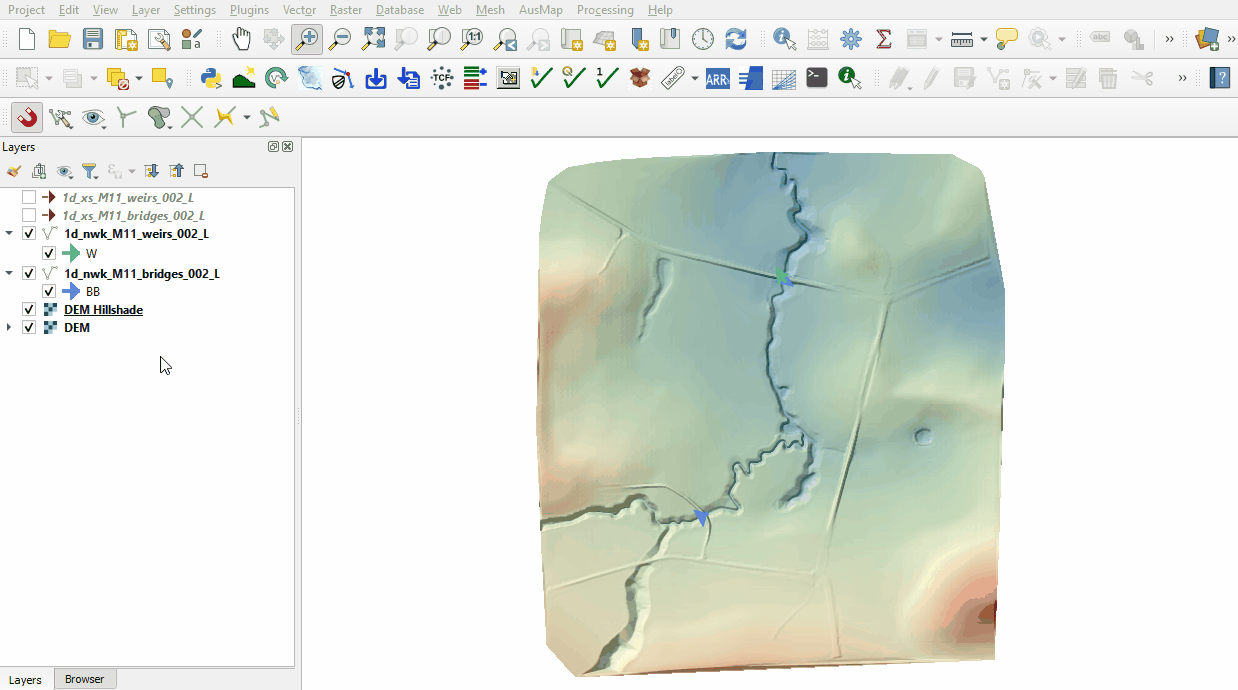
- Load the the below layers from the Module_11\TUFLOW\model\gis folder into QGIS:
- 1d_nwk_M11_bridges_002_L.shp
- 1d_nwk_M11_weirs_002_L.shp
- Use the 'Apply TUFLOW Styles to Open Layers'.
- The 1d_nwk bridge layer represents a bridge in 1D at the upstream and downstream road crossing. Type attribute ‘BB’ is specified, only pier loss and submerged deck loss coefficients are required, all other losses are automatically calculated.
- The 1d_nwk weir layer represents a weir for flow over the bridge in 1D at the downstream road crossing. Type attribute 'W' is specified, the weir is based on the broad crested weir formula:
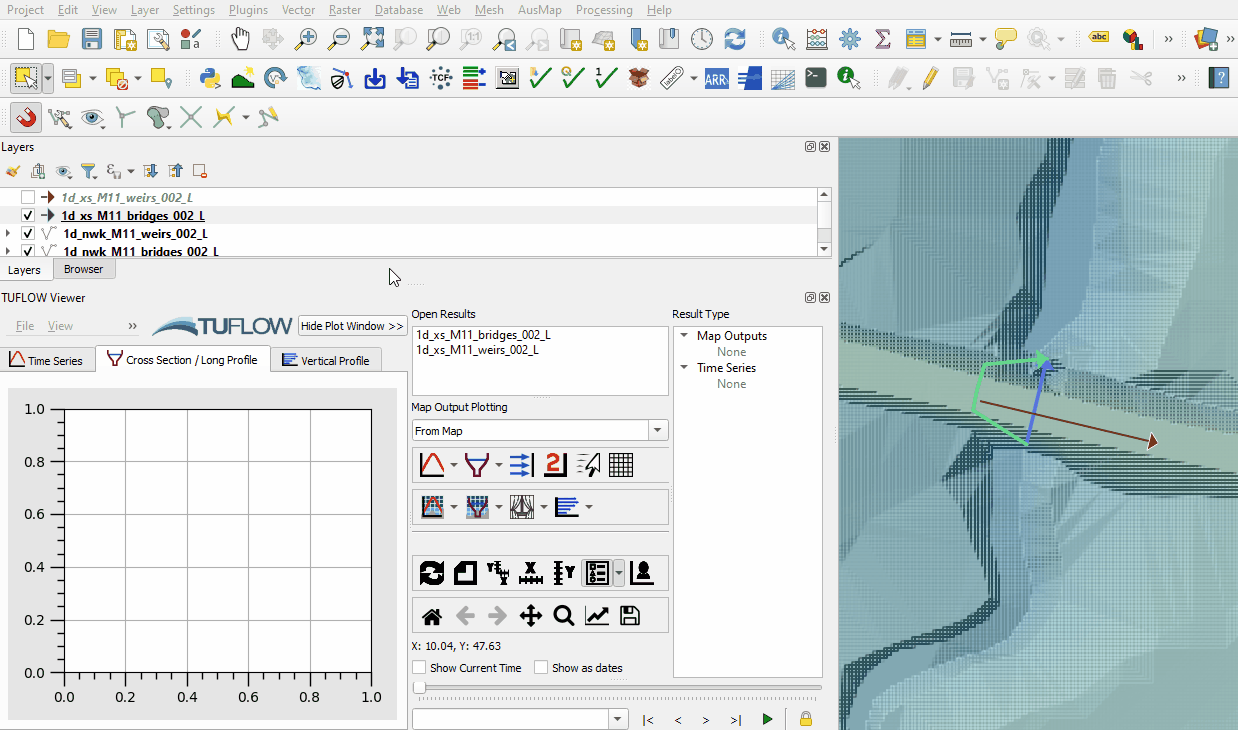
- Load the the below layers from the Module_11\TUFLOW\model\xs folder into QGIS:
- 1d_xs_M11_bridges_002_L
- 1d_xs_M11_weirs_002_L
- Use the 'Apply TUFLOW Styles to Open Layers'.
- Use the TUFLOW Viewer to view the 'HW' (height vs width) cross section of the bridges and 'XZ' (distance vs elevation) cross section of the weir.
Note: If a 1d_xs line has only two nodes, it must intersect with the 1d_nwk it provides information for. If a line has more than two nodes, it must be snapped to the 1d_nwk. The tutorial shows both.


Increment the 1d_nwk layer to remove both culverts contained within the main channel. They are replaced by a bridge (upstream) and bridge and weir (downstream):
- Navigate to the Module_11\model\gis folder and open the 1d_nwk_M03_culverts_001_L in QGIS.
- Select the 1d_nwk_M03_culverts_001_L layer in the Layers panel.
- Click on the ‘Increment Selected Layer’ symbol from the TUFLOW Plugin toolbar.
- Manually change the name from '1d_nwk_M03_culverts_001_L' to '1d_nwk_M11_culverts_002_L'.
- Select to 'Remove Source Layer from Workspace' and click 'OK'.
- The tool removes the source layer from the Layers panel and the 1d_nwk_M11_culverts_002_L appears.
- Use the 'Apply TUFLOW Styles to Open Layers'.
- Right click on the layer to toggle on Editing.
- Open the attribute table and delete both 'R' type culverts.
- Click 'OK' and turn off editing to save the edits.


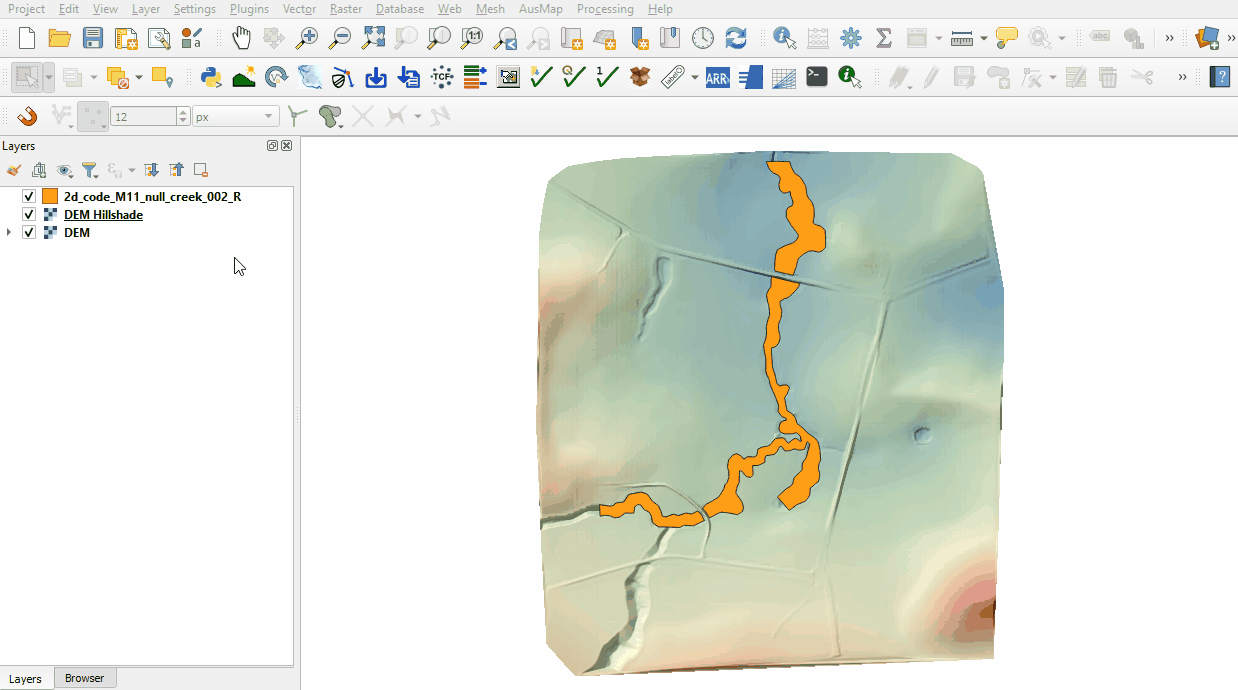
Increment the code layer to change active and inactive areas at the downstream road where 1D weir is used instead of 2D overtopping:
- Navigate to the Module_11\model\gis folder and open the 2d_code_M11_null_creek_001_R in QGIS.
- Select the 2d_code_M11_null_creek_001_R layer in the Layers panel.
- Click on the ‘Increment Selected Layer’ symbol from the TUFLOW Plugin toolbar.
- The tool automatically renames the '2d_code_M11_null_creek_001_R' to '2d_code_M11_null_creek_002_R'.
- Select to 'Remove Source Layer from Workspace' and click 'OK'.
- The tool removes the source layer from the Layers panel and the 2d_code_M11_null_creek_002_R appears.
- Use the 'Apply TUFLOW Styles to Open Layers'.
- Zoom to the downstream road crossing and right click on the layer to toggle on Editing.
- Click on the 'Add Polygon Feature' tool and draw a polygon snapped to the existing polygons.
- Set the attribute as '0'.
- Click 'OK' and turn off editing to save the edits.

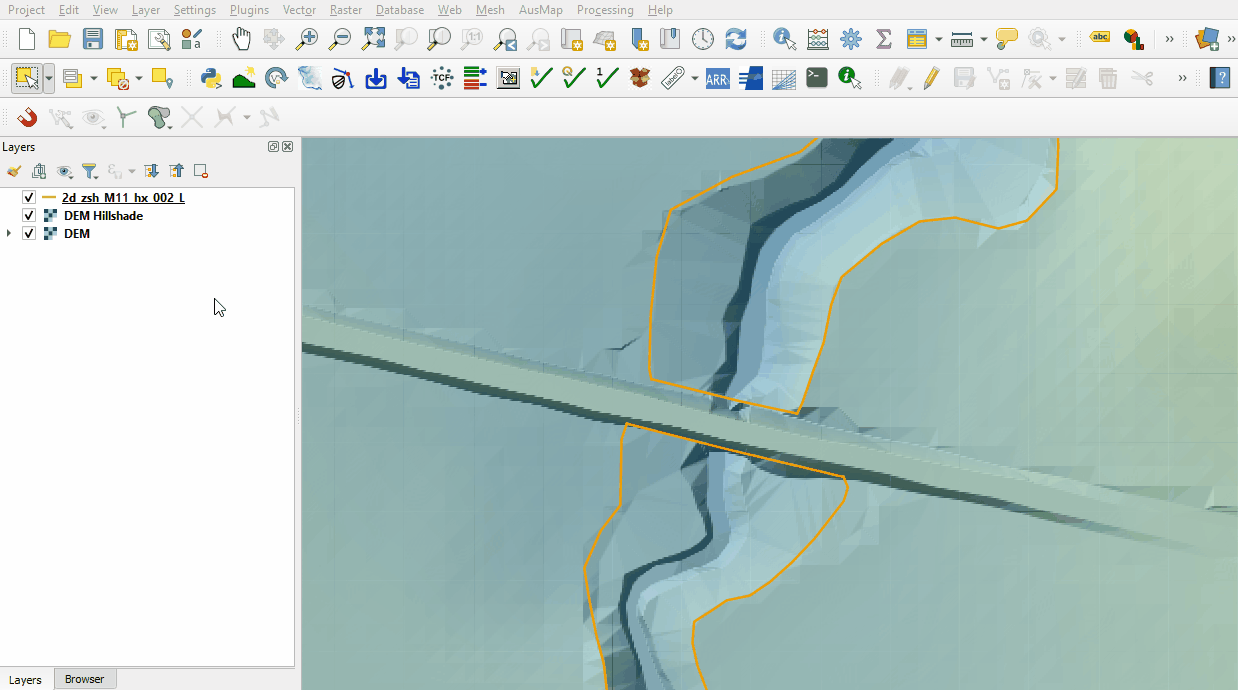
Increment the Z shape layer to change the elevation of the river banks at the downstream road:
- Navigate to the Module_11\model\gis folder and open the 2d_zsh_M11_hx_001_L in QGIS.
- Select the 2d_zsh_M11_hx_001_L layer in the Layers panel.
- Click on the ‘Increment Selected Layer’ symbol from the TUFLOW Plugin toolbar.
- The tool automatically renames the '2d_zsh_M11_hx_001_L' to '2d_zsh_M11_hx_002_L'.
- Select to 'Remove Source Layer from Workspace' and click 'OK'.
- The tool removes the source layer from the Layers panel and the 2d_zsh_M11_hx_002_L appears.
- Use the 'Apply TUFLOW Styles to Open Layers'.
- Zoom to the downstream road crossing and right click on the layer to toggle on Editing.
- Delete the two HX lines that intersect with the creek and digitise two new HX lines joining the existing lines following the bank.
- Set the 'Shape_Option' attribute as 'MAX'.
- Click 'OK' and turn off editing to save the edits.

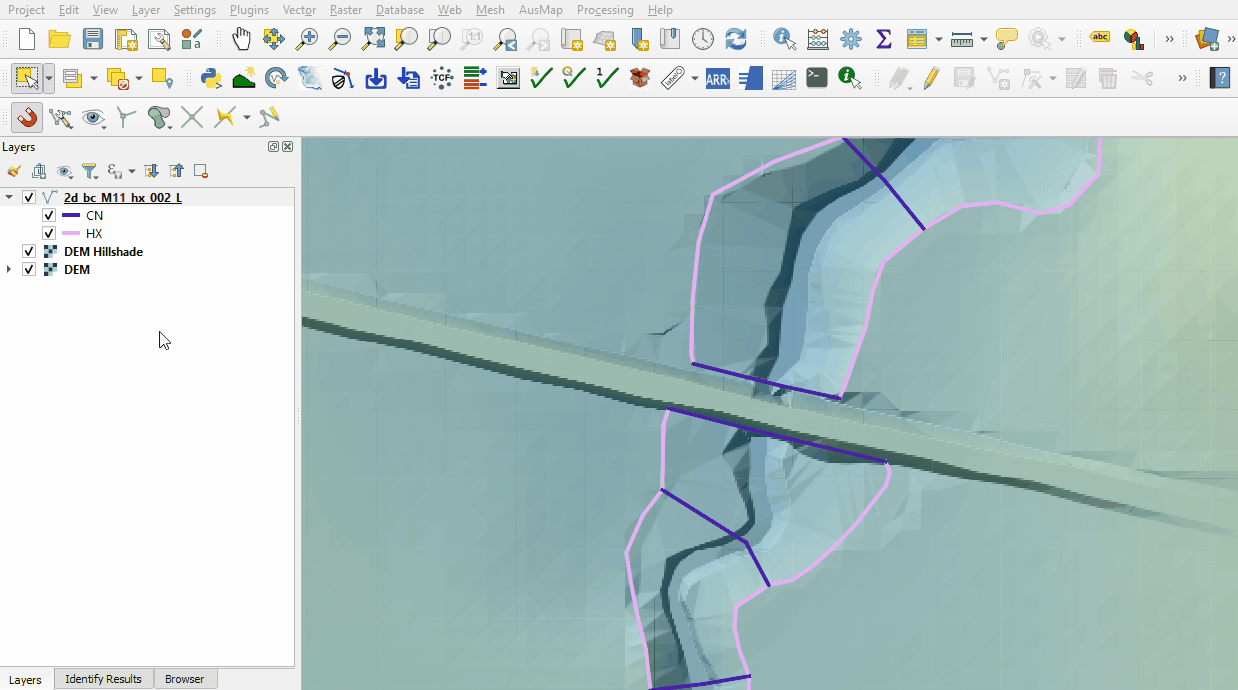
Increment the boundary condition layer to change the HX boundary at the downstream road:
- Navigate to the Module_11\model\gis folder and open the 2d_bc_M11_hx_001_L in QGIS.
- Select the 2d_bc_M11_hx_001_L layer in the Layers panel.
- Click on the ‘Increment Selected Layer’ symbol from the TUFLOW Plugin toolbar.
- The tool automatically renames the '2d_bc_M11_hx_001_L' to '2d_bc_M11_hx_002_L'.
- Select to 'Remove Source Layer from Workspace' and click 'OK'.
- The tool removes the source layer from the Layers panel and the 2d_bc_M11_hx_002_L appears.
- Use the 'Apply TUFLOW Styles to Open Layers'.
- Zoom to the downstream road crossing and right click on the layer to toggle on Editing.
- Water from 1D does not transition to 2D at this location anymore, delete the two HX lines intersecting the open channel. The water at the 1D channel node is transferred to the banks by the CN lines, all four CN lines remain:
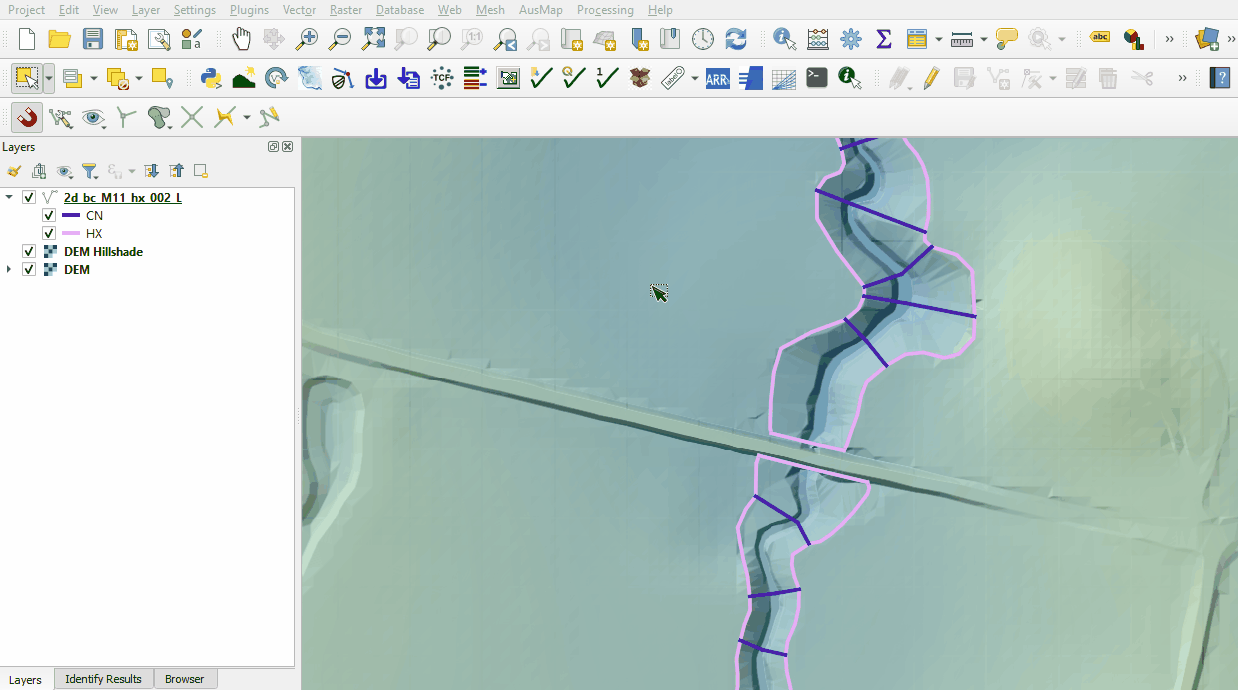
- Create new HX lines connecting the current HX lines on the banks of the open channel:
- Click 'OK' and turn off editing to save the edits.


Conclusion
- Two bridges were set up in 1D replacing two culverts within the open channel. The upstream bridge overtops into the 2D domain, the downstream bridge overtops into a 1D weir.
- The active area, banks elevation and boundary condition layers were updated to model the downstream bridge overtopping in 1D.
| Up |
|---|