TUFLOW CATCH Tutorial M02 GIS Inputs QGIS
Introduction
An interventions (2d_im) layer is created to remove pollutants from the run off around the paddocks and within the waterway.
TUFLOW CATCH Project Re-Configuration
Re-configure the TUFLOW CATCH project to use and save empty files to the correct folders:
- Go to Processing > Toolbox from the top drop down menu options to open the Processing Toolbox.
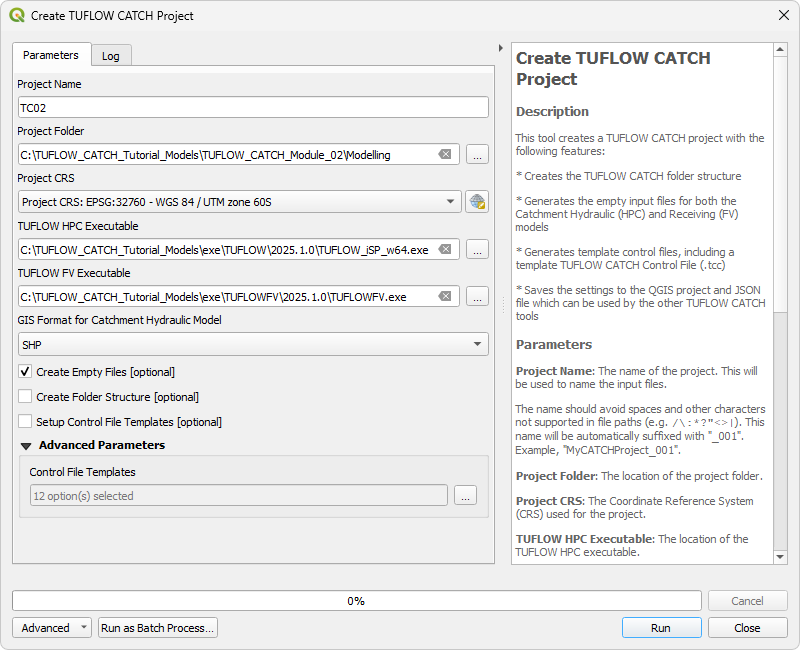
- Go to TUFLOW Catch in the processing tool list and select 'Create TUFLOW Catch Project'. This opens the dialog shown below.
- Project Name: TC02
- Project Folder: Click '...', and navigate to the TUFLOW_CATCH_Module_02\Modelling folder.
- Project CRS: Click the drop down menu and select 'Project CRS: EPSG:32760 - WGS 84 / UTM zone 60S’.
- TUFLOW HPC Executable: Click '...', and navigate to the exe\TUFLOW\2026.0.0 folder. Select TUFLOW_iSP_w64.exe.
- TUFLOW FV Executable: Click '...', and navigate to the exe\TUFLOWFV\2026.0.0 folder. Select TUFLOWFV.exe.
- Default GIS Format: Click the drop down menu and select 'SHP'.
- Tick on 'Create Empty Files'.
- Click 'Run' and a console window will open. This creates the empty GIS files.
- Once the tool has finished, click 'Close'.
- Set up the QGIS workspace by setting the projection to EPSG:32760, loading and styling the DEM and saving the workspace. See TUFLOW CATCH Module 01 - Project Initialisation for details.

Create Interventions
An interventions (2d_im) layer contains one or more lines, called intervention devices. These intervention devices may represent constructed wetlands, bioretention systems, grassed swales, riparian revegetation strips or similar features. In the TUFLOW CATCH Control file, each device is assigned mass removal properties, which can be defined and adjusted on a pollutant by pollutant basis. The location and orientation of each device is specified via lines in the 2d_im layer.
Create the 2d_im layer using the TUFLOW CATCH plugin:
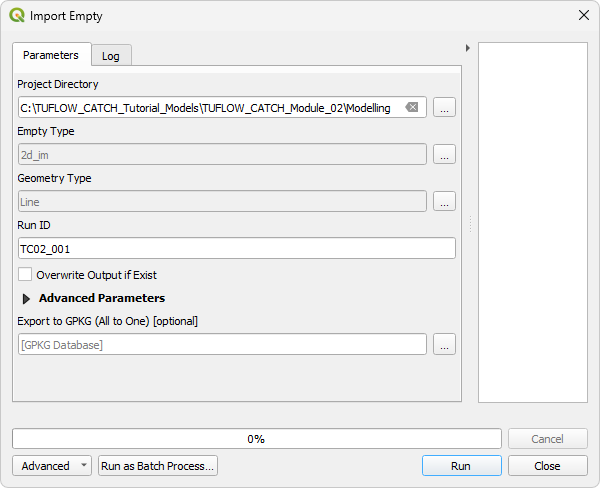
- In the Processing Toolbox, go to TUFLOW Catch in the processing tool list and select 'Import Empty'. This opens the dialog shown below.
- Project Directory: This should automatically be set to the TUFLOW_CATCH_Module_02\Modelling folder.
- Empty Type: Click ..., and tick on '2d_im' from the empty type list.
- Geometry Type: Click ..., and tick on 'Line'.
- Run ID: TC02_001
- Click 'Run'. Once the tool has finished, click 'Close'. The 2d_im_TC02_001_L will appear in the QGIS Layers panel.
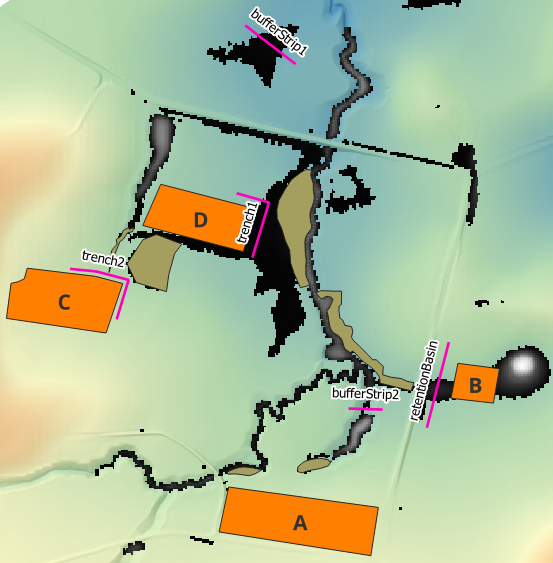
To help determine where the intervention devices should be placed, load in the following files:
- 2d_mat_TC01_001_R.shp from the TUFLOW\model\gis folder
- TC01_001_catchment_hydraulic_d_Max.tif from the TUFLOW_CATCH_Module_01\Modelling\TUFLOWCATCH\results\grids folder
Create interventions:
- In the QGIS Layers panel, select (left click) 2d_im_TC02_001_L and toggle on editing.
- Select 'Add Line Feature'.
- Digitise a line around the corner of the paddock with material ID 9 (paddockD). Use the right mouse button to terminate the line and an attributes dialog will appear. Set the ID to 'trench1' and click 'OK'.
- Repeat the same process as above to digitise a line between the road and the paddock with material ID 7 (paddockB). Set the ID to 'retentionBasin'.
- Zoom in to the downstream end of the model. Use the TC01_001_catchment_hydraulic_d_Max.tif to determine where the water will be flowing. Using the same process as above, digitise a line perpendicular to the water on the western side of the stream. Set the ID to 'bufferStrip1'.
- Create two more intervention devices with ID's 'trench2' and 'bufferStrip2'. Use the image below as a guide.
Note: To style the interventions, use the "Apply TUFLOW Styles to Open Layers" and the "Apply Label to Current Layer"
  tools from the TUFLOW Plugin toolbar.
- Once all the intervention devices have been created, turn off editing to save the edits.

| Up |
|---|