Tute M01 Inspect Zpts QGIS Archive
- Speed, direct input of the DEM to TUFLOW, is much faster than the process outline below; and
- Flexibility, if the cell size of the TUFLOW model is changed, the process below will need to be repeated, for a direct input of DEM or TIN, this is not necessary.
- Open QGIS and ensure that the DEM is open, the DEM can be found in the Module_Data\DEM\QGIS\ directory.
- Open the blank Zpt layer 2d_zpt_M01_5m_002_P.shp, this was written in the TUFLOW\Model\gis\ directory. The Zpts will appear as a mass of points when zoomed to the full extent. The zpts should appear as per the image below. Tip: The layer can be added be either using the Layer >> Add Vector Layer dialogue, using the shortcut keys Control + Shift + V, or by dragging the 2d_zpt_M01_5m_002_P.shp from windows explorer onto the Layers area of QGIS.
- Ensure that the point sampling tool plugin is installed. Instructions on installing this can be found on the QGIS Point Sampling Tips page.
- Start the plugin, by selecting Plugins >>> Analyses >>> Point Sampling Tool.
- In the Point Sampling Tool Dialogue:
- Ensure that the layer containing sampling points is set to 2d_zpt_M01_5m_002_P.
- Set the output point vector layer to \TUFLOW\model\gis\2d_zpt_M01_5m_003_P.shp.
- Select the following layers 2d_zpt_M01_5m_002_P : n, 2d_zpt_M01_5m_002_P : m, 2d_zpt_M01_5m_002_P : type and DEM_M01 : band 1 (the Elevation from the source point is omitted as this contains only null elevations).
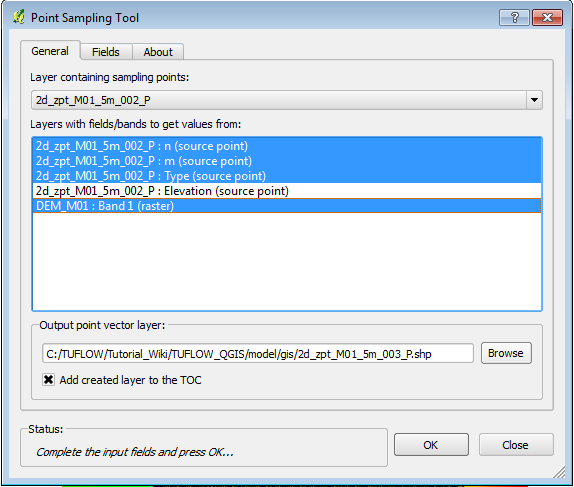
- Select OK to begin the inspection, the progress should be shown in the "Status" section of the dialogue as below. This inspection may take a while.
- Once the inspection has been completed, we need to remove any elevation point (Zpts) where the points are outside the extent of the DEM. During the inspection process these points were given the DEM_M01 value of Null or 0.
In order to select the points with a DEM_M01 value of zero, right click on the 2d_zpt_M01_5m_003_P entry in the layers table of contents and select Open Attribute Table. - In the Attribute Table dialogue:
- Set the layer to be editable using the toggle editing button which is shaped like a blue pen;
- Type "Null" (without the quotes) into the "Look For" section, at the bottom of the dialogue; and
- Set the field to look for "Null" to be DEM_M01, using the drop down box.
- After a few seconds, the "Null" entries should be highlighted, select the Delete Selected Features (Control + D) option.
- You will be prompted to confirm the delete, the items to be deleted will be highlighted. There should be 10,969 features to be deleted. Select OK to confirm.
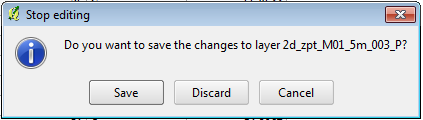
- The delete process may take a minute, once completed, select the "Toggle Editing" button to complete the edits. When prompted select, Save.
We have now updated the GIS layer, the next step is to modify the TUFLOW geometry control file to read the new shapefile.
- Save the current TGC file as M01_5m_003.tgc. Comment out or delete the Write MI and Stop lines entered previously (these are no longer needed).
- Add the following lines to the TGC file and save. Set Zpts == 75
Introduction
In this page we look at the process on assigning elevations to the TUFLOW Zpts that define the elevations in the model using QGIS. In this process we will open a shapefile containing all of the Zpts and then inspect the elevations from a DEM.
The process is similar to the process in QGIS, MapInfo and ArcGIS. However, this process is significantly slower in QGIS, taking approximately 30 minutes. Therefore, it is recommended that direct input of DEM is used instead. Direct input of the DEM has the following benefits:
The process of inspecting the Zpts in QGIS is outlined below for completeness.
Method


Read RowCol Zpts == ..\model\gis\2d_zpt_M01_5m_003_P.shp
Conclusion
The Zpts have been inspected from the DEM, the geometry control file (.tgc) updated to use the inspected Zpts. Please return to the tutorial model module 1 page where the next step is to define the active areas.