Tute M02 QGIS 1d nwk Archive
Jump to navigation
Jump to search
- In QGIS open the aerial photo and DEM layers as used in Module 1 (these are located in the Module_Data directory).
- Open the Culverts_L.shp layer in the Module_Data\Module_02\GIS\ Folder. In this module three culverts will be added to the model. The locations for these are provided in the Culverts_L layer. These are under the three roads, which were acting as dams in the module 1 results. We will add these to a new 1d_nwk layer, to do this we firstly import the empty or template file type:
- Open the 1d_nwk_empty_L template (empty) file from TUFLOW\model\gis\empty\ directory.
- Save a copy of this file as 1d_nwk_M02_Culverts_001_L.shp remembering to save this into the TUFLOW\model\gis\ folder (as it will no longer be an empty file). Remove the 1d_nwk_empty_L file and open the newly created 1d_nwk_M02_Culverts_001_L.
- Select the 1d_nwk_M02_Culverts_001_L layer and toggle the editing.
- In the layers dialogue, select the Culverts_L item, use the selection tool to select all three culverts. Select Edit >>> Copy Features. Navigate to the 1d_nwk_M02_Culverts_001_L item in the layers section and paste the culverts into this layer (Edit >>> Paste Features).
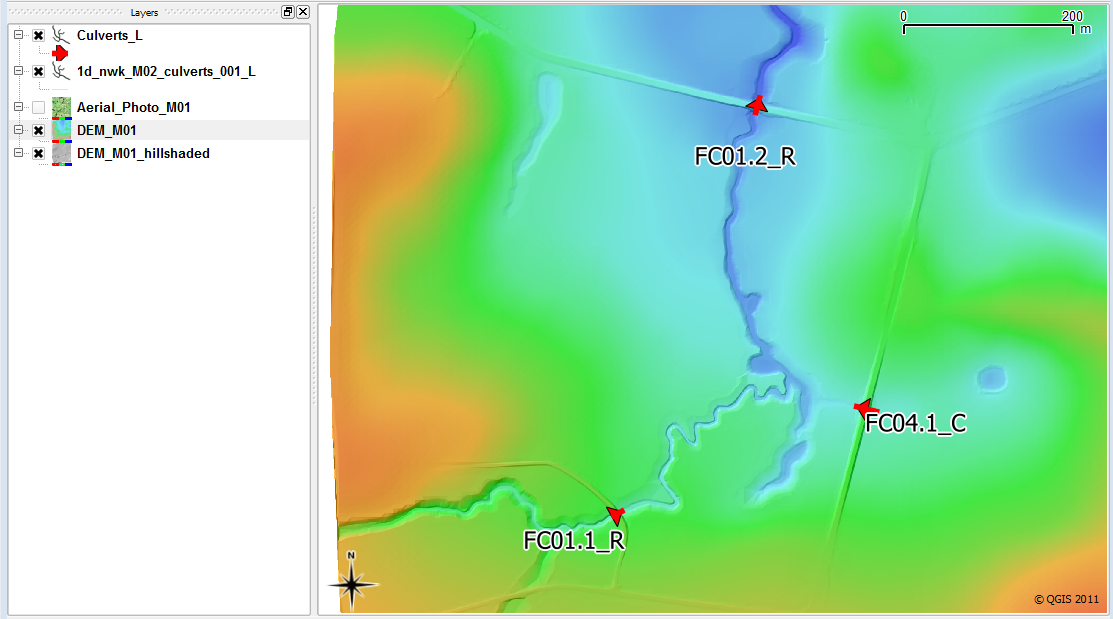
- The locations of the culverts and culvert ID's are shown in the image below.
- Enter the details shown in the table below each of the 3 culverts. To enter the details, ensure the layer is still editable and then either:
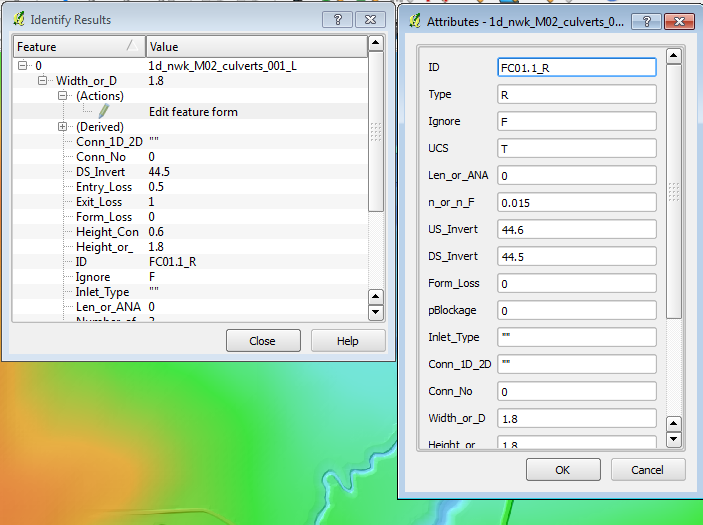
- Use the identify feature, to select a culvert, expand the Actions item and select Edit Feature Form. The details can then be entered at the dialogue (see 1st image below table); or
- Right click on the 1d_nwk_M02_Culverts_001 item in the layers section and select Open Attribute Table, this brings up a table for all of the items. The ID should have been copied across when these were copied. This is shown in the second image below the table.
TABLE OF CULVERT ATTRIBUTES
- Stop editing the layer by using the Toggle Editing button. When prompted, save the 1d_nwk_M02_culverts_001_L shapefile.
Introduction
This page details the method for using QGIS to create the GIS based culvert input. For this input we will use a 1d_nwk type TUFLOW input (1d network).
Method

| GIS Attribute | Culvert FC01.2_R | Culvert FC04.1_C | Culvert FC01.1_R |
|---|---|---|---|
| ID | FC01.2_R | FC04.1_C | FC01.1_R |
| Type | R | C | R |
| Ignore | F | F | F |
| UCS | T | T | T |
| Len_or_ANA | 10 | 20 | 7 |
| n_or_n_F | 0.015 | 0.015 | 0.015 |
| US_Invert | 37.6 | 43.35 | 44.6 |
| DS_Invert | 37.5 | 32.75 | 44.5 |
| Form_Loss | 0 | 0 | 0 |
| pBlockage | 0 | 0 | 0 |
| Inlet_Type | |||
| Conn_1d_2d | |||
| Conn_No | 0 | 0 | 0 |
| Width_or_Dia | 2.4 | 1.2 | 1.8 |
| Height_or_WF | 1.2 | 0 | 1.8 |
| Number_of | 5 | 3 | 3 |
| Height_Cont | 0.6 | 0.6 | 0.6 |
| Width_Cont | 0.9 | 0.9 | 0.9 |
| Entry_Loss | 0.5 | 0.5 | 0.5 |
| Exit_Loss | 1 | 1 | 1 |


Conclusion
The 1d_nwk_M02_culverts_001_L shapefile is ready for input into our TUFLOW model. The next step is to link the culverts with the 2D model, this step is detailed here.