Tute M04 Arc 2d bc hx Archive
Jump to navigation
Jump to search
Introduction
In this section we will create the 1D/2D links for the open channel. As described in the previous page, this consists of a 1D/2D link in the 2d_bc with type "HX" and a series of connection lines which connect the 1D computation points (nodes) to the HX line. For this tutorial the HX lines and a sample of the "CN" lines have been provided.
Method
- Ensure the 1d_nwk_M04_channels_001_L from the previous step is open, and that snapping to end, vertices and points is enabled in ArcMap.
- Copy the 2d_bc_M04_HX_001_L files from the Module_Data\Module_04\ folder and into the TUFLOW\model\gis\ folder you are working in. Open the 2d_bc_M04_HX_001_L.lyr file in ArcMap. This layer file contains different colouring for the "HX" and "CN" lines contained in the shapefile.
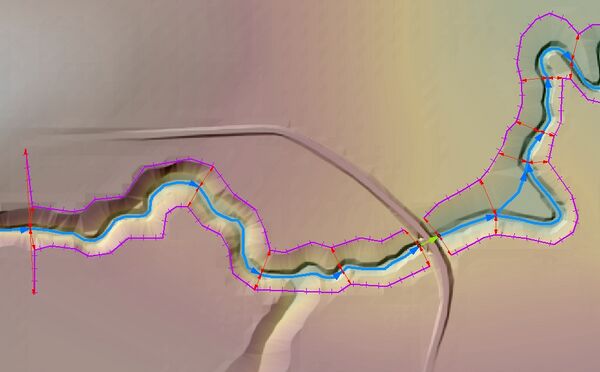
- Zoom into the upstream end of the creek channel (south western edge of the model). Make the 1d_nwk_M04_channels_001_L and 2d_bc_M04_HX_001_L visible. The HX line is shown as a purple line with cross-markers, the first CN connection has been digitised as a red line.
- Digitise a new line from the end of the channel to the end of the HX line as shown below. You may need to create a template for creating features in ArcMap. This will automatically populate the "Type" attribute to "CN" when you digitise the the line. Alternatively, if you are using an older version of ArcMap update the newly digitised lines when you have finished all digitising. To update these we would select features with a blank "Type" and update these to "CN". This is a similar process to that we used to populate the channel type in the previous step.
- As the upstream HX lines extend out perpendicular to the flow direction, we want to apply the same water level along this section. This allows water to flow onto the floodplain if the flow exceeds the capacity of the channel. Digitise two more lines from the end of the same channel to the HX line at the top of bank. This is shown in the image below.
- The CN connections at the end of the next channel have been digitised for you. Continue to digitise the CN lines that connect the HX line to the end of each channel. At the end of each channel there should be two CN lines, one from the end of the channel to the left bank HX line and one from the end of the channel to the right bank HX line. Continue this process to the downstream end of the model. Note some have already been digitised. If you get stuck please review the version provided in the Complete_Model folder of the download.
- Stop editing the layer and save the edits. This file is now ready for input into TUFLOW. Now that the we are modelling the creek in 1D, we need to remove the 1D/2D connection for the northern culvert (Culvert ID = FC01.2_R). The connections for this culvert were in a separate GIS layer 2d_bc_M02_culv_001_L.shp, so we can remove these by commenting this layer out of the TUFLOW Boundary Control File (.tbc). If we had other connections in this layer and only wanted some of them, the process would be to make a copy of the layer, rename and edit the new layer. This would ensure that the previous version was unchanged in case we needed to re-run an older version of the model.


The final configuration at upstream end of the creek has four CN lines connected to the HX lines.


Conclusion
The 2d_bc layer is now ready for input into TUFLOW. Please return to the tutorial where the next step is to define breaklines along the 1d/2d connections.