Tutorial M04 002 GIS Inputs QGIS GPKG
(Redirected from Tutorial M04 002 GIS Inputs QGIS GPKG draft)
Jump to navigation
Jump to search
Introduction
QGIS is used to create, import and view input data.
TUFLOW Project Re-Configuration
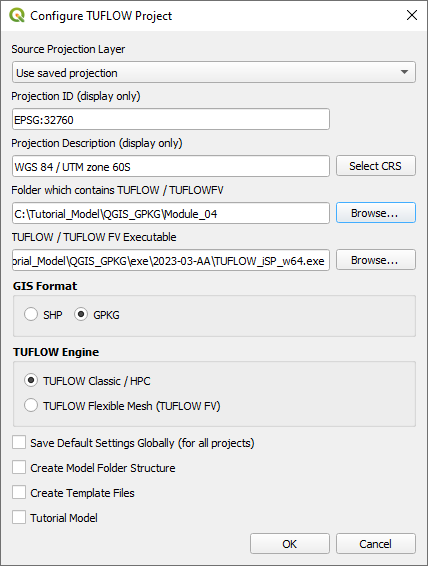
Re-configure the TUFLOW project to use and save empty files to the correct folder:
- Go to Plugins > TUFLOW > Editing > Configure / Create TUFLOW Project.
- Change the folder which contains TUFLOW to the Module_04 folder. This is the only change required, the model folder structure and template empty files are supplied from previous model.
Note: The 'results' and 'check' folder get automatically created when the TUFLOW model is run.
- Click 'OK' and save the QGIS workspace by selecting Project > Save As.
- Set the QGIS workspace projection to EPSG:32760, see Set the Projection.
Method
Set up the GeoPackage Database:
- Navigate to the Module_04\TUFLOW\model\gis folder. Save a copy of M04_001.gpkg as M04_002.gpkg.
- Within the QGIS Browser Panel, right click on 'Favorites' and select 'Add a Directory...'.
- Navigate to the Module_04 folder and select it.
Within the QGIS Browser Panel, navigate to the Module_04\Tutorial_Data folder. Drag and drop the following layer into the Module_04\TUFLOW\model\gis\M04_002.gpkg:
- 2d_bg_M04_002_L
Investigate the supplied files:
- Open the 2d_bg_M04_002_L file, either:
- Within the QGIS Browser Panel, navigate to M04_002.gpkg and double click the layer, or
- In File Explorer, drag and drop the M04_002.gpkg into the QGIS workspace and select the layer (hold Ctrl to select multiple).
- Use the ‘Apply TUFLOW Styles to Open Layers’.
- The 2d_bg represents the bridge in 2D, it has layers of varying blockage and form loss for the “pier layer” and the “super structure layer”, which consists of the “deck layer” and the “rail layer”.
Refer to the TUFLOW Manual for more information on the attributes of the 2d_bg layer.
Conclusion
- The 2d_bg layer was supplied for use as a 2D bridge.
| Up |
|---|
