Tutorial M01 Configure TUFLOW Project QGIS
Jump to navigation
Jump to search
Introduction
QGIS is used to configure TUFLOW project with the TUFLOW plugin. For installation, see Installation of TUFLOW Plugin.
TUFLOW Project Configuration
The TUFLOW plugin is used to configure the TUFLOW project. This includes specifying the model and executable file paths, defining the GIS projection (i.e. the geographic coordinate system used for the TUFLOW model, all inputs need to use the same projection) and writing GIS empty files for model inputs:
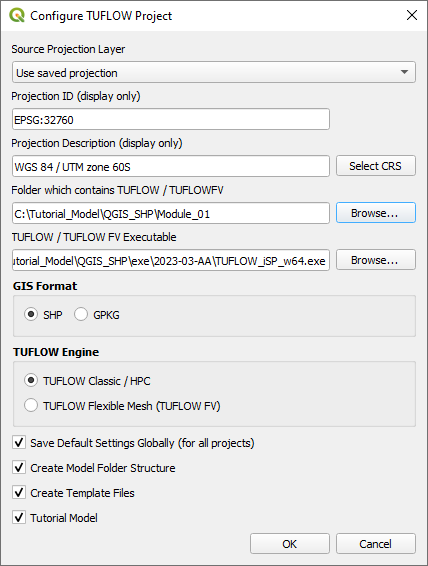
- Open the 'Configure TUFLOW Project' tool by selecting Plugins > TUFLOW > Editing > Configure / Create TUFLOW Project.
- Click 'Select CRS' and use the filter to select: WGS 84 / UTM zone 60S.
- Click 'Browse...' to select the folder location containing the TUFLOW folder. This creates the default TUFLOW model directory and sub-folders.
- Click 'Browse...' to select the location of the TUFLOW single precision executable file.
- Select 'SHP' as the GIS Format.
- Select 'TUFLOW Classic / HPC' as the TUFLOW Engine.
- Tick all box options:
- 'Save Default Settings Globally (for all projects)': The settings configured by this window sets the default for opening a new QGIS workspace.
- 'Create Model Folder Structure': The TUFLOW sub-folders (e.g. bc_dbase, model, runs) are made within the Module_01\TUFLOW folder. The check and results folder are automatically created when running the first TUFLOW model.
- 'Create Template Files': This creates an 'empty' folder in Module_01\TUFLOW\model\gis folder. It contains all the TUFLOW template files in the projection set above. It is important to create new template files for each project to ensure the projection is correct.
- 'Tutorial Model': Sets a command within the automatically generated TCF instructing TUFLOW to run the tutorial model licence free.
- Click 'OK' and a TUFLOW console window opens. This runs the first part of a TUFLOW model initialisation and creates TUFLOW folder structure, projection file, TUFLOW empty GIS files and base TCF file called Create_Empties.tcf.

Save QGIS Workspace
Save the QGIS workspace by selecting Project > Save As. Navigate to the Module_01 folder and type M01 as the filename with the extension .qgz.
Conclusion
- The Configure TUFLOW Project tool was used to set up TUFLOW model folders, define the GIS projection and write GIS empty files.
| Up |
|---|