Difference between revisions of "QGIS ARR to TUFLOW"
Ellis Symons (talk | contribs) |
Ellis Symons (talk | contribs) |
||
| Line 29: | Line 29: | ||
<li> Choose an output location<br> | <li> Choose an output location<br> | ||
[[File: ARR_dialog_output_location.PNG | 500px]]<br> | [[File: ARR_dialog_output_location.PNG | 500px]]<br> | ||
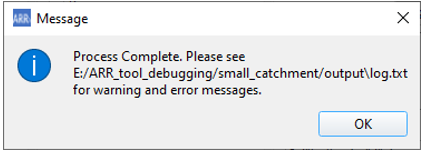
| − | <li> Click '''OK''' and wait for the tool to finish | + | <li> Click '''OK''' and wait for the tool to finish<br> |
| + | [[File: ARR_tool_complete_dialog.PNG | 450px]] | ||
</ol> | </ol> | ||
Revision as of 22:27, 10 May 2021
The ARR to TUFLOW utility has been developed to help users set up a TUFLOW model that uses Australian Rainfall and Runoff (ARR) input parameters and the Austalian Bureau of Meteorology (BOM) rainfall by automating the collection and processing of the data. The inputs and outputs of the tool are explained in detail below. Note: this tool helps with data processing however is not a substitute to reading ARR. Similarly this wiki page discusses the use of the tool and the options, however context should be derived from ARR directly. Please see the ARR Website for more information.
Getting Started
Installation
The ARR to TUFLOW tool is a free tool that comes as part of the TUFLOW plugin in QGIS. For instructions on how to install the plugin, read the following wiki page:
How to install the TUFLOW plugin
There are also instructions on installing plugins in the QGIS documentation - if you choose to follow the QGIS documentation, the plugin is called "TUFLOW" in the repository:
Link to QGIS Documentation - Installing and Managing Plugins
QGIS Version
The ARR to TUFLOW tool is, for the most part**, a Python tool that runs independently of QGIS. Therefore the installed QGIS version should not be a significant factor, however occasionally QGIS will update the Python version in the installation. This does present a small risk that the tool will break with QGIS version, although it's considered unlikely (the risk of the tool being broken by updates to the ARR datahub would be higher). If the tool does break, please see The Tool Isn't Working for information (the solution is most likely to update the plugin rather than reinstall an older version of QGIS).
**The tool does use QGIS for pre-processing tasks, such as area and centroid calculation as well as reprojection or cartesian to long-lat conversion.
Opening The ARR to TUFLOW Tool
Once the TUFLOW plugin is installed, the ARR to TUFLOW tool can be opened by clicking the following icon in the plugin toolbar:

Quickstart
- Load a catchment GIS into QGIS - this can either be a polygon or point layer
- Open the ARR to TUFLOW tool
- Select the GIS catchment layer in Input Catchment File dropdown box

- Select the attribute field to use as the catchment name in the Unique Catchment Identifier Field dropdown

- Select storm events from the list of magnitudes and durations
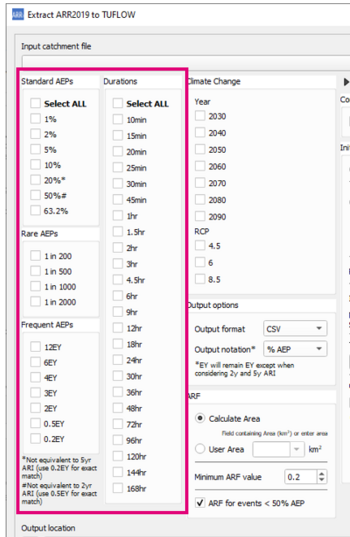
- Choose an output location

- Click OK and wait for the tool to finish


How to Run
This tool is a part of the QGIS plugin tool set and can be initiated through the plugin.
500px
300px
- Input GIS catchment layer:
Catchment layer to extract data for. The tool will use the geographical location of the catchment layer for data extraction from the ARR2016 datahub and BOM 2016 rainfall. The catchment layer is able to have multiple features (i.e. a number of subcatchments) and will extract data for each feature.This layer can be either a point or polygon layer. For polygon layers, the polygon centroid is used for geographical data extraction, and the area is used for ARF calculations. For point layers, ARF calculations cannot be automated.
- Unique Catchment Identifier:
The unique catchment identifier is used as the name for the inflow in the TUFLOW model. When extracting data for multiple subcatchments, it is important to have unique identifiers otherwise data will be overwritten if identical names have been used.
- Event Selection:
Select at least one event magnitude and one event duration.
- Climate Change Selection:
Optional climate change parameters. If choosing to include climate change, one year and one RCP must be selected.
- Output Options:
Output options include:- Selecting the format of the inflow files (*.csv or *.ts1)
- Selecting the output notation#:
- % AEP - e.g. 10p60m
- yr ARI - e.g. 10y60m
- # Frequent events (EY) will be denoted with e regardless of above options e.g. 12e60m. The only exception is the 0.5EY and 0.2EY which will be converted to 2y and 5y respectively when using yr ARI
- Areal Reduction Factor:
Choose the method of area calculation for the ARF:- Calculate area from input catchment - the area will be calculated automatically using QGIS (this option can only be used with polygon input layers)
- Manually Specify Area by attribute field - the area can be specified using an attribute field in the input GIS layer. The field containing the area values can be selected using the dropdown box
- To ignore ARF, use Manually Specify Area and select -None- in the dropdown box
- Optional additional temporal patterns
The tool allows the option of adding additional temporal patterns from other regions. This could be useful if your site is on the border of multiple regions and sensitivity with neighbouring temporal patterns is required. The option allows selection of as many additional temporal patterns as desired.
- Initial Loss Options
- Option to choose the preburst percentile (default is median). The initial loss is calculated by Storm Loss minus Preburst.
- Option to choose methods for calculating initial loss for durations less than 60 mins.
- Interpolate to Zero: Assumes an initial loss of 0 mm for a duration of 0 mins and interpolates for values between the 60 min duration and the 0 min duration.
- Rahman et al 2002: From a study of 11 Victorian catchments (source link)
- Hill et al 1996: 1998 (source 1996, source 1998)
- Static Value: User defined value for initial loss for durations less than 60min
- Use 60 min Loss: Adopt 60 min loss for durations less than 60 min
- BOM Terms and Conditions:
By selecting these, you agree to BOM's Conditions and Caveat (required to run run the utility)
- Output Location:
User defined folder where the outputs and log file of the utility will be written to
Log File
The log.txt file is written out into the same location as the other outputs and contains WARNING and ERROR messages from the tool.
The log.txt file is very important and should be checked after running the tool to check whether it has successfully run.
The QGIS utility calls an external Python script and once the script has completed (whether successfully or unsuccessfully) QGIS will report the process as complete. Therefore the user must check the log.txt file to check whether there has been any errors.
How to Read
- The first thing the log file will output is the version of the ARR_to_TUFLOW python script
File:QGIS ARR2016 log header text.png - The next item written will be a list of the inputs
800px - Following this will be a description of the function the utility is performing - e.g. extracting BOM data
- The last part is the most important and is where ERRORs and WARNINGs are written
File:QGIS ARR2016 log errors warnings.png
If reading in more than one catchment, each catchment extraction is a separate process and will be appended to the log.txt file.
Data Output
The following outputs are located in the folder <output_folder>\data
- Raw BOM and ARR Datahub outputs
- The raw data extracted from ARR2016 datahub and BOM2016 IFD
- ARR_Web_data_<catchment_name>.txt
- BOM_raw_web_<catchment_name>.html
- The raw data extracted from ARR2016 datahub and BOM2016 IFD
- Rainfall depths
- Processed rainfall depths after Areal Reduction Factors have been applied
- BOM_Rainfall_Depths_<catchment_name>.csv
- Processed rainfall depths after Areal Reduction Factors have been applied
- ARF Factors
- Calculated ARF factors applied to the rainfall depths
- <catchment_name>_ARF_Factors.csv
- Calculated ARF factors applied to the rainfall depths
- Storm Burst Rainfall Losses
- Calculated Storm Burst Initial Rainfall Losses (Complete Storm Initial Loss - Preburst Rainfall Depth)
- <catchment_name>_Burst_Initial_Loss.csv
- Calculated Storm Burst Initial Rainfall Losses (Complete Storm Initial Loss - Preburst Rainfall Depth)
TUFLOW Output
The following outputs are generated by the utility in TUFLOW format:
- Rainfall Inflows
- The rainfall inflows are output in the following location <output_folder>\rf_inflows. This output folder is where all the direct rainfall inflows that would be used in the TUFLOW model are output. An inflow file is generated for each event magnitude - duration combination. All available temporal patterns are included in a single file (including climate change options).
- <catchment_name>_RF_<magnitude><duration>.csv
- The rainfall inflows are output in the following location <output_folder>\rf_inflows. This output folder is where all the direct rainfall inflows that would be used in the TUFLOW model are output. An inflow file is generated for each event magnitude - duration combination. All available temporal patterns are included in a single file (including climate change options).
- BC_Dbase
- TUFLOW boundary condition database. Setup to point to the RF folder with wildcards applied.
- bc_dbase.csv
- TUFLOW boundary condition database. Setup to point to the RF folder with wildcards applied.
- Tuflow Event File
- TUFLOW Event File. Setup with wildcards applied. To keep the file names from becoming overly long and complicated, Climate Change scenarios are labelled as CC1, CC2.. etc. These correspond to the combinations of climate change scenarios requested by the user e.g. 2090_8.5 (climate change year: 2090, RCP: 8.5)
- Event_File.tef
- TUFLOW Event File. Setup with wildcards applied. To keep the file names from becoming overly long and complicated, Climate Change scenarios are labelled as CC1, CC2.. etc. These correspond to the combinations of climate change scenarios requested by the user e.g. 2090_8.5 (climate change year: 2090, RCP: 8.5)
An example of a naming convention that could be used with the ARR2016 output is: <Model_Name>_~e1~~e2~_~e3~_~s1~_00X.tcf where
- e1 = Event magnitude
- e2 = Event duration
- e3 = climate change scenario
- s1 = user defined scenario switch
For example M01_10p60m_CC1_EXG_001.tcf
Future Enhancements
- Automatic output to user choice of TUFLOW rainfall loss - infiltration / rainfall excess
The Tool Isn't Working
Can't access websites
For whatever reasons, sometimes the BOM or ARR Datahub websites are down or unable to be accessed by the tool. The below are a set of instructions that can be used as a workaround should this occur: