QGIS SWMM GeoPackage Create from SWMM inp: Difference between revisions
Created page with "== Introduction == This tool adds tables representing SWMM sections to an existing GeoPackage. The formatting works with the TUFLOW-SWMM tools for writing SWMM inp files. It i..." |
No edit summary |
||
| Line 1: | Line 1: | ||
== Introduction == |
== Introduction == |
||
This tool |
This tool converts a SWMM input file (.inp) to a GeoPackage file (.gpkg) that can be visualized and edited within GIS.<br> |
||
For most tables, the GeoPackage file is a simple conversion of the SWMM tables. For tables that have columns with multiple options, each of the options has its own column (it is a wide-format that does not reuse columns for different purposes).<br> |
|||
It is recommended to use this tool to create new SWMM sections to eliminate potential future errors when using the other TUFLOW-SWMM tools. |
|||
Some of the tables in the inp file will be combined in the GeoPackage representation. For example, the XSection table is appeneded to the Conduits, Weirs, and Orifices tables and the Losses table is appended to the Conduits table. Combining tables prevents needing to edit multiple tables when new features are added or moved.<br> |
|||
Fields usage can be inferred from looking at the SWMM input file documentation.<br> |
|||
== Usage == |
== Usage == |
||
| Line 11: | Line 13: | ||
=== Parameters === |
=== Parameters === |
||
<ol> |
<ol> |
||
<li>''' |
<li>'''SWMM Input File (.inp):''' Select the ... button to bring up a dialogue and then navigate to the location of the SWMM inp file to convert. |
||
<li>'''CRS for GeoPackage |
<li>'''CRS for GeoPackage:''' Select the desired CRS (Coordinate Reference System) for the GeoPackage by either the drop down menu, or by selecting 'Select CRS' [[File:CRS_icon.png]] and using the CRS Selector. |
||
<li>'''SWMM Tags to ignore during conversion in a comma delimited list:''' '''<font color=red>???</font>''' |
|||
<li>''' |
<li>'''GeoPackage output filename:''' Select the ... button to bring up a dialogue and then navigate to the desired location of the GeoPackage. |
||
</ol> |
</ol> |
||
<br> |
<br> |
||
[[File:.png]] |
[[File:create_from_swmm_inp_dialog.png]] |
||
<br><br> |
<br><br> |
||
Revision as of 11:49, 7 December 2023
Introduction
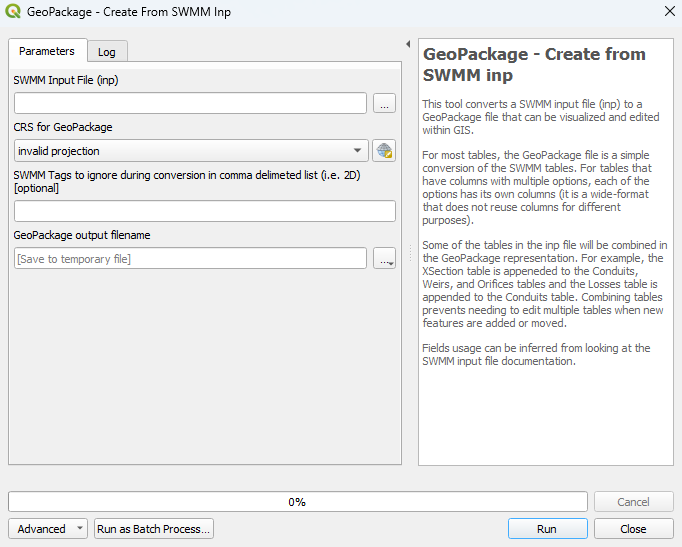
This tool converts a SWMM input file (.inp) to a GeoPackage file (.gpkg) that can be visualized and edited within GIS.
For most tables, the GeoPackage file is a simple conversion of the SWMM tables. For tables that have columns with multiple options, each of the options has its own column (it is a wide-format that does not reuse columns for different purposes).
Some of the tables in the inp file will be combined in the GeoPackage representation. For example, the XSection table is appeneded to the Conduits, Weirs, and Orifices tables and the Losses table is appended to the Conduits table. Combining tables prevents needing to edit multiple tables when new features are added or moved.
Fields usage can be inferred from looking at the SWMM input file documentation.
Usage
This tool can be found in the QGIS processing toolbox panel under 'TUFLOW > SWMM'. To open the Processing Toolbox Panel, navigate to 'Processing' in the menubar and select 'Toolbox'.

Parameters
- SWMM Input File (.inp): Select the ... button to bring up a dialogue and then navigate to the location of the SWMM inp file to convert.
- CRS for GeoPackage: Select the desired CRS (Coordinate Reference System) for the GeoPackage by either the drop down menu, or by selecting 'Select CRS'
 and using the CRS Selector.
- SWMM Tags to ignore during conversion in a comma delimited list: ???
- GeoPackage output filename: Select the ... button to bring up a dialogue and then navigate to the desired location of the GeoPackage.
Example
| Up |
|---|
