QGIS SWMM Junctions Downstream Junctions to Outfalls: Difference between revisions
| (21 intermediate revisions by 2 users not shown) | |||
| Line 1: | Line 1: | ||
== Introduction == |
== Introduction == |
||
This tool converts junctions on the downstream side of a network to outfall nodes as required by SWMM. |
This tool converts junctions on the downstream side of a network to outfall nodes as required by SWMM. An outfall layer with the converted nodes will be created along with a modified junction layer (outfall nodes removed). The contents of these layers need to be copied into the appropriate layers in the SWMM GeoPackage.<br> |
||
'''Note:''' It is recommended to use the <u>[[QGIS SWMM Conduits Assign Node Fields|Conduits - Assign Node Fields]]</u> tool and the <u>[[QGIS SWMM Integrity Make Node Names Unique|Integrity - Make Node Names Unique]]</u> tool to avoid errors when running the simulation. |
|||
'''Note:''' This tool relies on the 'From Node' and 'To Node' fields to determine position in the network. The <u>[[QGIS SWMM Conduits Assign Node Fields|Conduits - Assign node fields]]</u> processing tool will ensure the 'From Node' and 'To Node' fields are correctly assigned. |
|||
<br> |
<br> |
||
== Usage == |
== Usage == |
||
This tool, '''Junctions - Downstream junctions to outfalls''', can be found in the QGIS processing toolbox panel under |
This tool, '''Junctions - Downstream junctions to outfalls''', can be found in the QGIS processing toolbox panel under TUFLOW >> SWMM. To open the Processing Toolbox panel, navigate to 'Processing' in the menubar and select 'Toolbox'.<br> |
||
<br> |
<br> |
||
[[File:open_processing_toolbox.png]]<br> |
[[File:open_processing_toolbox.png]]<br> |
||
| Line 12: | Line 13: | ||
=== Parameters === |
=== Parameters === |
||
<ol> |
<ol> |
||
<li>'''Input junctions:''' |
<li>'''Input junctions:''' The existing junctions layer. |
||
<li>'''Selected features only:''' If node(s) in the junctions layer have been selected using the 'Select Features' tool, this option will become available. If checked on, the tool will only check the selected node(s). |
|||
<li>'''Input conduits:''' Select the ... button and tick on the conduits layer that the junctions are snapped to. |
|||
<li>''' |
<li>'''Input conduits:''' The conduits layer containing the channel(s) to which the junction and outfall node(s) are connected. |
||
<li>'''Modified junctions layer:''' Determines the location and filename of the modified junctions layer (outfall node(s) removed). |
|||
<li>'''New outfalls layer:''' Determines the location and filename of the new outfalls layer. |
|||
</ol> |
</ol> |
||
<br> |
<br> |
||
[[File: |
[[File:Junctions_Downstream_Junctions_to_Outfalls_Dialog_c.png]] |
||
<br><br> |
<br><br> |
||
| ⚫ | |||
:'''Output Options:'''<br> |
|||
:For each of the following options, the tool will output a new outfalls layer and won't override the existing one. <br> |
|||
<ol> |
|||
<br> |
<br> |
||
{{Video|name=Animation_Junctions_Downstream_Junctions_to_Outfalls_01b.mp4|width=1236}} |
|||
[[File:downstream_junctions_to_outfalls_output_options_2.png]] |
|||
<br><br> |
|||
:<li>Create Temporary Layer: |
|||
:*Creates a temporary scratch layer. This layer will open into the QGIS workspace but it will '''not''' be saved anywhere. |
|||
:<li>Save to File...: |
|||
:*The user can navigate to a folder and save the updated outfalls layer to a new GeoPackage Database. |
|||
:<li>Save to GeoPackage...: |
|||
:*The user can navigate to an existing GeoPackage Database. Once selected, a 'Layer Name' dialog will appear. Enter the new layer name, and the updated outfalls layer will be saved as that name in the GPKG. |
|||
::[[File:Layer_Name_dialog.png]] |
|||
:<li>Save to Database Table...: |
|||
:*'''<font color=red>???</font>''' |
|||
:<li>Append to Layer...: |
|||
:*'''<font color=red>???</font>'''<br> |
|||
</ol> |
|||
<br> |
<br> |
||
| ⚫ | |||
{{Video|name=.mp4|width=1235}} |
|||
{{Tips Navigation |
{{Tips Navigation |
||
Latest revision as of 14:58, 3 May 2024
Introduction
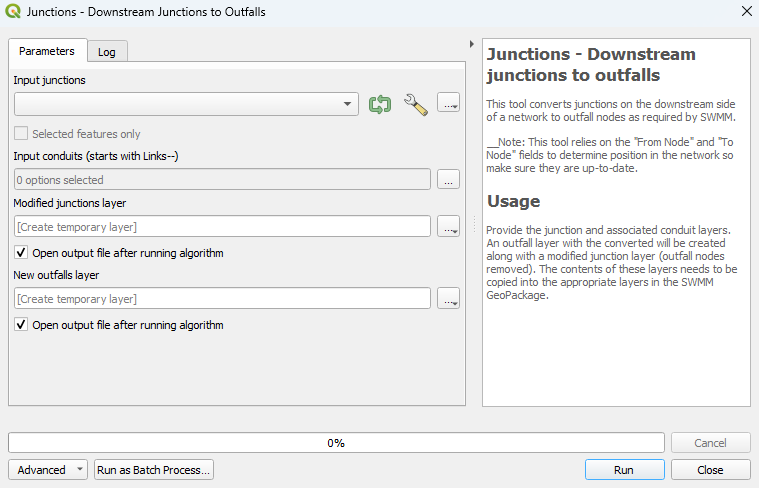
This tool converts junctions on the downstream side of a network to outfall nodes as required by SWMM. An outfall layer with the converted nodes will be created along with a modified junction layer (outfall nodes removed). The contents of these layers need to be copied into the appropriate layers in the SWMM GeoPackage.
Note: This tool relies on the 'From Node' and 'To Node' fields to determine position in the network. The Conduits - Assign node fields processing tool will ensure the 'From Node' and 'To Node' fields are correctly assigned.
Usage
This tool, Junctions - Downstream junctions to outfalls, can be found in the QGIS processing toolbox panel under TUFLOW >> SWMM. To open the Processing Toolbox panel, navigate to 'Processing' in the menubar and select 'Toolbox'.

Parameters
- Input junctions: The existing junctions layer.
- Selected features only: If node(s) in the junctions layer have been selected using the 'Select Features' tool, this option will become available. If checked on, the tool will only check the selected node(s).
- Input conduits: The conduits layer containing the channel(s) to which the junction and outfall node(s) are connected.
- Modified junctions layer: Determines the location and filename of the modified junctions layer (outfall node(s) removed).
- New outfalls layer: Determines the location and filename of the new outfalls layer.
Example
| Up |
|---|
