QGIS SWMM Conduits Assign Node Fields: Difference between revisions
| (20 intermediate revisions by 2 users not shown) | |||
| Line 1: | Line 1: | ||
== Introduction == |
== Introduction == |
||
This tool |
This tool provides users with the ability to reliably and efficiently assign the 'To Node' and 'From Node' fields of a conduits layer. It identifies the nodes snapped to the endpoints of conduits and assigns the 'To Node' and 'From Node' appropriately. |
||
<br> |
<br> |
||
This tool supports in-place editing if selected in the QGIS processing window. |
This tool supports in-place editing if selected in the QGIS processing window. |
||
== Usage == |
== Usage == |
||
This tool can be found in the QGIS processing toolbox panel under |
This tool, '''Conduits - Assign node fields''', can be found in the QGIS processing toolbox panel under TUFLOW >> SWMM. To open the Processing Toolbox panel, navigate to 'Processing' in the menubar and select 'Toolbox'.<br> |
||
<br> |
<br> |
||
[[File:open_processing_toolbox.png]]<br> |
[[File:open_processing_toolbox.png]]<br> |
||
| Line 11: | Line 11: | ||
=== Parameters === |
=== Parameters === |
||
<ol> |
<ol> |
||
<li>'''Input |
<li>'''Input layer:''' The existing conduits layer to which the 'To Node' and 'From Node' fields will be assigned. |
||
<li>'''Selected features only:''' If channel(s) in the conduits layer have been selected using the 'Select Features' tool, this option will become available. If checked on, the tool will only assign the 'To Node' and 'From Node' fields to the selected channel(s). |
|||
<li>'''SWMM Node Layers:''' The existing node layers that are snapped to the endpoints of the conduits. |
<li>'''SWMM Node Layers:''' The existing node layers that are snapped to the endpoints of the channel(s) in the conduits layer. |
||
<li>'''Conduits:''' Determines the |
<li>'''Conduits:''' Determines the location and filename of the output conduits layer. |
||
</ol> |
</ol> |
||
'''Note:''' If 'Edit Feature In-Place' is selected, the tool only requires the 'SWMM Node Layers' parameter. |
'''Note:''' If 'Edit Feature In-Place' is selected, the tool only requires the 'SWMM Node Layers' parameter. That is, the tool will override the existing conduits file with the updated 'To Node' and 'From Node' fields. |
||
<br> |
|||
[[File:Assign_Nodes_Dialog.png]] |
|||
<br><br> |
<br><br> |
||
[[File:Conduits_Assign_Node_Fields_Dialog_b.png]] |
|||
'''Output Options:'''<br> |
|||
For each of the following options, the tool will create a new conduits layer and won't overwrite the existing one. |
|||
:'''Create Temporary Layer:''' |
|||
::*Creates a temporary scratch layer. This layer will open into the QGIS workspace but it will '''not''' be saved anywhere. |
|||
:'''Save to File...:''' |
|||
::*The user can navigate to a folder and save the updated conduits layer to a new GeoPackage Database. |
|||
:'''Save to GeoPackage...:''' |
|||
::*The user can navigate to an existing GeoPackage Database. Once selected, a 'Layer Name' dialog will appear. Enter the new layer name, and the updated conduits layer will be saved as that name in the GPKG. |
|||
:::[[File:Layer_Name_dialog.png]] |
|||
:'''Save to Database Table...:''' |
|||
::*'''<font color=red>???</font>''' |
|||
:'''Append to Layer...:''' |
|||
::*'''<font color=red>???</font>''' |
|||
<br> |
|||
[[File:Assign_Nodes_Dialog_output_options.png]] |
|||
<br><br> |
<br><br> |
||
== Example == |
|||
Save to an existing GeoPackage: |
|||
<br> |
<br> |
||
{{Video|name= |
{{Video|name=Animation_Conduits_Assign_Node_Fields_01c.mp4|width=1236}} |
||
<br><br> |
|||
| ⚫ | |||
<br> |
<br> |
||
| ⚫ | |||
{{Video|name=Animation_Assign_Nodes_002b.mp4|width=1235}} |
|||
<br><br> |
<br><br> |
||
{{Video|name=Animation_Conduits_Assign_Node_Fields_02c.mp4|width=1236}} |
|||
{{Tips Navigation |
{{Tips Navigation |
||
Latest revision as of 12:19, 3 May 2024
Introduction
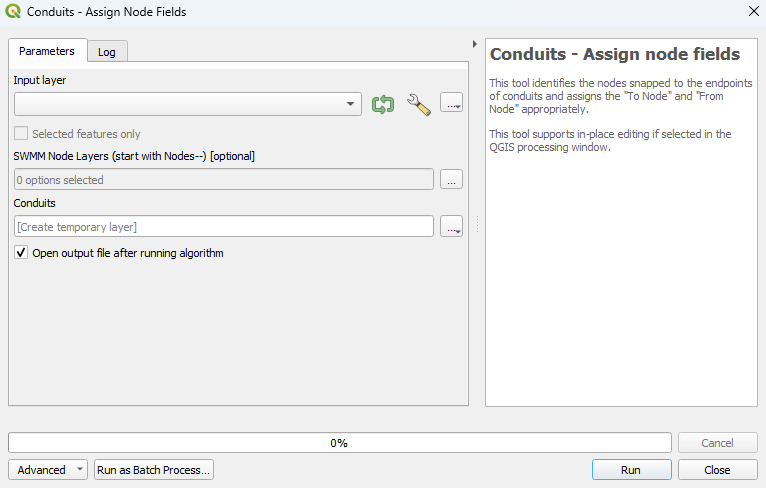
This tool provides users with the ability to reliably and efficiently assign the 'To Node' and 'From Node' fields of a conduits layer. It identifies the nodes snapped to the endpoints of conduits and assigns the 'To Node' and 'From Node' appropriately.
This tool supports in-place editing if selected in the QGIS processing window.
Usage
This tool, Conduits - Assign node fields, can be found in the QGIS processing toolbox panel under TUFLOW >> SWMM. To open the Processing Toolbox panel, navigate to 'Processing' in the menubar and select 'Toolbox'.

Parameters
- Input layer: The existing conduits layer to which the 'To Node' and 'From Node' fields will be assigned.
- Selected features only: If channel(s) in the conduits layer have been selected using the 'Select Features' tool, this option will become available. If checked on, the tool will only assign the 'To Node' and 'From Node' fields to the selected channel(s).
- SWMM Node Layers: The existing node layers that are snapped to the endpoints of the channel(s) in the conduits layer.
- Conduits: Determines the location and filename of the output conduits layer.
Note: If 'Edit Feature In-Place' is selected, the tool only requires the 'SWMM Node Layers' parameter. That is, the tool will override the existing conduits file with the updated 'To Node' and 'From Node' fields.

Example
Using the 'Edit Feature In-Place' tool:
| Up |
|---|