Difference between revisions of "TUFLOW CATCH Tutorial M04 Draft"
| (30 intermediate revisions by the same user not shown) | |||
| Line 3: | Line 3: | ||
In this module, a TUFLOW CATCH integrated model with interventions is developed. <br> | In this module, a TUFLOW CATCH integrated model with interventions is developed. <br> | ||
| − | TUFLOW CATCH Tutorial | + | TUFLOW CATCH Tutorial 04 is built from the models created in <u>[[TUFLOW_CATCH_Tutorial_M02 | TUFLOW CATCH Tutorial 02]]</u> and <u>[[TUFLOW_CATCH_Tutorial_M03 | TUFLOW CATCH Tutorial 03]]</u>. The completed TUFLOW CATCH Tutorial 03 is provided in the '''TUFLOW_CATCH_Module_04\Modelling''' folder of the download dataset as the starting point for this tutorial. |
| − | If | + | If unfamiliar with TUFLOW CATCH, it is recommended to complete <u>[[TUFLOW_CATCH_Tutorial_M01 | TUFLOW CATCH Tutorial 01]]</u>, <u>[[TUFLOW_CATCH_Tutorial_M02 | TUFLOW CATCH Tutorial 02]]</u> and <u>[[TUFLOW_CATCH_Tutorial_M03 | TUFLOW CATCH Tutorial 03]]</u> prior to starting this tutorial. |
| − | = | + | = Meteorological Data = |
| − | + | Meteorological inputs are defined in boundary condition blocks within the receiving model block of the TUFLOW CATCH Control file (.tcc). <!-- reference TUFLOW FV manual when it's done --> For this tutorial, timeseries meteorological data has been supplied. | |
| − | :*< | + | <ol> |
| + | <li>In Windows File Explorer, navigate to the '''TUFLOW_CATCH_Module_04\Tutorial_Data''' folder. Copy the '''TC04_met_ts_001.csv''' and paste it in the '''TUFLOW_CATCH_Module_04\Modelling\TUFLOWFV\bc_dbase\met''' folder. This file contains the timeseries meteorological data. | ||
| + | <li>Open the file. As this file is read by TUFLOW FV, the first column (Time) must contain the date is ISODATE format (DD/MM/YYYY hh:mm:ss). The other columns contain the data for the meteorological conditions that will be simulated in this model: <br> | ||
| + | {| | ||
| + | | | ||
| + | * '''AIR_TEMP''': Air temperature (degrees Celsius) | ||
| + | | | ||
| + | :::* '''REL_HUM''': Relative humidity (%) | ||
| + | |- | ||
| + | | | ||
| + | *'''LW_RAD''': Downward longwave radiation (W m<tt><font color="green"><sup>-2</sup></font></tt>) | ||
| + | | | ||
| + | :::*'''W10_X''': Zonal wind velocity at 10m (m s<sup>-1</sup>) | ||
| + | |- | ||
| + | | | ||
| + | *'''SW_RAD''': Downward shortwave radiation (W m<sup>-2</sup>) | ||
| + | | | ||
| + | :::*'''W10_Y''': Meridional wind velocity at 10m (m s<sup>-1</sup>) | ||
| + | |} | ||
| + | <br> | ||
| + | <br> | ||
| + | [[File: image of csv file|link=Special:FilePath/Image_of_csv_file]]<br> | ||
| + | <br> | ||
| + | |||
| + | |||
| + | </ol> | ||
= Simulation Control Files = | = Simulation Control Files = | ||
The following steps will require use of a text editor. The tutorial demonstration uses Notepad++. For its configuration information refer to <u>[[NotepadPlusPlus_Tips | Notepad++ Tips]]</u>. <br> | The following steps will require use of a text editor. The tutorial demonstration uses Notepad++. For its configuration information refer to <u>[[NotepadPlusPlus_Tips | Notepad++ Tips]]</u>. <br> | ||
| + | |||
| + | ==== Generate Template Files ==== | ||
| + | This tutorial requires a Water Quality Control file (.fvwq) and a Sediment Transport Control file (.fvsed). Use the TUFLOW CATCH plugin to generate template files: | ||
| + | <ol> | ||
| + | <li>In QGIS, go to Processing > Toolbox from the top drop down menu options to open the Processing Toolbox. | ||
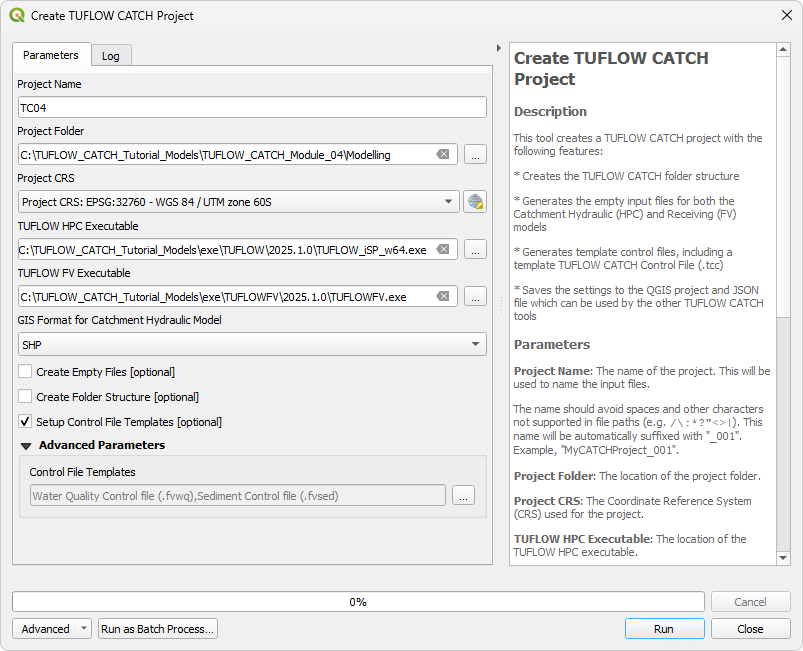
| + | <li>Go to TUFLOW Catch in the processing tool list and select 'Create TUFLOW Catch Project'. This opens the dialog shown below: | ||
| + | *Project Name: '''TC04''' | ||
| + | *Project Folder: Click '...', and navigate to the '''TUFLOW_CATCH_Module_04\Modelling''' folder. | ||
| + | *Project CRS: Click the drop down menu and select 'Project CRS: EPSG:32760 - WGS 84 / UTM zone 60S’. | ||
| + | * TUFLOW HPC Executable: Click '...', and navigate to the '''exe\TUFLOW\2025.0.2 folder'''. Select '''TUFLOW_iSP_w64.exe'''. | ||
| + | * TUFLOW FV Executable: Click '...', and navigate to the '''exe\TUFLOWFV\2025.0.0''' folder. Select '''TUFLOWFV.exe'''. | ||
| + | * Default GIS Format: Click the drop down menu and select 'SHP'. | ||
| + | * Tick on 'Setup Control File Templates'. | ||
| + | * Control File Templates: Click '...', and tick on: Water Quality Control file (.fvwq) and Sediment Control file (.fvsed). Ensure all other files are ticked off. | ||
| + | <li> Click 'Run'. Once the tool has finished click 'Close'.<br> | ||
| + | <br> | ||
| + | [[File: TC4_Create_CATCH_Project_01a.png]]<br> | ||
| + | <br> | ||
| + | </ol> | ||
| + | |||
| + | === Water Quality Control File (FVWQ) === | ||
| + | <ol> | ||
| + | <li> Navigate to the '''TUFLOWFV\wqm''' folder and open '''TC04_001.fvwq''' in a text editor. | ||
| + | <li> In the 'Simulation Controls' sections, update the following commands:<br> | ||
| + | <tt><font color=blue>Simulation Class</font><font color=red> == </font>DO <font color=green> ! Specify the simulation class to Dissolved Oxygen</font></tt><br> | ||
| + | <tt><font color=blue>WQ dt</font><font color=red> == </font>300 <font color=green> ! Interval for updating the water quality module </font></tt><br> | ||
| + | <tt><font color=blue>WQ Units</font><font color=red> == </font>mgL <font color=green> ! Specify the units to be mgL </font></tt><br> | ||
| + | |||
| + | <li> In the 'Constituent Model Settings', add the following commands to specify the constituent (oxygen and pathogens) parameters. For more information on the model settings for each constituent, refer to the TUFLOW FV Water Quality Manual: <u>[https://docs.tuflow.com/fv/wqm/manual/2025.1/SimulationConstruction-1.html#ConModClssOxy-4 Section 4.6.3.1 (Oxygen)]</u> and <u>[https://docs.tuflow.com/fv/wqm/manual/2025.1/SimulationConstruction-1.html#ConModClssPth-4 Section 4.6.3.2 (Pathogens)]</u>. <br> | ||
| + | <tt><font color=blue>Oxygen Model</font><font color=red> == </font>O2 <font color=green> ! Set the oxygen model</font></tt><br> | ||
| + | :<tt><font color=blue>Oxygen Min Max</font><font color=red> == </font>0.0, 12.0 <font color=green> ! Specify the allowable minimum and maximum oxygen concentrations</font></tt><br> | ||
| + | :<tt><font color=blue>Oxygen Benthic</font><font color=red> == </font>4.7, 1.08 <font color=green> ! Specify the global benthic parameters </font></tt><br> | ||
| + | <tt><font color=blue>End Oxygen Model</font></tt><br> | ||
| + | <tt><font color=blue>Pathogen Model</font><font color=red> == </font>Free, Ecoli <font color=green> ! Set the pathogen model and name</font></tt><br> | ||
| + | :<tt><font color=blue>Alive Min Max</font><font color=red> == </font>0.0, 1e7 <font color=green> ! Specify the allowable minimum and maximum concentrations</font></tt><br> | ||
| + | :<tt><font color=blue>Mortality</font><font color=red> == </font>0.08, 2e-12, 6.1, 1.0, 1.11 <font color=green> ! Specify the mortality parameters</font></tt><br> | ||
| + | :<tt><font color=blue>Visible Inactivation</font><font color=red> == </font>0.082, 0.0067, 0.5 <font color=green> ! Specify the visible light inactivation parameters</font></tt><br> | ||
| + | :<tt><font color=blue>UVA Inactivation</font><font color=red> == </font>0.5, 0.0067, 0.5 <font color=green> ! Specify the UV-A light inactivation parameters</font></tt><br> | ||
| + | :<tt><font color=blue>UVB Inactivation</font><font color=red> == </font>1.0, 0.0067, 0.5 <font color=green> ! Specify the UV-B light inactivation parameters</font></tt><br> | ||
| + | :<tt><font color=blue>Settling</font><font color=red> == </font>-0.03 <font color=green> ! Specify the settling of non-attached pathogens</font></tt><br> | ||
| + | <tt><font color=blue>End Pathogen Model</font></tt><br> | ||
| + | |||
| + | |||
| + | <li> In the 'Material Specifications' section, add the following material blocks to specify oxygen flux for each material ID.<br> | ||
| + | <tt><font color=blue>Material</font><font color=red> == </font>Default <font color=green> ! Defines default properties for all materials</font></tt><br> | ||
| + | :<tt><font color=blue>Oxygen Flux</font><font color=red> == </font>-1400.0 </font></tt><br> | ||
| + | <tt><font color=blue>End Material</font></tt><br> | ||
| + | <tt><font color=blue>Material</font><font color=red> == </font>1 <font color=green> ! Defines properties for material ID 1 (overwrites default)</font></tt><br> | ||
| + | :<tt><font color=blue>Oxygen Flux</font><font color=red> == </font>-1100.0 </font></tt><br> | ||
| + | <tt><font color=blue>End Material</font></tt><br> | ||
| + | <tt><font color=blue>Material</font><font color=red> == </font>2 <font color=green> ! Defines properties for material ID 2 (overwrites default)</font></tt><br> | ||
| + | :<tt><font color=blue>Oxygen Flux</font><font color=red> == </font>-1200.0 </font></tt><br> | ||
| + | <tt><font color=blue>End Material</font></tt><br> | ||
| + | <tt><font color=blue>Material</font><font color=red> == </font>3 <font color=green> ! Defines properties for material ID 3 (overwrites default)</font></tt><br> | ||
| + | :<tt><font color=blue>Oxygen Flux</font><font color=red> == </font>-1300.0 </font></tt><br> | ||
| + | <tt><font color=blue>End Material</font></tt><br> | ||
| + | |||
| + | |||
| + | <li> Save the FVWQ. | ||
| + | </ol> | ||
| + | |||
| + | === Sediment Transport Control File (FVSED) === | ||
| + | <ol> | ||
| + | <li> Navigate to the '''TUFLOWFV\stm''' folder and open '''TC04_001.fvsed''' in a text editor. | ||
| + | <li> Update the following command to match the output interval for the rest of the model (300secs or 5mins):<br> | ||
| + | <tt><font color=blue>Update dt</font><font color=red> == </font>300 <font color=green> ! Interval for updating the sediment transport module</font></tt><br> | ||
| + | |||
| + | <li> In the 'Settings' section, update the following commands. For more information on these commands, please refer to the <u>[https://downloads.tuflow.com/TUFLOWFV/Releases/Latest/TUFLOW_FV_ST_and_PT_Modules_User_Manual.pdf TUFLOW FV Sediment Transport Manual]</u>.<br> | ||
| + | <tt><font color=blue>Erosion Depth Limits</font><font color=red> == </font>0.1, 0.5 <font color=green> ! Depth limits within which the erosion rate is scaled down (meters)</font></tt><br> | ||
| + | <tt><font color=blue>Deposition Depth Limits</font><font color=red> == </font>0.1, 0.5 <font color=green> ! Depth limits within which the deposition rate is scaled down (meters)</font></tt><br> | ||
| + | <tt><font color=blue>Bed Roughness Model</font><font color=red> == </font>ks <font color=green> ! Set bed roughness model</font></tt><br> | ||
| + | <tt><font color=blue>Bed Roughness Parameters</font><font color=red> == </font>0.02, 0.02 <font color=green> ! Specify the bed roughness for current and waves</font></tt><br> | ||
| + | |||
| + | <li> In the 'Fractions' section, add in the following Fraction block to set the parameters for clay. <br> | ||
| + | <tt><font color=blue>Fraction</font><font color=red> == </font>Clay <font color=green> ! Set sediment fraction</font></tt><br> | ||
| + | :<tt><font color=blue>d50</font><font color=red> == </font>0.0002 <font color=green> ! Specify the median grain size of the sediment fraction (meters)</font></tt><br> | ||
| + | :<tt><font color=blue>Particle Density</font><font color=red> == </font>2650.0 <font color=green> ! Specify the density of the particle group (kg/m<sup>3</sup>)</font></tt><br> | ||
| + | :<tt><font color=blue>Settling Model</font><font color=red> == </font>Constant <font color=green> ! Set the settling model</font></tt><br> | ||
| + | :<tt><font color=blue>Settling Parameters</font><font color=red> == </font>1e-05 <font color=green> ! Specify constant settling velocity (m/s)</font></tt><br> | ||
| + | :<tt><font color=blue>Critical Stress Model</font><font color=red> == </font>Constant <font color=green> ! Set the critical stress model</font></tt><br> | ||
| + | :<tt><font color=blue>Critical Stress Parameters</font><font color=red> == </font>0.15 <font color=green> ! Specify constant critical stress (N/m<sup>2</sup>)</font></tt><br> | ||
| + | :<tt><font color=blue>Erosion Model</font><font color=red> == </font>Mehta <font color=green> ! Set the erosion model</font></tt><br> | ||
| + | :<tt><font color=blue>Erosion Parameters</font><font color=red> == </font>0.01, 0.5, 1.0 <font color=green> ! Specify constant erosion rate (g/m<sup>2</sup>s), critical shear stress (N/m<sup>2</sup>) and power coefficient</font></tt><br> | ||
| + | :<tt><font color=blue>Deposition Model</font><font color=red> == </font>ws0 <font color=green> ! Set the deposition model</font></tt><br> | ||
| + | <tt><font color=blue>End Fraction</font></tt><br> | ||
| + | |||
| + | |||
| + | |||
| + | <li> In the 'Materials' section, add the following material blocks to set the sediment transport for each material ID.<br> | ||
| + | <tt><font color=blue>Material</font><font color=red> == </font>1, 2 <font color=green> ! Defines properties for material IDs 1 and 2</font></tt><br> | ||
| + | :<tt><font color=blue>Nlayer</font><font color=red> == </font>1 <font color=green> ! Number of sediment bed layers</font></tt><br> | ||
| + | :<tt><font color=blue>Layer</font><font color=red> == </font>1 <font color=green> ! Bed layer number </font></tt><br> | ||
| + | ::<tt><font color=blue>Dry Density</font><font color=red> == </font>800 <font color=green> ! Dry density of bed layer (kg/m<sup>3</sup>) </font></tt><br> | ||
| + | ::<tt><font color=blue>Initial Mass</font><font color=red> == </font>1500 <font color=green> ! Initial mass of each sediment fraction (kg/m<sup>2</sup>) </font></tt><br> | ||
| + | :<tt><font color=blue>End Layer</font></tt><br> | ||
| + | <tt><font color=blue>End Material</font></tt><br> | ||
| + | <tt><font color=blue>Material</font><font color=red> == </font>3 <font color=green> ! Defines properties for material ID 3</font></tt><br> | ||
| + | :<tt><font color=blue>Nlayer</font><font color=red> == </font>1 <font color=green> ! Number of sediment bed layers</font></tt><br> | ||
| + | :<tt><font color=blue>Layer</font><font color=red> == </font>1 <font color=green> ! Bed layer number </font></tt><br> | ||
| + | ::<tt><font color=blue>Dry Density</font><font color=red> == </font>800 <font color=green> ! Dry density of bed layer (kg/m<sup>3</sup>) </font></tt><br> | ||
| + | ::<tt><font color=blue>Initial Mass</font><font color=red> == </font>3200 <font color=green> ! Initial mass of each sediment fraction (kg/m<sup>2</sup>) </font></tt><br> | ||
| + | :<tt><font color=blue>End Layer</font></tt><br> | ||
| + | <tt><font color=blue>End Material</font></tt><br> | ||
| + | |||
| + | |||
| + | <li>Save the FVSED. | ||
| + | </ol> | ||
== TUFLOW CATCH Control File (TCC) == | == TUFLOW CATCH Control File (TCC) == | ||
=== Global Settings === | === Global Settings === | ||
| − | For this tutorial, leave all commands as is. This section of the .tcc was populated in <u>[[TUFLOW_CATCH_Tutorial_M01 | TUFLOW CATCH Tutorial | + | For this tutorial, leave all commands as is. This section of the .tcc was populated in <u>[[TUFLOW_CATCH_Tutorial_M01 | TUFLOW CATCH Tutorial 01]]</u>. |
=== Catchment Hydraulic Model === | === Catchment Hydraulic Model === | ||
| − | + | This block contains commands that construct the TUFLOW HPC simulation. | |
| + | <ol> | ||
| + | <li> Save a copy of '''TC03_001.tcc''' as '''TC04_001.tcc''' in the '''TUFLOW_CATCH_Module_04\Modelling\TUFLOWCATCH\runs''' folder. | ||
| + | <li> Open '''TC04_001.tcc''' in a text editor, and comment out the following command:<br> | ||
| + | <tt><font color=green>! Pollutant == Salinity, Temperature, WQ_DISS_OXYGEN_MG_L, WQ_PATH_ECOLI_ALIVE_CFU_100ML, WQ_PATH_ECOLI_DEAD_CFU_100ML, SED_CLAY ! Specify the pollutant names</font></tt><br> | ||
| + | </ol> | ||
=== Pollutant Export Model === | === Pollutant Export Model === | ||
| − | This block contains commands that control the pollutant export (and other constituent) simulation. | + | This block contains commands that control the pollutant export (and other constituent) simulation. As this tutorial model is an integrated simulation with interventions, we must turn the pollutant export model back on: |
<ol> | <ol> | ||
| − | <li> | + | <li> Set the pollutant export model:<br> |
| − | + | <tt><font color=blue>Catchment Pollutant Export Model</font><font color=red> == </font>Mass Accumulation Release </font></tt><br> | |
| − | <tt><font color=blue> | + | <li> Uncomment all the commands. The pollutant export model block should look the same as in <u>[[TUFLOW_CATCH_Tutorial_M02#Pollutant_Export_Model | TUFLOW CATCH Tutorial 02]]</u> |
| − | |||
| − | <li> | ||
</ol> | </ol> | ||
=== Receiving Model === | === Receiving Model === | ||
| − | For this tutorial, | + | This block contains commands that construct the TUFLOW FV simulation. For this tutorial, the receiving model block must be updated to include water quality and sediment transport. |
| + | <ol> | ||
| + | <li> In the 'General Parameters' section, update the following commands to turn on salinity, temperature, sediment and heat. For more information on these commands, refer to <u>[https://downloads.tuflow.com/TUFLOWFV/Releases/Latest/TUFLOW_FV_User_Manual.pdf Appendix B of the TUFLOW FV Manual]</u> <!-- Update link here when TUFLOW FV Manual update is done --><br> | ||
| + | <tt><font color=blue>Include Salinity</font><font color=red> == </font>1, 0 <font color=green> </font></tt><br> | ||
| + | <tt><font color=blue>Include Temperature</font><font color=red> == </font>1, 0 <font color=green> </font></tt><br> | ||
| + | <tt><font color=blue>Include Sediment</font><font color=red> == </font>1, 0 <font color=green> </font></tt><br> | ||
| + | <tt><font color=blue>Include Heat</font><font color=red> == </font>1 <font color=green> </font></tt><br> | ||
| + | |||
| + | <li> In the 'Water Quality' section, update the following commands to set the general WQ parameters and to reference the Water Quality Control file. <br> | ||
| + | <tt><font color=blue>Water Quality Model</font><font color=red> == </font>TUFLOW <font color=green></font></tt><br> | ||
| + | <tt><font color=blue>Water Quality Control File</font><font color=red> == </font>..\..\TUFLOWFV\wqm\TC04_001.fvwq <font color=green> ! Reference the Water Quality Control File</font></tt><br> | ||
| + | <tt><font color=blue>Water Quality Model Directory</font><font color=red> == </font>..\..\TUFLOWFV\wqm\ <font color=green> ! Location of the Water Quality Directory</font></tt><br> | ||
| + | <tt><font color=blue>Cell Water Quality Depth</font><font color=red> == </font>0.05 <font color=green> ! Minimum depth to execute water quality calculations (meters)</font></tt><br> | ||
| + | |||
| + | <li> In the 'Sediment Transport' section, update the following command to reference the Sediment Control file:<br> | ||
| + | <tt><font color=blue>Sediment Control File</font><font color=red> == </font>..\..\TUFLOWFV\stm\TC04_001.fvsed <font color=green> ! Reference the Sediment Control File</font></tt><br> | ||
| + | |||
| + | <li> In the 'Initial Conditions' section, update the following commands to set the initial temperature and salinity:<br> | ||
| + | <tt><font color=blue>Initial Temperature</font><font color=red> == </font>17.0 <font color=green> ! Specify initial temperature (degrees Celsius)</font></tt><br> | ||
| + | <tt><font color=blue>Initial Salinity</font><font color=red> == </font>0.0 <font color=green> ! Specify initial salinity (psu)</font></tt><br> | ||
| + | |||
| + | <li>In the 'Meteorology' section, add the following boundary condition blocks to specify meteorological conditions. The variable '<tt>met_ts</tt>' is used to define the location of the meteorological data. <br> | ||
| + | <tt><font color=blue>Set Variable met_ts</font><font color=red> == </font>..\..\TUFLOWFV\bc_dbase\met\TC04_met_ts_001.csv </font></tt><br> | ||
| + | <tt><font color=blue>BC</font><font color=red> == </font>LW_RAD, <<met_ts>> <font color=green> ! Downward longwave radiation (W m<sup>-2</sup>)</font></tt><br> | ||
| + | :<tt><font color=blue>BC Header</font><font color=red> == </font>Time, LW_RAD <font color=green> ! Column headers to read from time series file</font></tt><br> | ||
| + | :<tt><font color=blue>BC Update dt</font><font color=red> == </font>300 <font color=green> ! Specify update timestep for BC (seconds)</font></tt><br> | ||
| + | :<tt><font color=blue>BC Time Units</font><font color=red> == </font>Hours <font color=green> ! Specify time units</font></tt><br> | ||
| + | :<tt><font color=blue>BC Reference Time</font><font color=red> == </font>01/01/2021 10:00 <font color=green> ! Specify boundary condition reference time</font></tt><br> | ||
| + | <tt><font color=blue>End BC</font></tt><br> | ||
| + | <tt><font color=blue>BC</font><font color=red> == </font>SW_RAD, <<met_ts>> <font color=green> ! Downward shortwave radiation (W m<sup>-2</sup>)</font></tt><br> | ||
| + | :<tt><font color=blue>BC Header</font><font color=red> == </font>Time, SW_RAD</tt><br> | ||
| + | :<tt><font color=blue>BC Update dt</font><font color=red> == </font>300</tt><br> | ||
| + | :<tt><font color=blue>BC Time Units</font><font color=red> == </font>Hours</tt><br> | ||
| + | :<tt><font color=blue>BC Reference Time</font><font color=red> == </font>01/01/2021 10:00</tt><br> | ||
| + | <tt><font color=blue>End BC</font></tt><br> | ||
| + | <tt><font color=blue>BC</font><font color=red> == </font>W10, <<met_ts>> <font color=green> ! Wind velocity at 10m (m s<sup>-1</sup>)</font></tt><br> | ||
| + | :<tt><font color=blue>BC Header</font><font color=red> == </font>Time, W10_X, W10_Y</tt><br> | ||
| + | :<tt><font color=blue>BC Update dt</font><font color=red> == </font>300</tt><br> | ||
| + | :<tt><font color=blue>BC Time Units</font><font color=red> == </font>Hours</tt><br> | ||
| + | :<tt><font color=blue>BC Reference Time</font><font color=red> == </font>01/01/2021 10:00</tt><br> | ||
| + | <tt><font color=blue>End BC</font></tt><br> | ||
| + | <tt><font color=blue>BC</font><font color=red> == </font>AIR_TEMP, <<met_ts>> <font color=green> ! Temperature input (deg C)</font></tt><br> | ||
| + | :<tt><font color=blue>BC Header</font><font color=red> == </font>Time, AIR_TEMP</tt><br> | ||
| + | :<tt><font color=blue>BC Update dt</font><font color=red> == </font>300</tt><br> | ||
| + | :<tt><font color=blue>BC Time Units</font><font color=red> == </font>Hours</tt><br> | ||
| + | :<tt><font color=blue>BC Reference Time</font><font color=red> == </font>01/01/2021 10:00</tt><br> | ||
| + | <tt><font color=blue>End BC</font></tt><br> | ||
| + | <tt><font color=blue>BC</font><font color=red> == </font>REL_HUM, <<met_ts>> <font color=green> ! Relative humidity (%)</font></tt><br> | ||
| + | :<tt><font color=blue>BC Header</font><font color=red> == </font>Time, REL_HUM</tt><br> | ||
| + | :<tt><font color=blue>BC Update dt</font><font color=red> == </font>300</tt><br> | ||
| + | :<tt><font color=blue>BC Time Units</font><font color=red> == </font>Hours</tt><br> | ||
| + | :<tt><font color=blue>BC Reference Time</font><font color=red> == </font>01/01/2021 10:00</tt><br> | ||
| + | <tt><font color=blue>End BC</font></tt><br> | ||
| + | |||
| + | |||
| + | <li> In the 'Outputs' section, update the existing NetCDF output block to include sediment:<br> | ||
| + | <tt><font color=blue>Output</font><font color=red> == </font>NetCDF <font color=green></font></tt><br> | ||
| + | :<tt><font color=blue>Output Parameters</font><font color=red> == </font>h, v, d, sed_1 <font color=green> ! Outputs water level, velocity, depth and sediment</font></tt><br> | ||
| + | :<tt><font color=blue>Output Interval</font><font color=red> == </font>30 <font color=green> ! Interval to output the data (seconds) </font></tt><br> | ||
| + | :<tt><font color=blue>Suffix</font><font color=red> == </font>HD <font color=green> ! Specify suffix for the output NetCDF file </font></tt> | ||
| + | <tt><font color=blue>End Output</font></tt><br> | ||
| + | |||
| + | |||
| + | <li> At the end of the 'Outputs' section, add the following output block to output water quality results.<br> | ||
| + | <tt><font color=blue>Output</font><font color=red> == </font>NetCDF <font color=green></font></tt><br> | ||
| + | :<tt><font color=blue>Output Parameters</font><font color=red> == </font>wq_all <font color=green> ! Outputs water quality results </font></tt><br> | ||
| + | :<tt><font color=blue>Output Interval</font><font color=red> == </font>30 <font color=green> ! Interval to output the data (seconds) </font></tt><br> | ||
| + | :<tt><font color=blue>Suffix</font><font color=red> == </font>WQ <font color=green> ! Specify suffix for the output NetCDF file </font></tt> | ||
| + | <tt><font color=blue>End Output</font></tt><br> | ||
| + | |||
| + | |||
| + | <li>Save the TCC. | ||
| + | </ol> | ||
= Running the Simulation = | = Running the Simulation = | ||
| − | + | <ol> | |
| + | <li>In Windows File Explorer, navigate to the '''TUFLOWCATCH\runs''' folder. Save a copy of '''_run_TC03_CATCH.bat''' as '''_run_TC04_CATCH.bat''' and open the file in a text editor. | ||
| + | <li>Update the batch file to reference the '''TC04_001.tcc''':<br> | ||
| + | <tt><font color=blue>set </font>exe<font color=red>=</font>"..\..\..\..\exe\TUFLOWCATCH\2025.0.1\TUFLOWCATCH.exe"</tt><br> | ||
| + | <tt><font color=orange>%exe%</font> TC04_001.tcc</font></tt> | ||
| + | <li>Double click the batch file in file explorer to run the simulation. <br> | ||
| + | </ol> | ||
| + | <br> | ||
= Troubleshooting = | = Troubleshooting = | ||
| Line 41: | Line 255: | ||
| − | = | + | = Results Output = |
| − | Complete the steps outlined in the following links to review | + | Complete the steps outlined in the following links to review simulation results from the TUFLOW CATCH integrated model simulation: |
| − | + | :*<u>[[TUFLOW_CATCH_Tutorial_M04_Results_QGIS | TC04 - Results]]</u><br> | |
| − | <u>[[TUFLOW_CATCH_Tutorial_M04_Results_QGIS | | ||
= Conclusion = | = Conclusion = | ||
Latest revision as of 12:17, 9 June 2025
Page Under Construction
Introduction
In this module, a TUFLOW CATCH integrated model with interventions is developed.
TUFLOW CATCH Tutorial 04 is built from the models created in TUFLOW CATCH Tutorial 02 and TUFLOW CATCH Tutorial 03. The completed TUFLOW CATCH Tutorial 03 is provided in the TUFLOW_CATCH_Module_04\Modelling folder of the download dataset as the starting point for this tutorial. If unfamiliar with TUFLOW CATCH, it is recommended to complete TUFLOW CATCH Tutorial 01, TUFLOW CATCH Tutorial 02 and TUFLOW CATCH Tutorial 03 prior to starting this tutorial.
Meteorological Data
Meteorological inputs are defined in boundary condition blocks within the receiving model block of the TUFLOW CATCH Control file (.tcc). For this tutorial, timeseries meteorological data has been supplied.
- In Windows File Explorer, navigate to the TUFLOW_CATCH_Module_04\Tutorial_Data folder. Copy the TC04_met_ts_001.csv and paste it in the TUFLOW_CATCH_Module_04\Modelling\TUFLOWFV\bc_dbase\met folder. This file contains the timeseries meteorological data.
- Open the file. As this file is read by TUFLOW FV, the first column (Time) must contain the date is ISODATE format (DD/MM/YYYY hh:mm:ss). The other columns contain the data for the meteorological conditions that will be simulated in this model:
- AIR_TEMP: Air temperature (degrees Celsius)
- REL_HUM: Relative humidity (%)
- LW_RAD: Downward longwave radiation (W m-2)
- W10_X: Zonal wind velocity at 10m (m s-1)
- SW_RAD: Downward shortwave radiation (W m-2)
- W10_Y: Meridional wind velocity at 10m (m s-1)
Simulation Control Files
The following steps will require use of a text editor. The tutorial demonstration uses Notepad++. For its configuration information refer to Notepad++ Tips.
Generate Template Files
This tutorial requires a Water Quality Control file (.fvwq) and a Sediment Transport Control file (.fvsed). Use the TUFLOW CATCH plugin to generate template files:
- In QGIS, go to Processing > Toolbox from the top drop down menu options to open the Processing Toolbox.
- Go to TUFLOW Catch in the processing tool list and select 'Create TUFLOW Catch Project'. This opens the dialog shown below:
- Project Name: TC04
- Project Folder: Click '...', and navigate to the TUFLOW_CATCH_Module_04\Modelling folder.
- Project CRS: Click the drop down menu and select 'Project CRS: EPSG:32760 - WGS 84 / UTM zone 60S’.
- TUFLOW HPC Executable: Click '...', and navigate to the exe\TUFLOW\2025.0.2 folder. Select TUFLOW_iSP_w64.exe.
- TUFLOW FV Executable: Click '...', and navigate to the exe\TUFLOWFV\2025.0.0 folder. Select TUFLOWFV.exe.
- Default GIS Format: Click the drop down menu and select 'SHP'.
- Tick on 'Setup Control File Templates'.
- Control File Templates: Click '...', and tick on: Water Quality Control file (.fvwq) and Sediment Control file (.fvsed). Ensure all other files are ticked off.
- Click 'Run'. Once the tool has finished click 'Close'.

Water Quality Control File (FVWQ)
- Navigate to the TUFLOWFV\wqm folder and open TC04_001.fvwq in a text editor.
- In the 'Simulation Controls' sections, update the following commands:
Simulation Class == DO ! Specify the simulation class to Dissolved Oxygen
WQ dt == 300 ! Interval for updating the water quality module
WQ Units == mgL ! Specify the units to be mgL
- In the 'Constituent Model Settings', add the following commands to specify the constituent (oxygen and pathogens) parameters. For more information on the model settings for each constituent, refer to the TUFLOW FV Water Quality Manual: Section 4.6.3.1 (Oxygen) and Section 4.6.3.2 (Pathogens).
Oxygen Model == O2 ! Set the oxygen model
- Oxygen Min Max == 0.0, 12.0 ! Specify the allowable minimum and maximum oxygen concentrations
- Oxygen Benthic == 4.7, 1.08 ! Specify the global benthic parameters
Pathogen Model == Free, Ecoli ! Set the pathogen model and name
- Alive Min Max == 0.0, 1e7 ! Specify the allowable minimum and maximum concentrations
- Mortality == 0.08, 2e-12, 6.1, 1.0, 1.11 ! Specify the mortality parameters
- Visible Inactivation == 0.082, 0.0067, 0.5 ! Specify the visible light inactivation parameters
- UVA Inactivation == 0.5, 0.0067, 0.5 ! Specify the UV-A light inactivation parameters
- UVB Inactivation == 1.0, 0.0067, 0.5 ! Specify the UV-B light inactivation parameters
- Settling == -0.03 ! Specify the settling of non-attached pathogens
- Oxygen Min Max == 0.0, 12.0 ! Specify the allowable minimum and maximum oxygen concentrations
- In the 'Material Specifications' section, add the following material blocks to specify oxygen flux for each material ID.
Material == Default ! Defines default properties for all materials
- Oxygen Flux == -1400.0
Material == 1 ! Defines properties for material ID 1 (overwrites default)
- Oxygen Flux == -1100.0
Material == 2 ! Defines properties for material ID 2 (overwrites default)
- Oxygen Flux == -1200.0
Material == 3 ! Defines properties for material ID 3 (overwrites default)
- Oxygen Flux == -1300.0
- Oxygen Flux == -1400.0
- Save the FVWQ.
Sediment Transport Control File (FVSED)
- Navigate to the TUFLOWFV\stm folder and open TC04_001.fvsed in a text editor.
- Update the following command to match the output interval for the rest of the model (300secs or 5mins):
Update dt == 300 ! Interval for updating the sediment transport module
- In the 'Settings' section, update the following commands. For more information on these commands, please refer to the TUFLOW FV Sediment Transport Manual.
Erosion Depth Limits == 0.1, 0.5 ! Depth limits within which the erosion rate is scaled down (meters)
Deposition Depth Limits == 0.1, 0.5 ! Depth limits within which the deposition rate is scaled down (meters)
Bed Roughness Model == ks ! Set bed roughness model
Bed Roughness Parameters == 0.02, 0.02 ! Specify the bed roughness for current and waves
- In the 'Fractions' section, add in the following Fraction block to set the parameters for clay.
Fraction == Clay ! Set sediment fraction
- d50 == 0.0002 ! Specify the median grain size of the sediment fraction (meters)
- Particle Density == 2650.0 ! Specify the density of the particle group (kg/m3)
- Settling Model == Constant ! Set the settling model
- Settling Parameters == 1e-05 ! Specify constant settling velocity (m/s)
- Critical Stress Model == Constant ! Set the critical stress model
- Critical Stress Parameters == 0.15 ! Specify constant critical stress (N/m2)
- Erosion Model == Mehta ! Set the erosion model
- Erosion Parameters == 0.01, 0.5, 1.0 ! Specify constant erosion rate (g/m2s), critical shear stress (N/m2) and power coefficient
- Deposition Model == ws0 ! Set the deposition model
- d50 == 0.0002 ! Specify the median grain size of the sediment fraction (meters)
- In the 'Materials' section, add the following material blocks to set the sediment transport for each material ID.
Material == 1, 2 ! Defines properties for material IDs 1 and 2
- Nlayer == 1 ! Number of sediment bed layers
- Layer == 1 ! Bed layer number
- Dry Density == 800 ! Dry density of bed layer (kg/m3)
- Initial Mass == 1500 ! Initial mass of each sediment fraction (kg/m2)
- Dry Density == 800 ! Dry density of bed layer (kg/m3)
- End Layer
Material == 3 ! Defines properties for material ID 3
- Nlayer == 1 ! Number of sediment bed layers
- Layer == 1 ! Bed layer number
- Dry Density == 800 ! Dry density of bed layer (kg/m3)
- Initial Mass == 3200 ! Initial mass of each sediment fraction (kg/m2)
- Dry Density == 800 ! Dry density of bed layer (kg/m3)
- End Layer
- Nlayer == 1 ! Number of sediment bed layers
- Save the FVSED.
TUFLOW CATCH Control File (TCC)
Global Settings
For this tutorial, leave all commands as is. This section of the .tcc was populated in TUFLOW CATCH Tutorial 01.
Catchment Hydraulic Model
This block contains commands that construct the TUFLOW HPC simulation.
- Save a copy of TC03_001.tcc as TC04_001.tcc in the TUFLOW_CATCH_Module_04\Modelling\TUFLOWCATCH\runs folder.
- Open TC04_001.tcc in a text editor, and comment out the following command:
! Pollutant == Salinity, Temperature, WQ_DISS_OXYGEN_MG_L, WQ_PATH_ECOLI_ALIVE_CFU_100ML, WQ_PATH_ECOLI_DEAD_CFU_100ML, SED_CLAY ! Specify the pollutant names
Pollutant Export Model
This block contains commands that control the pollutant export (and other constituent) simulation. As this tutorial model is an integrated simulation with interventions, we must turn the pollutant export model back on:
- Set the pollutant export model:
Catchment Pollutant Export Model == Mass Accumulation Release
- Uncomment all the commands. The pollutant export model block should look the same as in TUFLOW CATCH Tutorial 02
Receiving Model
This block contains commands that construct the TUFLOW FV simulation. For this tutorial, the receiving model block must be updated to include water quality and sediment transport.
- In the 'General Parameters' section, update the following commands to turn on salinity, temperature, sediment and heat. For more information on these commands, refer to Appendix B of the TUFLOW FV Manual
Include Salinity == 1, 0
Include Temperature == 1, 0
Include Sediment == 1, 0
Include Heat == 1
- In the 'Water Quality' section, update the following commands to set the general WQ parameters and to reference the Water Quality Control file.
Water Quality Model == TUFLOW
Water Quality Control File == ..\..\TUFLOWFV\wqm\TC04_001.fvwq ! Reference the Water Quality Control File
Water Quality Model Directory == ..\..\TUFLOWFV\wqm\ ! Location of the Water Quality Directory
Cell Water Quality Depth == 0.05 ! Minimum depth to execute water quality calculations (meters)
- In the 'Sediment Transport' section, update the following command to reference the Sediment Control file:
Sediment Control File == ..\..\TUFLOWFV\stm\TC04_001.fvsed ! Reference the Sediment Control File
- In the 'Initial Conditions' section, update the following commands to set the initial temperature and salinity:
Initial Temperature == 17.0 ! Specify initial temperature (degrees Celsius)
Initial Salinity == 0.0 ! Specify initial salinity (psu)
- In the 'Meteorology' section, add the following boundary condition blocks to specify meteorological conditions. The variable 'met_ts' is used to define the location of the meteorological data.
Set Variable met_ts == ..\..\TUFLOWFV\bc_dbase\met\TC04_met_ts_001.csv
BC == LW_RAD, <<met_ts>> ! Downward longwave radiation (W m-2)
- BC Header == Time, LW_RAD ! Column headers to read from time series file
- BC Update dt == 300 ! Specify update timestep for BC (seconds)
- BC Time Units == Hours ! Specify time units
- BC Reference Time == 01/01/2021 10:00 ! Specify boundary condition reference time
BC == SW_RAD, <<met_ts>> ! Downward shortwave radiation (W m-2)
- BC Header == Time, SW_RAD
- BC Update dt == 300
- BC Time Units == Hours
- BC Reference Time == 01/01/2021 10:00
BC == W10, <<met_ts>> ! Wind velocity at 10m (m s-1)
- BC Header == Time, W10_X, W10_Y
- BC Update dt == 300
- BC Time Units == Hours
- BC Reference Time == 01/01/2021 10:00
BC == AIR_TEMP, <<met_ts>> ! Temperature input (deg C)
- BC Header == Time, AIR_TEMP
- BC Update dt == 300
- BC Time Units == Hours
- BC Reference Time == 01/01/2021 10:00
BC == REL_HUM, <<met_ts>> ! Relative humidity (%)
- BC Header == Time, REL_HUM
- BC Update dt == 300
- BC Time Units == Hours
- BC Reference Time == 01/01/2021 10:00
- BC Header == Time, LW_RAD ! Column headers to read from time series file
- In the 'Outputs' section, update the existing NetCDF output block to include sediment:
Output == NetCDF
- Output Parameters == h, v, d, sed_1 ! Outputs water level, velocity, depth and sediment
- Output Interval == 30 ! Interval to output the data (seconds)
- Suffix == HD ! Specify suffix for the output NetCDF file
- Output Parameters == h, v, d, sed_1 ! Outputs water level, velocity, depth and sediment
- At the end of the 'Outputs' section, add the following output block to output water quality results.
Output == NetCDF
- Output Parameters == wq_all ! Outputs water quality results
- Output Interval == 30 ! Interval to output the data (seconds)
- Suffix == WQ ! Specify suffix for the output NetCDF file
- Output Parameters == wq_all ! Outputs water quality results
- Save the TCC.
Running the Simulation
- In Windows File Explorer, navigate to the TUFLOWCATCH\runs folder. Save a copy of _run_TC03_CATCH.bat as _run_TC04_CATCH.bat and open the file in a text editor.
- Update the batch file to reference the TC04_001.tcc:
set exe="..\..\..\..\exe\TUFLOWCATCH\2025.0.1\TUFLOWCATCH.exe"
%exe% TC04_001.tcc - Double click the batch file in file explorer to run the simulation.
Troubleshooting
See tips on common mistakes and troubleshooting steps if the model doesn't run:
Results Output
Complete the steps outlined in the following links to review simulation results from the TUFLOW CATCH integrated model simulation: