Tute SAGA M01 Create Projection: Difference between revisions
Jump to navigation
Jump to search
Content deleted Content added
Chris Huxley (talk | contribs) |
Chris Huxley (talk | contribs) |
||
| Line 4: | Line 4: | ||
=Method= |
=Method= |
||
<ol> |
|||
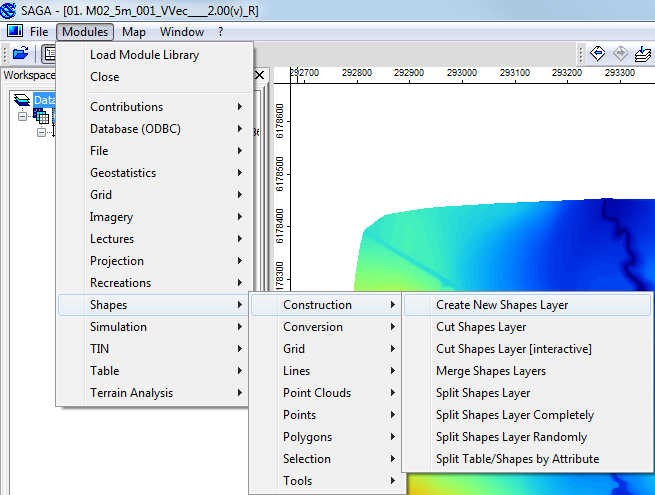
<li>Using the menus navigate to ''Modules >> Shapes >> Construction >> Create New Shapes Layer''. |
<li> Using the drop menus navigate to ''Modules >> Shapes >> Construction >> Create New Shapes Layer''. |
||
[[File:Tute M01 Saga New Shape.png|frame|none|Create a new Shapes Layer]] |
[[File:Tute M01 Saga New Shape.png|frame|none|Create a new Shapes Layer]] |
||
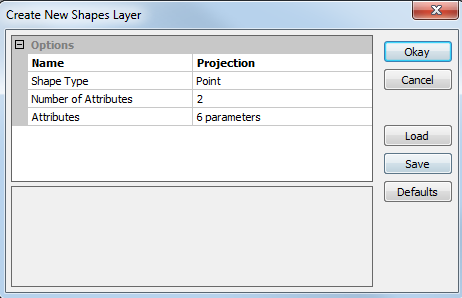
<li> |
<li> Set the ''Name'' field to '''Projection'''. Leave the remaining options as the defaults. |
||
[[File:Tute M01 Saga New Shape2.png|frame|none|New Shapes Layer Dialogue]] |
[[File:Tute M01 Saga New Shape2.png|frame|none|New Shapes Layer Dialogue]] |
||
A new shape layer called |
A new shape layer called '''Projection''' should have been created, this should be visible in the Data tab of the workspace. |
||
[[File:Tute M01 Saga Projection1.png|frame|none|Newly Created Projection Shape Layer]] |
[[File:Tute M01 Saga Projection1.png|frame|none|Newly Created Projection Shape Layer]] |
||
The next step is to define the projection of this |
The next step is to define the projection of this shapefile. |
||
<li>In the menus select ''Modules >> Projection >> Set Coordinate Reference System''. |
<li> In the menus select ''Modules >> Projection >> Set Coordinate Reference System''. |
||
<li>In the dialogue set the following:<br> |
<li> In the dialogue set the following:<br> |
||
*Geographic Coordinate System to |
*Geographic Coordinate System to WGS84 |
||
* Projected Coordinate Systems to WGS84 / UTM Zone 60S |
* Projected Coordinate Systems to WGS84 / UTM Zone 60S |
||
* Under Shapes add the Projection shape (this applies the setting to this shape layer). |
* Under Shapes add the Projection shape (this applies the setting to this shape layer). |
||
Select ''Okay'' |
* Select ''Okay''<br> |
||
| ⚫ | |||
[[File:Tute M01 Saga Projection2.png|frame|none|Set the Coordinate System ]] |
[[File:Tute M01 Saga Projection2.png|frame|none|Set the Coordinate System ]] |
||
<li>Right click on the Projection layer in the Data tab of the workspace and select ''Save As''.<br> |
<li> Right click on the Projection layer in the Data tab of the workspace and select ''Save As''.<br> |
||
Save the file under the '''TUFLOW\Model\gis\''' directory as '''Projection.shp'''. |
<li> Save the file under the '''TUFLOW\Model\gis\''' directory as '''Projection.shp'''. |
||
| ⚫ | |||
=Conclusion= |
=Conclusion= |
||
A new GIS layer has been created and this will be used to define the projection of the TUFLOW model. Please return to the tutorial module page <u>[[Tutorial_Module01#Set_GIS_Projection_and_Create_Empty_.28Template.29_Files | here]]</u>. |
A new GIS layer has been created and this will be used to define the projection of the TUFLOW model. Please return to the tutorial module page <u>[[Tutorial_Module01#Set_GIS_Projection_and_Create_Empty_.28Template.29_Files | here]]</u>. |
||
Revision as of 09:09, 4 January 2017
- Using the drop menus navigate to Modules >> Shapes >> Construction >> Create New Shapes Layer.
Create a new Shapes Layer - Set the Name field to Projection. Leave the remaining options as the defaults.
New Shapes Layer Dialogue A new shape layer called Projection should have been created, this should be visible in the Data tab of the workspace.

Newly Created Projection Shape Layer The next step is to define the projection of this shapefile.
- In the menus select Modules >> Projection >> Set Coordinate Reference System.
- In the dialogue set the following:
- Geographic Coordinate System to WGS84
- Projected Coordinate Systems to WGS84 / UTM Zone 60S
- Under Shapes add the Projection shape (this applies the setting to this shape layer).
- Select Okay
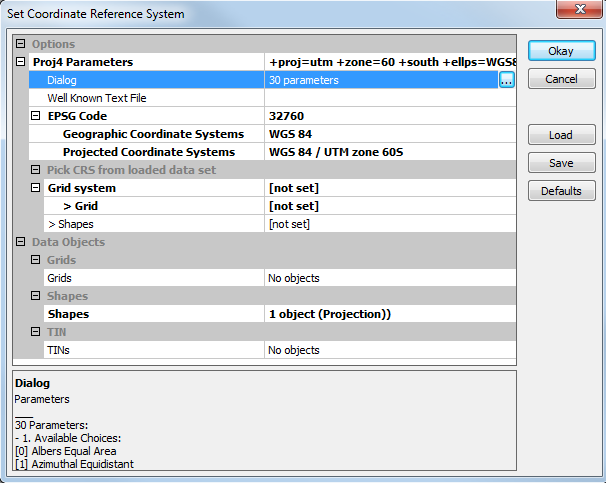
Set the Coordinate System - Right click on the Projection layer in the Data tab of the workspace and select Save As.
- Save the file under the TUFLOW\Model\gis\ directory as Projection.shp.
Introduction
This page describes the process of creating a new "Shapes" layer in SAGA. We will define the projection of this table. It will be used to set the GIS coordinate system (projection) of the TUFLOW model.
Method


Conclusion
A new GIS layer has been created and this will be used to define the projection of the TUFLOW model. Please return to the tutorial module page here.