TUFLOW Setup with Kart QGIS Plugin: Difference between revisions
Tuflowduncan (talk | contribs) |
Tuflowduncan (talk | contribs) No edit summary |
||
| Line 5: | Line 5: | ||
The first step is to install the Kart QGIS plugin. This is done using the '''Manage and Install Plugins''' tool within QGIS. Search for Kart and install the plugin. |
The first step is to install the Kart QGIS plugin. This is done using the '''Manage and Install Plugins''' tool within QGIS. Search for Kart and install the plugin. |
||
[[File:Kart QGIS Plugin.png|left|thumb|600x600px|Kart QGIS Plugin]] |
[[File:Kart QGIS Plugin.png|left|thumb|600x600px|Kart QGIS Plugin]] |
||
The plugin requires that you install Kart from https://kartproject.org/ |
|||
Once the plugin and Kart is installed, there is a Kart menu within QGIS with some settings. Specify the path to the installed Kart executable. There's an option to Auto Commit which will commit your changes to the repository when you 'Toggle editing' off within QGIS. This can be a useful option, although the drawback is that you are not prompted to add a commit message. |
|||
[[File:Kart Settings.png|left|thumb|Kart Settings]] |
|||
The Kart Repositories panel should show something similar to the following, with no repositories showing. |
|||
[[File:Kart Repository.png|left|thumb|Initial Kart Repository]] |
|||
== Set up the TUFLOW Model and Initialise Kart Repository == |
|||
With Kart set up, we can now move towards setting up your TUFLOW model. To use Kart, you would need to be using a Geopackage GIS Format. To set up your TUFLOW folders, you can use your chosen method of either the [[QGIS TUFLOW Create Project|TUFLOW Create Project]] tool or the [[Create TUFLOW Project]] tool. |
|||
With the TUFLOW folders set up, there is now some fiddly steps to go through so that we can set up a Kart repository. Kart probably works best with a single Geopackage for the whole TUFLOW model, although it would be possible to use with seperate Geopackages. The steps below are for a single Geopackage. |
|||
* Cut and paste the Empties folder and the Geopackage file from the '''TUFLOW\Model\GIS''' folder to TUFLOW\Model. This is because Kart can not initialise a repository if the folder is not empty. |
|||
* Rename the ''''GIS'''<nowiki/>' folder to '*Model_Name*' where '*Model_Name*' is the same as your Geopackage name. |
|||
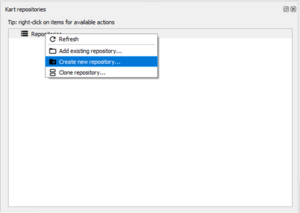
* Use the Kart Create new repository tool to create a new Kart repository. [[File:Create Kart Repository.png|left|thumb|Create Kart Repository]] |
|||
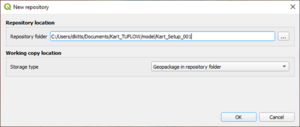
* Select the '''TUFLOW\Model\Model_Name''' folder and ensure 'Geopackage in repository folder' is selected in the Storage type option. Click OK.[[File:Kart Repository Setup.png|alt=Kart Repository Setup|left|thumb]] |
|||
* Cut and paste the ''''empty'''<nowiki/>' folder from '''TUFLOW\Model''' to the '''TUFLOW\Model\Model_Name''' folder. |
|||
* Rename the '<nowiki/>'''Model_Name'''<nowiki/>' folder to ''''GIS'''<nowiki/>'. |
|||
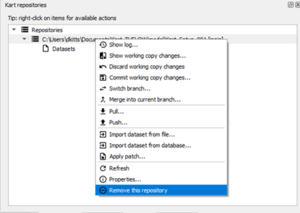
* in the Kart repositories panel, highlight the current repositiry and choose to 'remove this repository'. Click Yes when the prompt dialogue comes up.[[File:Remove Repository.png|left|thumb|Remove Repository]] |
|||
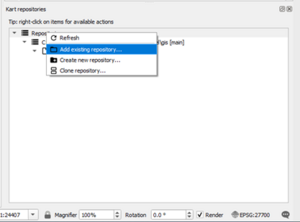
* We now need to add the renamed folder as an existing repository. Right click on the repositories optoin and select 'Add existing repository'. Navigate to the '''TUFLOW\Model\GIS''' folder and choose select folder.[[File:Add Existing Respository.png|left|thumb|Add Existing Repository]] |
|||
* We need to now import the '''Model_Name.gpkg''' into the repository. This is done by right clicking on the repository and selecting 'Import dataset from file'. Navigate to the '''TUFLOW\Model\Model_Name.gpkg'''. |
|||
[[File:Import dataset from File.png|left|thumb|Import Dataset from File]] |
|||
* The repository will now show the Geopackage layers, which at present is the projection layer. |
|||
[[File:Repository.png|left|thumb|Repository after Importing the Geopackage Dataset]] |
|||
* Finally, the Model_Name.gpkg can be deleted from the '''TUFLOW\Model''' folder. |
|||
The above steps are by far and away the fiddliest steps with the TUFLOW model Kart set up. Now we can start building the TUFLOW model. |
|||
== TUFLOW Model Build == |
|||
We can now start to build our TUFLOW model using the traditional steps of the [[QGIS TUFLOW Import Empty|Import Empty File]] tool within the QGIS TUFLOW Plugin. When importing the empty files, we can import to the gpkg in Kart repository using the options in the following image, ensuring to select the 'All to one' option and choosing to 'Import into Kart repor folder'. |
|||
[[File:Import Empty File.png|left|thumb|Import Empty File]] |
|||
Once the empty file is imported, you can refresh the Kart Repository, and see the additional layers with there. |
|||
[[File:Kart Repository 2.png|left|thumb|Kart Respository Showing the Imported Empty File]] |
|||
We can now build the model geometry as we would do usually. |
|||
== Benefits of Kart == |
|||
The benefit of using Kart is the version control that it offers during the model build. The video below shows an initial model build with some additional layers and where the layer geometry has undergone a number of iterative changes. The video shows: |
|||
* The commit history table. |
|||
* Differences between different commits both in text form and in geometry form. |
|||
For a full list of Kart tools, the user is recommended to consult the Kart documentation [https://docs.kartproject.org/en/latest/ here]. Like Git, Kart will provide tools that allow branching and merging. It is also possible to apply spatial and temporal filters for changes. |
|||
Revision as of 21:01, 26 June 2025
Introduction
Kart is a version control tool which stores geospatial data (and tabular data) in Git, providing a neat version control system whilst building TUFLOW models. Despite using Git, there is no requirement for the user to have a thorough understanding of Git, it's processes and commands. The Kart QGIS plugin provides user interface for Kart which provides some tools for reviewing changes to the geospatial data. This page describes a workflow for setting up a TUFLOW project, utilising Kart, and provides some of the benefits of using the Kart tools for version control.
Install the Kart Plugin
The first step is to install the Kart QGIS plugin. This is done using the Manage and Install Plugins tool within QGIS. Search for Kart and install the plugin.

The plugin requires that you install Kart from https://kartproject.org/
Once the plugin and Kart is installed, there is a Kart menu within QGIS with some settings. Specify the path to the installed Kart executable. There's an option to Auto Commit which will commit your changes to the repository when you 'Toggle editing' off within QGIS. This can be a useful option, although the drawback is that you are not prompted to add a commit message.

The Kart Repositories panel should show something similar to the following, with no repositories showing.

Set up the TUFLOW Model and Initialise Kart Repository
With Kart set up, we can now move towards setting up your TUFLOW model. To use Kart, you would need to be using a Geopackage GIS Format. To set up your TUFLOW folders, you can use your chosen method of either the TUFLOW Create Project tool or the Create TUFLOW Project tool.
With the TUFLOW folders set up, there is now some fiddly steps to go through so that we can set up a Kart repository. Kart probably works best with a single Geopackage for the whole TUFLOW model, although it would be possible to use with seperate Geopackages. The steps below are for a single Geopackage.
- Cut and paste the Empties folder and the Geopackage file from the TUFLOW\Model\GIS folder to TUFLOW\Model. This is because Kart can not initialise a repository if the folder is not empty.
- Rename the 'GIS' folder to '*Model_Name*' where '*Model_Name*' is the same as your Geopackage name.
- Use the Kart Create new repository tool to create a new Kart repository.
Create Kart Repository

- Select the TUFLOW\Model\Model_Name folder and ensure 'Geopackage in repository folder' is selected in the Storage type option. Click OK.

- Cut and paste the 'empty' folder from TUFLOW\Model to the TUFLOW\Model\Model_Name folder.
- Rename the 'Model_Name' folder to 'GIS'.
- in the Kart repositories panel, highlight the current repositiry and choose to 'remove this repository'. Click Yes when the prompt dialogue comes up.
Remove Repository

- We now need to add the renamed folder as an existing repository. Right click on the repositories optoin and select 'Add existing repository'. Navigate to the TUFLOW\Model\GIS folder and choose select folder.
Add Existing Repository

- We need to now import the Model_Name.gpkg into the repository. This is done by right clicking on the repository and selecting 'Import dataset from file'. Navigate to the TUFLOW\Model\Model_Name.gpkg.

- The repository will now show the Geopackage layers, which at present is the projection layer.

- Finally, the Model_Name.gpkg can be deleted from the TUFLOW\Model folder.
The above steps are by far and away the fiddliest steps with the TUFLOW model Kart set up. Now we can start building the TUFLOW model.
TUFLOW Model Build
We can now start to build our TUFLOW model using the traditional steps of the Import Empty File tool within the QGIS TUFLOW Plugin. When importing the empty files, we can import to the gpkg in Kart repository using the options in the following image, ensuring to select the 'All to one' option and choosing to 'Import into Kart repor folder'.
Once the empty file is imported, you can refresh the Kart Repository, and see the additional layers with there.

We can now build the model geometry as we would do usually.
Benefits of Kart
The benefit of using Kart is the version control that it offers during the model build. The video below shows an initial model build with some additional layers and where the layer geometry has undergone a number of iterative changes. The video shows:
- The commit history table.
- Differences between different commits both in text form and in geometry form.
For a full list of Kart tools, the user is recommended to consult the Kart documentation here. Like Git, Kart will provide tools that allow branching and merging. It is also possible to apply spatial and temporal filters for changes.