1D Bridges: Difference between revisions
Rohan.king (talk | contribs) |
Rohan.king (talk | contribs) mNo edit summary |
||
| Line 13: | Line 13: | ||
</ul></div> |
</ul></div> |
||
| ⚫ | |||
| ⚫ | |||
<br> |
<br> |
||
*Link to 2D section – this section explains 1D bridges only. |
*Link to 2D section – this section explains 1D bridges only. |
||
| Line 20: | Line 18: | ||
*Examples on a XZ and HW bridge type – pictures & csv examples |
*Examples on a XZ and HW bridge type – pictures & csv examples |
||
*Information on the checks you can carry out |
*Information on the checks you can carry out |
||
| ⚫ | |||
| ⚫ | |||
=Loss Theory= |
|||
| ⚫ | |||
| ⚫ | |||
*Theory |
*Theory |
||
**Loss types (piers Kp, blockage Kb) |
**Loss types (piers Kp, blockage Kb) |
||
**Guidance/reference on how to derive losses |
**Guidance/reference on how to derive losses |
||
**Make sure to include section on automation of pier losses? |
**Make sure to include section on automation of pier losses? |
||
| ⚫ | |||
| ⚫ | |||
=Irregular shaped bridges= |
=Irregular shaped bridges= |
||
Revision as of 00:06, 2 February 2016
Page Under Construction
Introduction
The following section looks at bridges using the 1D component of TUFLOW, for information on bridges in the 2D domain please see the following section on 2D hydraulic Structures and Module 6.
As a typical rule-of-thumb, if the channel up stream &/or downstream of the bridge is modeled in 1D then the bridge should also be modeled in 1D. Ideally any change in the channel from ESTRY 1D to 2D or vice-versa should also occur at a structure (i.e. bridge, culvert, etc) to facilitate the transition in solution schemes. The images below displays a typical preferred setup, however as is the case with hydraulic modeling your particular model situation may be different and therefore not always conform to these ideals.
-
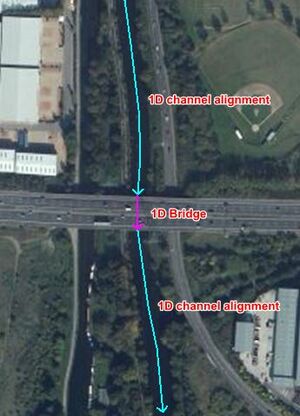
1D channel to 1D bridge to 1D channel -
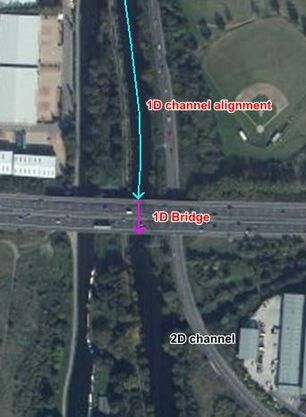
1D channel to 1D bridge to 2D channel -
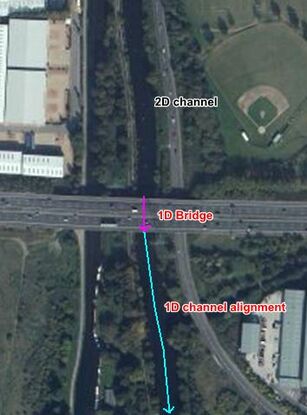
2D channel to 1D bridge to 1D channel


- Link to 2D section – this section explains 1D bridges only.
- Advice on when you would model a 1D bridge versus a 2D bridge (read module 6).
- Examples on a XZ and HW bridge type – pictures & csv examples
- Information on the checks you can carry out
- Method A & Method B for bridges – refer to Bill’s post on 1.56 value
Loss Theory
Details on how the default loss coefficient of 1.56 was derived can be found here.
- Theory
- Loss types (piers Kp, blockage Kb)
- Guidance/reference on how to derive losses
- Make sure to include section on automation of pier losses?
Irregular shaped bridges
Typical checks
The table below highlights some of the commonly used check files when reviewing 1D bridges. The full list of TUFLOW check files can be found here.
| Filename prefix / suffix | Brief Description |
|---|---|
| _1d_bc_tables_check.csv | Contains the inverts of the 1D nodes and at the ends of the 1D channels. Very useful for checking for smooth transitions from one channel to another and with the nodes. |
| 1d_ta_tables_check.csv | Tabular data as read from tables via the 1d_tab layers for cross-section, storage and other data. Provides full traceability to original data source and additional information such as hydraulic properties determined from a cross-section profile. Flood Modeller XZ processed, and MIKE 11 processed cross-section data included. Refer also to the _xsl_check layer. |
| _hydroprop_check.mif _hydroprop_check_L.shp |
Contains the hydraulic properties at the top of the hydraulic properties tables as attributes of the 1D channels. Other information such as the primary Manning’s n is also provided. Very useful for carrying out quality control checks on the 1D channels. |
| _inverts_check.mif _inverts_check_P.shp |
Contains the inverts of the 1D nodes and at the ends of the 1D channels. Very useful for checking for smooth transitions from one channel to another and with the nodes. |
| _iwl_check.mif _iwl_check_P.shp |
GIS .mif/.mid or .shp files of the initial water levels at the 1D model nodes. |
| _nwk_C_check.mif _nwk_C_check_L.shp |
GIS .mif/.mid or .shp files of the final 1D model network. This check layer contains the channels of the 1D domain only. The _nwk_N_check layer contains the nodes. The layers lines are coloured based on the channel type (available for the .mid/.mif format only). |
| _nwk_N_check.mif _nwk_N_check_P.shp |
GIS .mif/.mid or .shp files of the final 1D model network. This check layer contains the nodes of the 1D domain only. The _nwk_C_check layer contains the channels. The node symbology is displayed as a red circle for nodes connected to two or more channels, a larger magenta circle for nodes connected to one channel and a large yellow square for nodes not connected to a channel (available for the .mid/.mif format only). This is very useful for checking for channel ends or nodes that are not snapped. |
| _xsl_check.mif _xsl_check_L.shp |
GIS layer containing tabular data as read from 1d_xs input layers. Contains the XS ID and other useful information on the cross-section properties, etc. Refer also to _ta_tables_check.csv. |
Any further questions please email TUFLOW support: support@tuflow.com