Tute M01 Boundaries SMS Archive
Introduction
A TUFLOW simulation computes the water surface elevations and velocities within the model domain. This requires definition of the model domain (such as topography and materials) as well as external forces (boundary conditions).
This model will three boundary condition types:
- An external flow verse time boundary condition on the upstream portion of the model
- An internal flow verse time boundary on the upstream portion of a tributary; and
- Downstream water level - flow (stage-discharge) boundary

This boundary condition configuration is very typical of hydraulic models. TUFLOW has the ability to store multiple boundary condition curves to represent separate events. For example, curves for 10, 50, and 100 year events can be included in the same boundary condition. Each simulation specifies the event that is used for the simulation. Generally, boundary condition locations are digitized by hand. However, in order to ensure uniformity we will use the geometry created from the "Boundary.mif" GIS file in the previous section Defining Active and Inactive Areas of the 2D Domain.
Methodology
External Flow Verse Time Boundary
To create the upstream boundary condition arc and assign boundary conditions:
- Turn off the display of all project explorer items except the Scatter Data. Depending on your current settings, you might need to turn off the display of scatter Points and turn on Contours, Contour color fill and Contour Transperancy from the Display Options dialog.
- Make sure that arcs and vertices are visible in the map layer and select the BC coverage to switch to the map module.
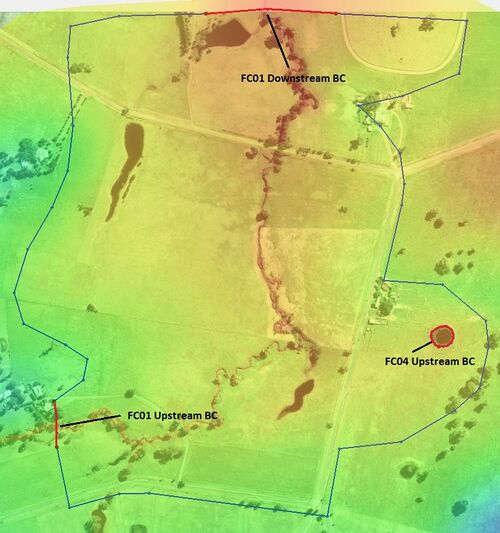
- Click on the Select Feature Vertex tool. Select the vertices at the end of the “FC01 Upstream BC Arc” shown above (hold the shift key to select multiple vertices). Select the Feature Objects | Vertices <-> Nodes command. Converting vertices to nodes creates new arcs from the existing vertices. The new arc should have two nodes (endpoints) and two interior vertices.
- Select the newly created arc using the Select Feature Arc tool. Right click and select Attributes.
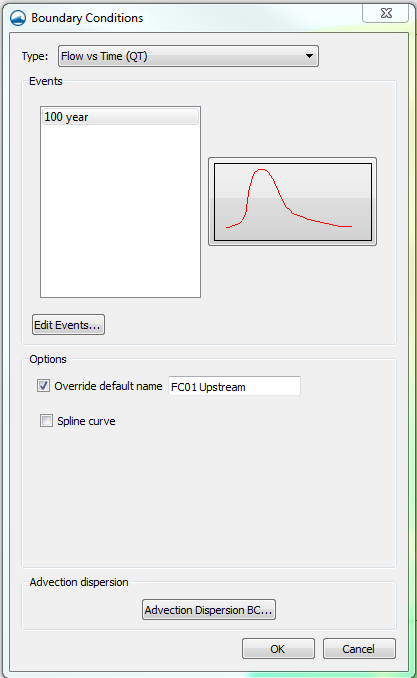
- Change the Type to Flow vs Time (QT). Make sure the Spline Curve option (in the Options section of the dialog) is not selected.
- Click Edit Events... button.
- Click on + sign which will add an event named "new_event" in the Events box. Click on this new event to select it and type “100 year” as the name. Click OK.
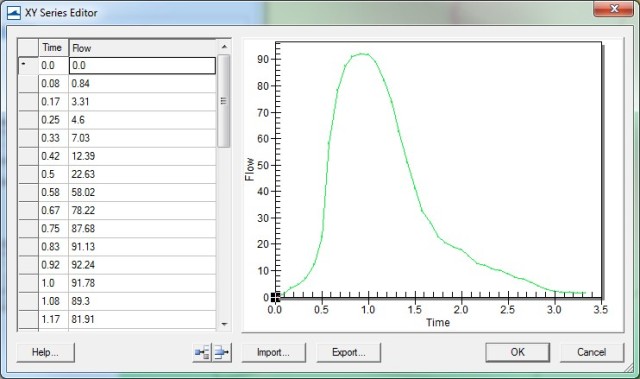
- Select the “100 year” event and click on the button (rectangular box) currently labeled “Curve undefined” to bring up the XY Series Editor dialog.
- Open the file \Module_Data\Module01\100yr2hr.xls” in a spreadsheet program, and copy the inflow times to the first column and the column of inflow values under the heading "FC01 Inflow" to the second column. Click OK.
- Toggle on the Override default name option and rename the arc to "FC01 Upstream".
- Click OK.
Internal Flow Verse Time Boundary
- Use the Create Feature Arc tool to trace a circular flow source arc in the area shown as “FC04 Upstream BC" on the image to the right .
- Select Feature Objects | Build Polygons to convert this new arc into a polygon feature so that we can use it as an internal source-area inflow.
- Select Select Feature Polygon tool and double click inside this new polygon to bring up Boundary Conditions dialog.
- Change Type to "Flow/Rainfall Over Area" and toggle on "Flow Vs Time".
- Click on event "100 year" to select it. Click on Curve Undefined button. Please NOTE that you do not need to create the event again, since it is already set up.
- Copy the FC04 inflow values from the spreadsheet (100yr2hr.xls)and paste into the XY Series editor (use the same time values) and click OK.
- Toggle on the Override default name option and rename the arc to "FC04 Upstream".
- Make sure Set cell code is set to "Active". Click OK.
Downstream Stage-Discharge boundary
The downstream boundary condition is going to be a rating curve computed from a friction slope within TUFLOW. To create the downstream boundary arc and set up the boundary condition:
- Use the Vertex->Nodes tool to create the downstream boundary arc (“FC01 Downstream Boundary Arc” as shown in the image at right).
- Using the Select Feature Arc tool, double click the downstream BC arc. This will bring up the Boundary Conditions dialog.
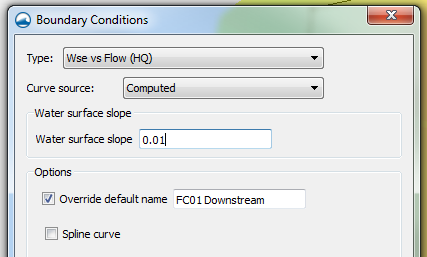
- Change the type to Wse vs Flow (HQ). Make sure the Spline Curve option is not selected.
- Change the Curve Source to "Computed".
- Set the Water Surface Slope to "0.01".
- Toggle on the Override default name option and rename the arc to "FC01 Downstream".
- Click OK to return to the main screen in SMS.
- Save your SMS project.

We already used the BC coverage to specify the cells that should be on (active) for our simulation. This is because we want cells outside of our boundary conditions to be turned off or they can cause problems with the solution. In addition, turning off cells that we know will be dry during the entire simulation reduces runtimes.
The necessary control file commands and boundary condition databases are created by SMS and passed directly to TUFLOW as long as the boundary conditions are set up correctly within SMS. Skip ahead to the "Set Model Controls and Run the Simulation" section.

