TUFLOW CATCH Tutorial M03 TUFLOW HPC GIS Inputs QGIS
Page Under Construction
Introduction
The updated culvert layers are supplied and inspected.
TUFLOW CATCH Project Re-Configuration
Re-configure the TUFLOW CATCH project to use and save empty files to the correct folders:
- Go to Processing > Toolbox from the top drop down menu options to open the Processing Toolbox.
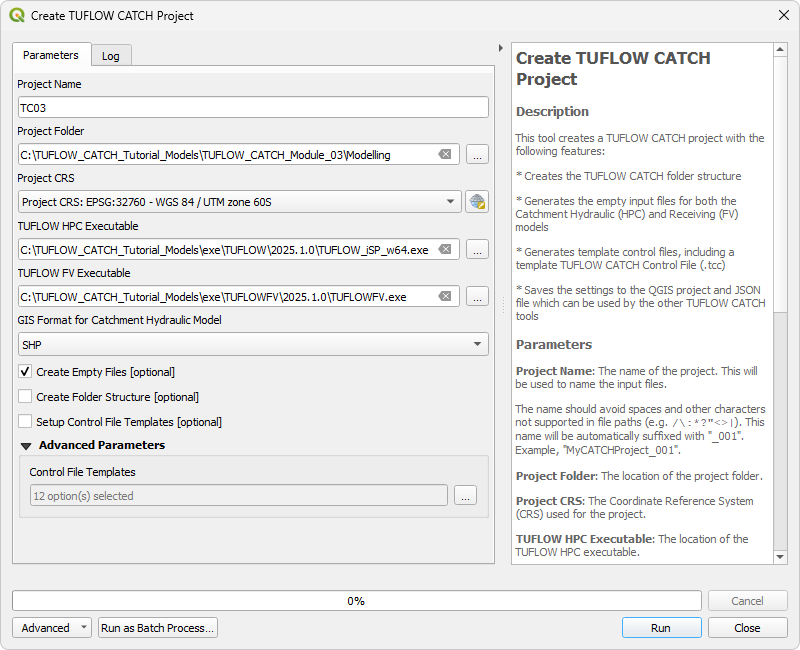
- Go to TUFLOW Catch in the processing tool list and select 'Create TUFLOW Catch Project'. This opens the dialog shown below.
- Project Name: TC03
- Project Folder: Click '...', and navigate to the TUFLOW_CATCH_Module_03\Modelling folder.
- Project CRS: Click the drop down menu and select 'Project CRS: EPSG:32760 - WGS 84 / UTM zone 60S’.
- TUFLOW HPC Executable: Click '...', and navigate to the exe\TUFLOW\2025.1.0 folder. Select TUFLOW_iSP_w64.exe.
- TUFLOW FV Executable: Click '...', and navigate to the exe\TUFLOWFV\2025.1.0 folder. Select TUFLOWFV.exe.
- Default GIS Format: Click the drop down menu and select 'SHP'.
- Tick on 'Create Empty Files'.
- Click 'Run' and a console window will open. This creates the empty GIS files.
- Once the tool has finished, click 'Close'.
- Set the QGIS workspace projection to EPSG:32760, see TUFLOW CATCH Module 01 - Project Initialisation.

Review Supplied TUFLOW Input Files
Navigate to the TUFLOW_CATCH_Module_03\Tutorial_Data folder. Copy the below layers into the Modelling\TUFLOW\model\gis folder:
- 2d_bc_TC03_001_P
- 2d_bc_TC03_001_L
- 1d_nwk_TC03_001_L
For this tutorial, a TUFLOW FV mesh will be included in the channel (outlined in the next section: TUFLOW FV GIS Inputs). Currently, there is a TUFLOW HPC culvert defined in the channel. This culvert needs to be removed from the TUFLOW HPC, and redefined in TUFLOW FV format.
- Load the supplied files into QGIS and use the 'Apply TUFLOW Styles to Open Layers'.
- Notice that the downstream culvert has been removed. All other culverts are the same.
| Up |
|---|