TUFLOW SWMM Tutorial M01 Check QGIS
Revision as of 14:29, 8 December 2023 by Chris Huxley (talk | contribs) (→Review the TUFLOW Check Files)
Review SWMM Check Files
When TUFLOW runs SWMM it can accommodate for multiple INP input files within the SWMM Control file. TUFLOW combines the input INP files into a single combined INP file for the simulation execution. The combined file that TUFLOW uses is written to the TUFLOW/results folder. The QGIS TUFLOW Plugin SWMM Processing Tool, 'GeoPackage - Create from SWMM inp' can be used to create a spatial GeoPackage version of the data for post simulation review checking.
- In the Processing Toolbox, select the 'GeoPackage - Create from SWMM inp' tool.
- Select: GeoPackage Input File: Navigate to the TUFLOW\results folder and select TS01_5m_001_swmm.inp.
- Set the CRS for GepPackage: WGS 84 / UTM Zone 60S.
- Leave SWMM Tags to ignore blank.
- Set the GeoPackage output filename: TUFLOW\check\TS01_5m_001_swmm_check.gpkg
- Click 'Run'.
- Once the tool is finished, click 'Close'.
- 'TS01_5m_001_swmm_check.gpkg will now be available in the TUFLOW\check folder.
- Open TUFLOW\check\TS01_5m_001_swmm_check.gpkg in QGIS. When prompted, open all Layers included in the GeoPackage file.
- Review the Links--Conduit, Node--Junction, Nodes--Outfall and Project--Options information to verify the data matches the input values that were entered.
<< Add video >>
Review the TUFLOW Check Files
- Open TUFLOW\check\TS01_5m_001_Check.gpkg. When prompted, open layers TS01_5m_001_grd_check_R and TS01_5m_001_1d_to_2d_check_R
- Use the 'Apply TUFLOW Styles to Open Layers'.
- Use the 'Apply GPKG Layer Names'.
- The grd_check is the 2D grid defined by the 2d_code layer and contains a region object for each cell. It is useful to understand how the model is orientated, the cell size in relation to the hydraulic features and where certain calculations occur in the model. In this tutorial, the grid is orientated to align with the downstream road.
- The nwk_C_check_L file shows all attributes applied to the network elements. Some fields should be inspected as they have changes from the input 1d_nwk_M03_culverts layer:
- Len_or_ANA: contains the length used by TUFLOW (determined by the digitised line).
- pSlope: the slope of the 1D element.
<< Add video >> - The 1d_to_2d_check_R file shows the cells selected by the SX boundary links. It is recommended the same number of linking cells is selected at both the upstream and downstream of the culverts and that the number of selected cells is proportional to the structure size. Zoom to each structure to inspect the SX links:
- The point SX selects a single cell in which the point falls.
- The region SX selects all cells where the cell centers fall within the region.
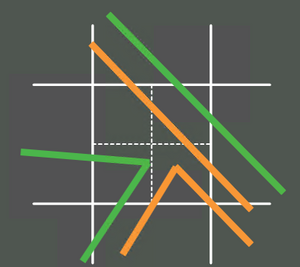
- The line SX selects cells which are intercepted by the line using the crosshair approach. For example, the dashed lines below are the hidden crosshairs within a cell. An SX line must intersect at least one of these crosshairs to be selected:
- The point SX selects a single cell in which the point falls.
<< Add video >>

| Up |
|---|