Difference between revisions of "Tutorial M07 GIS Inputs QGIS"
Jump to navigation
Jump to search
Melissa1987 (talk | contribs) |
|||
| Line 11: | Line 11: | ||
<li>Click 'OK' and save the QGIS workspace by selecting Project > Save As.<br> | <li>Click 'OK' and save the QGIS workspace by selecting Project > Save As.<br> | ||
<br> | <br> | ||
| − | [[File:M07 | + | [[File:M07 Config Proj AF.png]]<br><br> |
<li>Set the QGIS workspace projection to EPSG:32760, see <u>[https://wiki.tuflow.com/index.php?title=Tutorial_Site_Familiarisation_QGIS#Set_the_Projection Set the Projection]</u>. | <li>Set the QGIS workspace projection to EPSG:32760, see <u>[https://wiki.tuflow.com/index.php?title=Tutorial_Site_Familiarisation_QGIS#Set_the_Projection Set the Projection]</u>. | ||
</ol> | </ol> | ||
Revision as of 17:05, 16 November 2022
Introduction
QGIS is used to create, import and view input data.
TUFLOW Project Re-Configuration
Re-configure the TUFLOW project to use and save empty files to the correct folder:
- Go to Plugins > TUFLOW > Editing > Configure / Create TUFLOW Project.
- Change the folder which contains TUFLOW to the Module_07 folder. This is the only change required, the model folder structure and template empty files are supplied from previous model.
Note: The 'results' and 'check' folder get automatically created when the TUFLOW model is run.
- Click 'OK' and save the QGIS workspace by selecting Project > Save As.
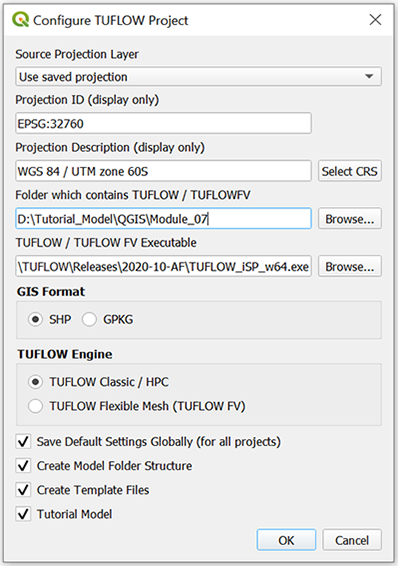
- Set the QGIS workspace projection to EPSG:32760, see Set the Projection.

Method
Navigate to the Module_07\TUFLOW\model\gis folder:
- Drag and drop the 2d_code_M01_001_R.shp file into the workspace, or
- Select Layer > Add layer > Add Vector Layer and navigate to the Module_07\TUFLOW\model\gis folder.
- Use the 'Apply TUFLOW Styles to Open Layers'.
Create quadtree nesting layer:
- Click on the ‘Import Empty File’ symbol from the TUFLOW Plugin toolbar.
- Select '2d_qnl' from the Empty Type list.
- In the Run ID box write 'M07_001'.
- Tick the 'Regions' Geometry Type and hit 'OK'. The 2d_qnl (quadtree nesting layer) file appears in the Layers panel.
- Right click on the '2d_qnl_M07_001_R' and toggle on Editing.
- Select 'Add Polygon Feature' and digitise a polygon around the creek.
- Terminate the polygon by right clicking and write '2' into the 'Nest_Level' attribute.
- Turn off editing to save the edits.

Conclusion
- A 2d_qnl layer was digitised surrounding the creek.
| Up |
|---|