Tutorial M06 002 GIS Inputs QGIS GPKG
Jump to navigation
Jump to search
Introduction
QGIS is used to create, import and view input data.
TUFLOW Project Re-Configuration
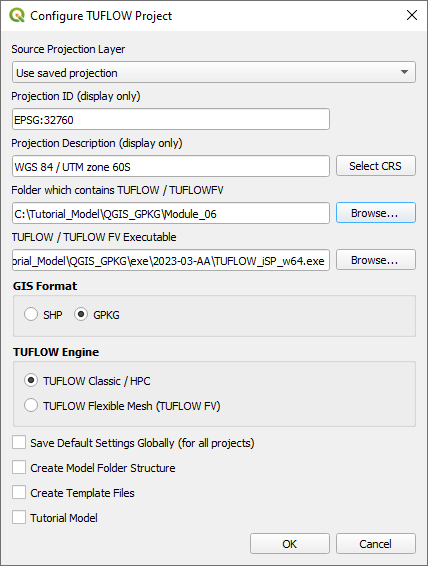
Re-configure the TUFLOW project to use and save empty files to the correct folder:
- Go to Plugins > TUFLOW > Editing > Configure / Create TUFLOW Project.
- Change the folder which contains TUFLOW to the Module_06 folder. This is the only change required, the model folder structure and template empty files are supplied from previous model.
Note: The 'results' and 'check' folder get automatically created when the TUFLOW model is run.
- Click 'OK' and save the QGIS workspace by selecting Project > Save As.
- Set the QGIS workspace projection to EPSG:32760, see Set the Projection.

Method
Set up the GeoPackage Database:
- Navigate to the Module_06\TUFLOW\model\gis folder. Save a copy of M02_001.gpkg as M06_002.gpkg.
- Within the QGIS Browser Panel, right click on 'Favorites' and select 'Add a Directory...'.
- Navigate to the Module_06 folder and select it.
Create a 2d_rf layer with digitised polygons based on the input rainfall hyetographs:
- Click on the ‘Import Empty File’ tool from the TUFLOW plugin toolbar.
- Select '2d_rf' from the Empty Type list.
- In the Run ID box write: 'M06_polygons_002'.
- Tick the 'Regions' Geometry Type.
- In the Spatial Database Options, select 'All to one'. Navigate to the Module_06/TUFLOW/model/gis folder and select M06_002.gpkg. Click Save and hit 'OK'.
- The 2d_rf_M06_polygons_002_R appears in the QGIS Layers Panel.
The same catchment breakup is used as the 2d_sa layer:
- Load in the 2d_sa_M01_001_R layer from M06_002.gpkg, either:
- Within the QGIS Browser Panel, navigate to M06_002.gpkg and double click the layer, or
- In File Explorer, drag and drop the M06_002.gpkg into the QGIS workspace and select the layer.
- Copy and paste the polygons from the 2d_sa layer into the 2d_rf:
- Open the attribute table of the 2d_rf layer and make the following edits:
- Update names to match the names in the rainfall_stations.csv input data (RF_FC04, RF_FC05, RF_FC06, RF_FC07)
- f1: 1
- f2: 1
- Turn off editing to save the edits.
Conclusion
- Polygons have been digitised based on input rainfall hyetographs.
| Up |
|---|