Tutorial M06 002 GIS Inputs QGIS GPKG: Difference between revisions
Jump to navigation
Jump to search
Content deleted Content added
Created page with "<span style="color:#FF0000"> <font size = 18>Page Under Construction</font> </span> = Introduction = QGIS is used to create, import and view input data.<br> <br> = Method = C..." |
No edit summary |
||
| (5 intermediate revisions by the same user not shown) | |||
| Line 1: | Line 1: | ||
<span style="color:#FF0000"> |
|||
<font size = 18>Page Under Construction</font> |
|||
| ⚫ | |||
= Introduction = |
= Introduction = |
||
QGIS is used to create, import and view input data.<br> |
QGIS is used to create, import and view input data.<br> |
||
<br> |
|||
= TUFLOW Project Re-Configuration = |
|||
Re-configure the TUFLOW project to use and save empty files to the correct folder:<br> |
|||
<ol> |
|||
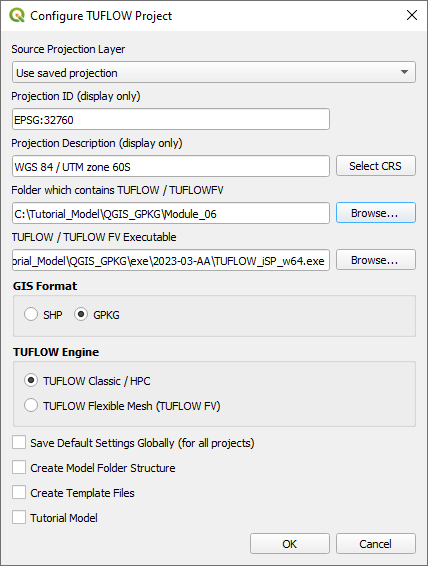
<li>Go to Plugins > TUFLOW > Editing > Configure / Create TUFLOW Project. |
|||
<li>Change the folder which contains TUFLOW to the '''Module_06''' folder. This is the only change required, the model folder structure and template empty files are supplied from previous model.<br> |
|||
Note: The 'results' and 'check' folder get automatically created when the TUFLOW model is run. <br> |
|||
<li>Click 'OK' and save the QGIS workspace by selecting Project > Save As.<br> |
|||
<br> |
|||
[[File:M06_GPKG_ConfigureProject.PNG]]<br><br> |
|||
<li>Set the QGIS workspace projection to EPSG:32760, see <u>[https://wiki.tuflow.com/index.php?title=Tutorial_Site_Familiarisation_QGIS#Set_the_Projection Set the Projection]</u>. |
|||
| ⚫ | |||
<br> |
<br> |
||
= Method = |
= Method = |
||
Set up the GeoPackage Database: |
|||
<ol> |
|||
| ⚫ | |||
<li>Within the QGIS Browser Panel, right click on 'Favorites' and select 'Add a Directory...'. |
|||
<li>Navigate to the '''Module_06''' folder and select it. |
|||
</ol> |
|||
Create a 2d_rf layer with digitised polygons based on the input rainfall hyetographs: |
Create a 2d_rf layer with digitised polygons based on the input rainfall hyetographs: |
||
<ol> |
<ol> |
||
<li>Click on the ‘Import Empty File’ tool from the TUFLOW |
<li>Click on the ‘Import Empty File’ tool from the TUFLOW plugin toolbar. |
||
<li>Select '2d_rf' from the Empty Type list. |
<li>Select '2d_rf' from the Empty Type list. |
||
<li>In the Run ID box write: 'M06_polygons_002'. |
<li>In the Run ID box write: 'M06_polygons_002'. |
||
<li>Tick the 'Regions' Geometry Type |
<li>Tick the 'Regions' Geometry Type. |
||
<li>In the Spatial Database Options, select 'All to one'. Navigate to the '''Module_06/TUFLOW/model/gis''' folder and select '''M06_002.gpkg'''. Click Save and hit 'OK'. |
|||
<li>The '''2d_rf_M06_polygons_002_R''' appears in the QGIS Layers Panel. |
|||
</ol> |
</ol> |
||
The same catchment breakup is used as the 2d_sa layer: |
The same catchment breakup is used as the 2d_sa layer: |
||
<ol> |
|||
| ⚫ | |||
<li>Load in the '''2d_sa_M01_001_R''' layer from '''M06_002.gpkg''', either: |
|||
:*Within the QGIS Browser Panel, navigate to '''M06_002.gpkg''' and double click the layer, or |
|||
:*In File Explorer, drag and drop the '''M06_002.gpkg''' into the QGIS workspace and select the layer. |
|||
<li>Copy and paste the polygons from the 2d_sa layer into the 2d_rf: <br> |
<li>Copy and paste the polygons from the 2d_sa layer into the 2d_rf: <br> |
||
<br> |
<br> |
||
{{Video|name=Animation_M06_GIS_002_01a.mp4|width=1270}}<br> |
|||
[[File:Animation M06 GIS 002 01a.gif]]<br> |
|||
<br> |
<br> |
||
<li>Open the attribute table of the 2d_rf layer and make the following edits: |
<li>Open the attribute table of the 2d_rf layer and make the following edits: |
||
| Line 27: | Line 50: | ||
<li>Turn off editing to save the edits.<br> |
<li>Turn off editing to save the edits.<br> |
||
<br> |
<br> |
||
{{Video|name=Animation_M06_GPKG_GIS_002_02a.mp4|width=1270}}<br> |
|||
[[File:Animation M06 GIS 002 02a.gif]]<br> |
|||
</ol> |
</ol> |
||
<br> |
<br> |
||
Latest revision as of 13:26, 14 August 2023
Introduction
QGIS is used to create, import and view input data.
TUFLOW Project Re-Configuration
Re-configure the TUFLOW project to use and save empty files to the correct folder:
- Go to Plugins > TUFLOW > Editing > Configure / Create TUFLOW Project.
- Change the folder which contains TUFLOW to the Module_06 folder. This is the only change required, the model folder structure and template empty files are supplied from previous model.
Note: The 'results' and 'check' folder get automatically created when the TUFLOW model is run.
- Click 'OK' and save the QGIS workspace by selecting Project > Save As.
- Set the QGIS workspace projection to EPSG:32760, see Set the Projection.

Method
Set up the GeoPackage Database:
- Navigate to the Module_06\TUFLOW\model\gis folder. Save a copy of M02_001.gpkg as M06_002.gpkg.
- Within the QGIS Browser Panel, right click on 'Favorites' and select 'Add a Directory...'.
- Navigate to the Module_06 folder and select it.
Create a 2d_rf layer with digitised polygons based on the input rainfall hyetographs:
- Click on the ‘Import Empty File’ tool from the TUFLOW plugin toolbar.
- Select '2d_rf' from the Empty Type list.
- In the Run ID box write: 'M06_polygons_002'.
- Tick the 'Regions' Geometry Type.
- In the Spatial Database Options, select 'All to one'. Navigate to the Module_06/TUFLOW/model/gis folder and select M06_002.gpkg. Click Save and hit 'OK'.
- The 2d_rf_M06_polygons_002_R appears in the QGIS Layers Panel.
The same catchment breakup is used as the 2d_sa layer:
- Load in the 2d_sa_M01_001_R layer from M06_002.gpkg, either:
- Within the QGIS Browser Panel, navigate to M06_002.gpkg and double click the layer, or
- In File Explorer, drag and drop the M06_002.gpkg into the QGIS workspace and select the layer.
- Copy and paste the polygons from the 2d_sa layer into the 2d_rf:
- Open the attribute table of the 2d_rf layer and make the following edits:
- Update names to match the names in the rainfall_stations.csv input data (RF_FC04, RF_FC05, RF_FC06, RF_FC07)
- f1: 1
- f2: 1
- Turn off editing to save the edits.
Conclusion
- Polygons have been digitised based on input rainfall hyetographs.
| Up |
|---|