GeoPackage Tips
Page Under Construction
Introduction
This page includes tips and tricks for working with the GeoPackage Vector format (supported since the TUFLOW 2023-03-AA Release). GeoPackage is a widely supported, open GIS database format, built upon an SQLite database (data is stored as a single file with the extension .gpkg).
This database format has several benefits, including:
- Multiple GIS layers can be stored in the single file database. For example, all GIS input layers can be stored in a single GeoPackage file.
- Supports spatial indexing, greatly reducing loading and viewing times making it much faster to work with in GIS packages.
- Faster to write from TUFLOW than the shapefile format.
For more information see the 2023 Release Notes.
Database Organisation
There are many ways to organise model inputs when using GeoPackages. This allows modellers to decide how they structure their inputs files, for example some options include:
- a single database for an entire project,
- separate database for an existing or developed case, or
- separate databases for each type of input (e.g. elevation, materials, culverts).
To define the database for TUFLOW to refer to the following command is used:
Spatial Database == /path/to/database
This command can be repeated multiple times throughout control files, TUFLOW will change which database it looks to based on the last time the above command has been referenced.
Referencing a GeoPackage Database
Referencing a GeoPackage Layer
Outputs
Result and check file vector outputs can be written into separate databases or grouped, with 'grouped' being the default. Grouped databases will group by output folder location, for example, the check file folder will contain one GeoPackage Database that contains all check file layers within it. Separate databases will group geometries together, for example, PLOT_P, PLOT_L, PLOT_R will be written to one database. The following command can be used to set the output to either separate or grouped: Spatial Database Output == SEPARATE | {GROUPED}
This is a huge benefit in terms of file organisation. The below shows a TUFLOW 'Check' folder from a model using the GeoPackage (grouped). The same 'Check' folder for a model using Shapefile would have 44(!) items in it.
QGIS Tips & Tricks
Convert TUFLOW Model GIS Format
The Convert TUFLOW Model GIS Format tool has been developed to convert the GIS formats for an entire models (input files and control files). For example, if you have a model currently set up using the SHP vector format and FLT raster format, you can automatically convert it to GPKG and TIF. This tool works both ways for any TUFLOW supported format and will automatically show in the 'Processing Toolbox' if you have the TUFLOW Plugin installed.
Configuring a New Project
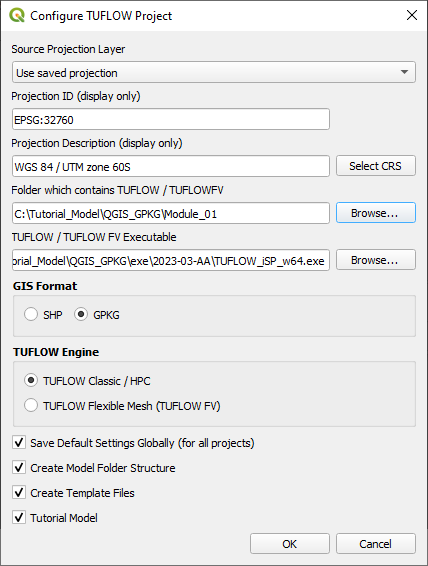
QGIS is used to configure TUFLOW projects with the TUFLOW plugin. To configure a new TUFLOW project with GeoPackage as the GIS format, use the TUFLOW plugin:
- Open the 'Configure TUFLOW Project' tool by selecting Plugins > TUFLOW > Editing > Configure / Create TUFLOW Project.
- Select the required CRS for the project.
- Click 'Browse...' to select the folder location containing the TUFLOW folder. This creates the default TUFLOW model directory and sub-folders.
- Click 'Browse...' to select the location of the TUFLOW single precision executable file.
- Select 'GPKG' as the GIS Format.
- Select the required TUFLOW Engine and box options.
- Click 'OK'. This will configure the TUFLOW project using GeoPackage.
Updating Layer Names
QGIS Browser Panel
The QGIS Browser Panel is the recommended location to view, access, open and edit layers with a GeoPackage Database. It is possible to:
- View layers inside a Geopackage Database.
- View layers inside a Geopackage Database.
- Move a layer from one GeoPackage Database to another.
- Move a layer from one GeoPackage Database to another.
- Move a shapefile into a GeoPackage Database. QGIS will automatically convert it to a Geopackage layer.
- Move a shapefile into a GeoPackage Database. QGIS will automatically convert it to a Geopackage layer.
- Rename a layer or database (using the File Management Tool)
- Delete a layer or database (using the File Management Tool)
Setting a Brower Panel Favourite
For quick access, a project folder can be set as a favourite in the QGIS Browser Panel.
- Right click in the Toolbar panel and tick on 'Browser Panel' from the 'Panels' options.
- Within the QGIS Browser Panel, right click on 'Favorites' and select 'Add a Directory...'.
- Navigate to the project folder and select it.
