XPSWMM Conversion TUFLOW Structure
Revision as of 14:34, 15 February 2024 by Emilie Nielsen (talk | contribs) (→Convert XPSWMM Model to Recommended TUFLOW Structure)
Convert XPSWMM Model to Recommended TUFLOW Structure
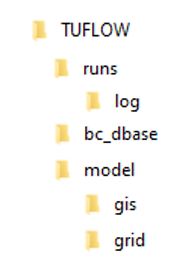
When XPSWMM writes its TUFLOW files, it consolidates all the information into a single folder (typically the 2D\Data folder). This is not a standard TUFLOW structure. The standard structure used by the majority of TUFLOW modelers globally includes the following subfolders:
To simplify the process of converting the XPSWMM model to the recommended TUFLOW SWMM folder structure, we have created a processing tool. This tool converts the GIS format of the XPSWMM model, creates the recommended TUFLOW folder structure and saves the converted model files to their correct locations. For more information on the processing tool, see Convert TUFLOW Model GIS Format.
- Open QGIS. If you do not have QGIS installed:
- Install QGIS 3.34 or later: Latest 64-bit version of QGIS.
- Install the QGIS TUFLOW Plugin by following the instructions, QGIS TUFLOW Plugin Installation.
- In QGIS, go to Processing > Toolbox from the top dropdown menu options to open the Processing Toolbox.
- Go to 'TUFLOW' in the processing tool list and select 'Convert TUFLOW Model GIS Format'. This opens the dialog shown below.
- TCF: Click '...' and navigate to the XPSWMM .tcf. This should be located in the 2D\Data folder.
- Output Vector Format: 'GPKG'
- Output Raster Format: 'GTIFF'
- Output Profile: Any option can be used. 'ALL IN ONE' is used in this example for model design consistency with the TUFLOW SWMM Tutorials.
- Output Folder: Click '...' and navigate to an appropriate location to save your TUFLOW model. In this location, create a new folder called TUFLOW and select it.
- Advanced Parameters:
- Tick on 'Write empty files'.
- Output CRS: Select an appropriate Coordinate Reference System (CRS) for the model.
- Tick on 'Force TUFLOW Directory Structure'.
- TUFLOW Directory Structure Settings: Click '...'. Under 'Folder Structure', click the
 icon to add a folder. Set 'Key' to swmm, and 'Path' to ./model/swmm.
- Click 'Run'. Once the tool is finished, click 'Close'.
- Inspect the tool output to familiarize yourself with the TUFLOW model structure.
| Up |
|---|
