Difference between revisions of "Tutorial M03 Check Files QGIS GPKG"
Jump to navigation
Jump to search
(→Method) |
|||
| Line 15: | Line 15: | ||
Review the check files: | Review the check files: | ||
<ol> | <ol> | ||
| − | <li> | + | <li>Open the files, either: |
| − | + | :*Within the QGIS Browser Panel, navigate to '''Module_03\TUFLOW\check\M03_5m_001_Check.gpkg''' and double click the following layers, or | |
| − | :*'''M03_5m_001_grd_check_R''' | + | ::*'''M03_5m_001_grd_check_R''' |
| − | :*'''M03_5m_001_nwk_C_check_L''' | + | ::*'''M03_5m_001_nwk_C_check_L''' |
| − | :*'''M03_5m_001_1d_to_2d_check_R''' | + | ::*'''M03_5m_001_1d_to_2d_check_R''' |
| + | :*In File Explorer, navigate to the '''Module_03\TUFLOW\check''' folder, drag and drop the '''M03_5m_001_Check.gpkg''' into the QGIS workspace and select the layers above (hold Ctrl to select multiple). | ||
<li>Use the 'Apply TUFLOW Styles to Open Layers'. | <li>Use the 'Apply TUFLOW Styles to Open Layers'. | ||
<li>Use the 'Apply GPKG Layer Names'. | <li>Use the 'Apply GPKG Layer Names'. | ||
Revision as of 10:44, 31 July 2023
Page Under Construction
Introduction
QGIS is used to import the check files and review the 1D to 2D connections between the 1D network features and the 2D domain.
Method
This tutorial introduces:
Review the check files:
- Open the files, either:
- Within the QGIS Browser Panel, navigate to Module_03\TUFLOW\check\M03_5m_001_Check.gpkg and double click the following layers, or
- M03_5m_001_grd_check_R
- M03_5m_001_nwk_C_check_L
- M03_5m_001_1d_to_2d_check_R
- In File Explorer, navigate to the Module_03\TUFLOW\check folder, drag and drop the M03_5m_001_Check.gpkg into the QGIS workspace and select the layers above (hold Ctrl to select multiple).
- Use the 'Apply TUFLOW Styles to Open Layers'.
- Use the 'Apply GPKG Layer Names'.
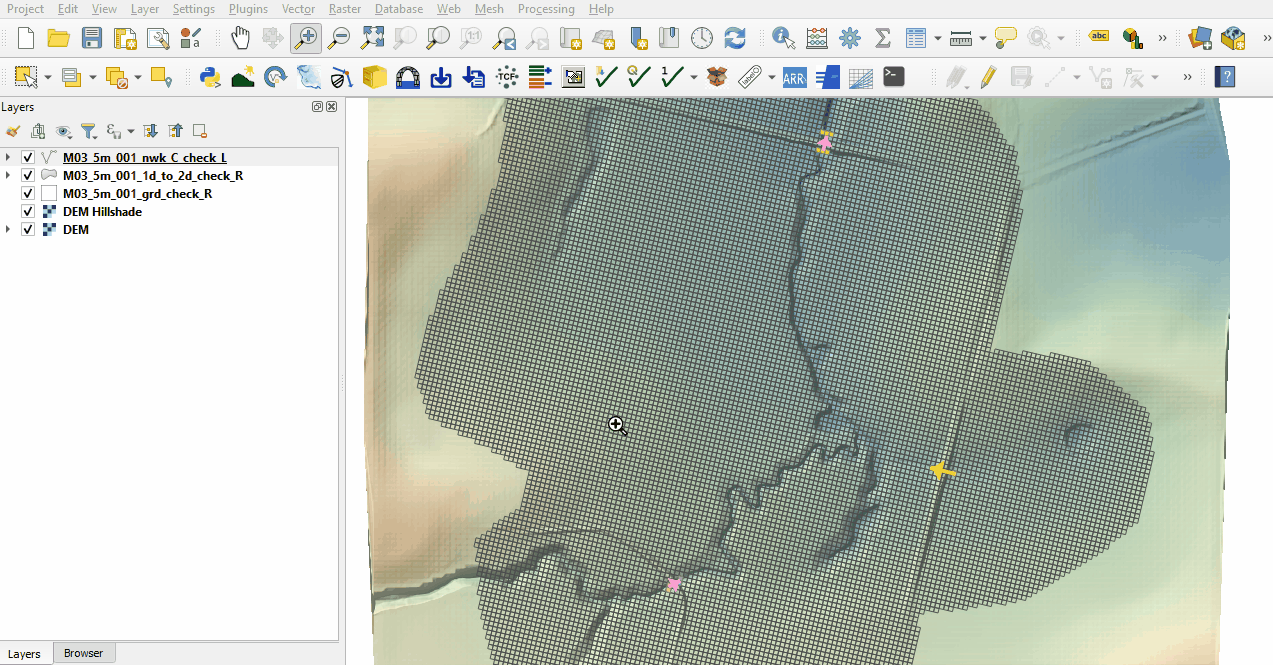
- The grd_check is the 2D grid defined by the 2d_code layer and contains a region object for each cell. It is useful to understand how the model is orientated, the cell size in relation to the hydraulic features and where certain calculations occur in the model. In this tutorial, the grid is orientated to align with the downstream road.
- The nwk_C_check_L file shows all attributes applied to the network elements. Some fields should be inspected as they have changes from the input 1d_nwk_M03_culverts layer:
- Len_or_ANA: contains the length used by TUFLOW (determined by the digitised line).
- pSlope: the slope of the 1D element.
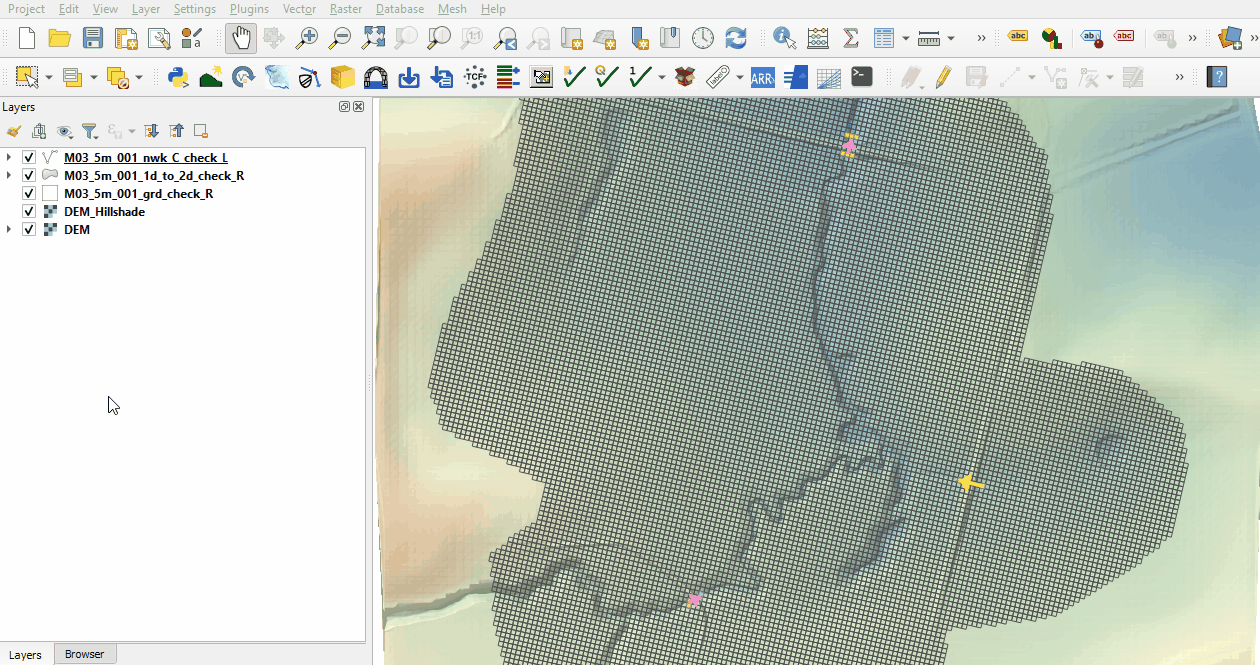
- The 1d_to_2d_check_R file shows the cells selected by the SX boundary links. It is recommended the same number of linking cells is selected at both the upstream and downstream of the culverts and that the number of selected cells is proportional to the structure size. Zoom to each structure to inspect the SX links:
- The point SX selects a single cell in which the point falls.
- The region SX selects all cells where the cell centers fall within the region.
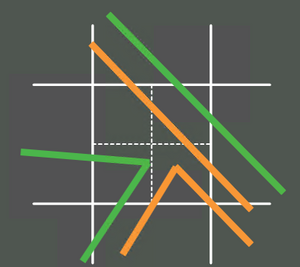
- The line SX selects cells which are intercepted by the line using the crosshair approach. For example, the dashed lines below are the crosshairs within a cell. A line must intersect at least one of these crosshairs to be selected:
- The point SX selects a single cell in which the point falls.


Conclusion
- The nwk_C_check file investigated the attributes for the 1D culverts.
- The 1d_to_2d_check and grd_check files were used to assess the SX connections between the 1D culvers and the 2D domain.
| Up |
|---|