GeoPackage Tips: Difference between revisions
| (70 intermediate revisions by 3 users not shown) | |||
| Line 1: | Line 1: | ||
<span style="color:#FF0000"> |
|||
<font size = 18>Page Under Construction</font> |
|||
</span> |
|||
= Introduction = |
= Introduction = |
||
This page includes tips and tricks for working with the |
This page includes tips and tricks for working with the GPKG vector format (supported since the TUFLOW 2023-03-AA Release). GPKG is a widely supported, open GIS database format, built upon an SQLite database (data is stored as a single file with the extension .gpkg). <br><br> |
||
This database format has several benefits, including: |
This database format has several benefits, including: |
||
*Multiple GIS |
*Multiple GIS layers can be stored in the single file database. For example, all GIS input layers can be stored in a single GPKG file. |
||
*Supports spatial indexing, greatly reducing loading and viewing times making it much faster to work |
*Supports spatial indexing, greatly reducing loading and viewing times, making it much faster to work within GIS packages. |
||
*Faster to write from TUFLOW than the shapefile format. |
*Faster to write from TUFLOW than the shapefile format. |
||
For more information |
For more information, refer to Section 4.4.3 of the <u>[https://docs.tuflow.com/classic-hpc/manual/latest/ TUFLOW Manual]</u>. |
||
<br><br> |
|||
= Database Organisation = |
= Database Organisation = |
||
There are many ways to organise model inputs when using |
There are many ways to organise model inputs when using GPKG. This allows modellers to decide how they structure their inputs files, for example some options include: |
||
* |
*Single database for an entire project |
||
* |
*Separate database for each control file (e.g. geometry, boundary control file) |
||
*Separate database for an existing or developed case |
|||
*separate databases for each type of input (e.g. elevation, materials, culverts). <br> |
|||
*Separate databases for each type of input (e.g. elevation, materials, culverts) |
|||
== Referencing a GeoPackage Database == |
|||
To define the database for TUFLOW to refer to the following command is used:<br> |
|||
To reference a GPKG Database: |
|||
<font color="blue"><tt>Spatial Database</tt></font> <font color="red"><tt>== </tt></font> <font color="black"><tt>/path/to/database </tt></font> <br><br> |
|||
<ol> |
|||
<li>Specify a GPKG Database for the entire model by adding the following command to the beginning of the .tcf. This database will be the default for all inputs in all control files. There is no need to reference the database again in the other control files. <br> |
|||
<font color="blue"><tt>Spatial Database </tt></font> <font color="red"><tt>== </tt></font> <font color="black"><tt> <path_to_database> </tt> |
|||
<li>Specify a different GPKG Database for subsequent inputs using the following command. A new database can be specified multiple times throughout control files, TUFLOW will looks into the last database referenced above the feature. The command can be used in the .tcf, .ecf, .tbc, .tgc, .qcf, .tef. For example:<br> |
|||
<font color="blue"><tt>Spatial Database </tt></font> <font color="red"><tt>== </tt></font> <font color="black"><tt>gis\2d_zsh.gpkg </tt> <font color="green"><tt> ! Sets GPKG Database</tt></font> <br> |
|||
<font color="black"><font color="blue"><tt>Read GIS Z Shape </tt></font> <font color="red"><tt>== </tt></font> <font color="black"><tt>2d_zsh_existing_L </tt></font> <font color="green"><tt> ! References the 2d_zsh_L layer from 2d_zsh.gpkg</tt></font> <br> |
|||
<font color="blue"><tt>Read GIS Z Shape </tt></font> <font color="red"><tt>== </tt></font> <font color="black"><tt>2d_zsh_development_L </tt></font> <font color="green"><tt> ! References the 2d_zsh_L layer from 2d_zsh.gpkg</tt></font> <br><br> |
|||
<font color="blue"><tt>Spatial Database </tt></font> <font color="red"><tt>== </tt></font> <font color="black"><tt>gis\2d_mat.gpkg </tt></font> <font color="green"><tt> ! Sets GPKG Database</tt></font> <br> |
|||
<font color="blue"><tt>Read GIS Mat </tt></font> <font color="red"><tt>== </tt></font> <font color="black"><tt>2d_mat_existing_R </tt></font> <font color="green"><tt> ! References the 2d_mat_R layer from 2d_mat.gpkg</tt></font> <br> |
|||
<font color="blue"><tt>Read GIS Mat </tt></font> <font color="red"><tt>== </tt></font> <font color="black"><tt>2d_mat_development_R </tt></font> <font color="green"><tt> ! References the 2d_mat_R layer from 2d_mat.gpkg</tt></font> <br> |
|||
</ol>Note: The commands are localised to their relevant control file with the exception of the .tcf which acts as a global command (local spatial database will take precedence). If no database is referenced in the other control files, the database referenced in the .tcf will be used.<br> |
|||
== |
==Referencing a GeoPackage Layer== |
||
There are many ways to reference a GPKG Layer. The following commands can be used in the .tcf, .ecf, .tbc, .tgc, .qcf and .tef. <br> |
|||
== Referencing a GeoPackage Layer == |
|||
<ol> |
|||
<li>To specify a table in a GPKG, use ">>":<br> |
|||
<font color="blue"><tt>Read GIS Z Shape </tt></font> <font color="red"><tt>== </tt></font> <font color="black"><tt>gis\2d_zsh.gpkg >> 2d_zsh_L </tt><br> |
|||
<li>To specify more than one table in a GPKG in the same command line, use "|". The database has to be referenced for all the tables. <br> |
|||
<font color="blue"><tt>Read GIS Z Shape </tt></font> <font color="red"><tt>== </tt></font> <font color="black"><tt>gis\2d_zsh.gpkg >> 2d_zsh_L | gis\2d_zsh.gpkg >> 2d_zsh_P </tt><br> |
|||
<li>To specify more than one table in a GPKG in the same command line, use "&&". This is similar to "|", however there is no need to reference the database again. <br> |
|||
<font color="blue"><tt>Read GIS Z Shape </tt></font> <font color="red"><tt>== </tt></font> <font color="black"><tt>gis\2d_zsh.gpkg >> 2d_zsh_L && 2d_zsh_P </tt><br> |
|||
<li>"&&" can be used in conjunction with "|":<br> |
|||
<font color="blue"><tt>Read GIS Z Shape </tt></font> <font color="red"><tt>== </tt></font> <font color="black"><tt>gis\2d_zsh_R.gpkg | gis\2d_zsh.gpkg >> 2d_zsh_L && 2s_zsh_P </tt><br> |
|||
<li>To specify a GPKG file path only. It will assume the table name is the same as the GPKG database name. The following are equivalent:<br> |
|||
<font color="blue"><tt>Read GIS Z Shape </tt></font> <font color="red"><tt>== </tt></font> <font color="black"><tt>gis\2d_zsh_L.gpkg </tt><br> |
|||
<font color="blue"><tt>Read GIS Z Shape </tt></font> <font color="red"><tt>== </tt></font> <font color="black"><tt>gis\2d_zsh_L.gpkg >> 2d_zsh_L </tt><br> |
|||
<li>To specify all the tables in a GPKG, use the command "USE ALL" with ">>":<br> |
|||
<font color="blue"><tt>Read GIS Z Shape </tt></font> <font color="red"><tt>== </tt></font> <font color="black"><tt>gis\2d_zsh.gpkg >> USE ALL </tt><br> |
|||
<br> |
|||
</ol> |
|||
If the GPKG Database is specified to use for subsequent inputs, the commands will become:<br> |
|||
<font color="blue"><tt>Spatial Database </tt></font> <font color="red"><tt>== </tt></font> <font color="black"><tt>gis\2d_zsh.gpkg </tt> <font color="green"><tt> ! Sets GPKG Database</tt></font> <br> |
|||
<ol> |
|||
<li>To specify a table:<br> |
|||
<font color="blue"><tt>Read GIS Z Shape </tt></font> <font color="red"><tt>== </tt></font> <font color="black"><tt>2d_zsh_L </tt><br> |
|||
<li>To specify more than one table in the same command line. The following are equivalent:<br> |
|||
<font color="blue"><tt>Read GIS Z Shape </tt></font> <font color="red"><tt>== </tt></font> <font color="black"><tt>2d_zsh_L | 2d_zsh_P </tt><br> |
|||
<font color="blue"><tt>Read GIS Z Shape </tt></font> <font color="red"><tt>== </tt></font> <font color="black"><tt>2d_zsh_L && 2d_zsh_P </tt><br> |
|||
</ol> |
|||
Note: If the GPKG for the model is referenced in the .tcf (using the 'Spatial Database' command), it does not need to be referenced again in the other control files. However, if the model inputs are not contained in a single GPKG, the separate databases must be referenced accordingly. |
|||
== Outputs == |
== Outputs == |
||
Result and check file vector outputs can be written into separate databases or grouped, with 'grouped' being the default. Grouped databases will group by output folder location, for example, the check file folder will contain one |
Result and check file vector outputs can be written into separate databases or grouped, with 'grouped' being the default. Grouped databases will group by output folder location, for example, the check file folder will contain one GPKG Database that contains all check file layers within it. Separate databases will group geometries together, for example, PLOT_P, PLOT_L, PLOT_R will be written to one database. The following command can be used to set the output to either separate or grouped: <br> |
||
<font color="blue"><tt>Spatial Database Output</tt></font> <font color="red"><tt>== </tt></font> <font color="black"><tt>SEPARATE | {GROUPED} </tt></font> <br><br> |
|||
This is a huge benefit in terms of file organisation. The below shows a TUFLOW 'Check' folder from a model using the GeoPackage (grouped). The same 'Check' folder for a model using Shapefile would have 44(!) items in it. <br><br> |
|||
This is a huge benefit in terms of file organisation. The below shows the TUFLOW 'Check' folder from a model using the GPKG grouped and a model using the GPKG separate. The same 'Check' folder for a model using Shapefile would have 44(!) items in it.<br> |
|||
<ol>[[File:GPKG Tips CheckFiles.mp4]]<br><br></ol> |
|||
*Grouped: |
|||
{{Video|name=Animation_Outputs_grouped.mp4|width=1000}}<br> |
|||
*Separate (grouped geometries): |
|||
{{Video|name=Animation_Outputs_separate.mp4|width=1000}}<br> |
|||
= QGIS Tips & Tricks = |
= QGIS Tips & Tricks = |
||
==Convert TUFLOW Model GIS Format== |
==Convert TUFLOW Model GIS Format== |
||
The <u>[ |
The <u>[[Convert_TUFLOW_Model_GIS_Format| Convert TUFLOW Model GIS Format]]</u> tool converts one GIS format to another for an entire model (input files and control files). For example, a model currently using the SHP vector format and FLT raster format can be converted to GPKG and TIF. This tool works both ways (to or from GPKG) for any TUFLOW supported formats and is available in the 'Processing Toolbox' once the <u>[[TUFLOW_QGIS_Plugin | TUFLOW Plugin]]</u> is installed. <br><br> |
||
==Configuring a New Project== |
==Configuring a New Project== |
||
QGIS is used to configure TUFLOW projects with the TUFLOW plugin. To configure a new TUFLOW project with GPKG as the GIS format, use the TUFLOW plugin: |
|||
<ol> |
|||
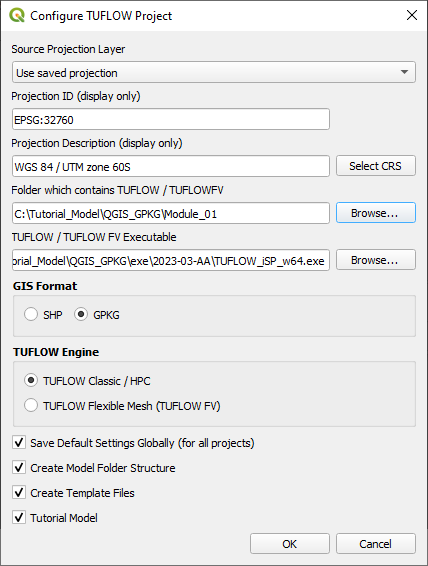
<li>Open the 'Configure TUFLOW Project' tool by selecting Plugins > TUFLOW > Editing > Configure / Create TUFLOW Project. |
|||
<li>Click 'Select CRS' to select the required CRS for the project. |
|||
<li>Click 'Browse...' to select the folder location containing the TUFLOW folder. This creates the default TUFLOW model directory and sub-folders. |
|||
<li>Click 'Browse...' to select the location of the TUFLOW single precision executable file. |
|||
<li>Select 'GPKG' as the GIS Format. |
|||
<li>Select the required TUFLOW Engine. |
|||
<li>Select the relevent remaining options (Note: Do not select "Tutorial Model" if you are building a project model) |
|||
<li>Click 'OK'. This will configure the TUFLOW project using GPKG.<br> |
|||
<br> |
|||
[[File:M01_GPKG_Configure_01.PNG]]<br> |
|||
<br> |
|||
</ol> |
|||
== Setting a Browser Panel Favourite == |
|||
==Updating Layer Names == |
|||
<u>[https://wiki.tuflow.com/QGIS_TUFLOW_Apply_GPKG_Layer_Names Updating a GPKG Layer Name]</u> |
|||
== QGIS Browser Panel == |
|||
The QGIS Browser Panel is the recommended location to view, access, open and edit layers with a GeoPackage Database. It is possible to: |
|||
:*View layers inside a Geopackage Database. |
|||
:*Move a layer from one GeoPackage Database to another. |
|||
:*Move a shapefile into a GeoPackage Database. QGIS will automatically convert it to a Geopackage layer. |
|||
:*Rename a layer or database (using the File Management Tool) |
|||
:*Delete a layer or database (using the File Management Tool) |
|||
== Setting a Brower Panel Favourite == |
|||
For quick access, a project folder can be set as a favourite in the QGIS Browser Panel. |
For quick access, a project folder can be set as a favourite in the QGIS Browser Panel. |
||
<ol> |
<ol> |
||
<li>Right click in the Toolbar panel and tick on 'Browser Panel' from the 'Panels' options. |
<li>Right click in the Toolbar panel and tick on 'Browser Panel' from the 'Panels' options. |
||
<li>Within the QGIS Browser Panel, right click on 'Favorites' and select 'Add a Directory...'. |
<li>Within the QGIS Browser Panel, right click on 'Favorites' and select 'Add a Directory...'. |
||
<li>Navigate to the project folder and select it. |
<li>Navigate to the project folder and select it.<br> |
||
{{Video|name=Animation_M01_GPKG_Browser_Panel_01c.mp4|width=1200}} |
|||
<br></ol> |
<br></ol> |
||
<br> |
<br> |
||
== |
== QGIS Browser Panel == |
||
The QGIS Browser Panel is the recommended location to view, access, open and edit GPKG layers. It is possible to: |
|||
<ol> |
|||
<li>View layers inside a GPKG.<br> |
|||
<br> |
|||
{{Video|name=browser_panel_view_gpkg_layers.mp4|width=1000}} |
|||
<br> |
|||
<li>Move a layer from one GPKG to another.<br> |
|||
<br> |
|||
{{Video|name=browser_panel_move_layer_b.mp4|width=1000}} |
|||
<br> |
|||
<li>Move a shapefile into a GPKG. QGIS automatically converts it to a GPKG layer.<br> |
|||
<br> |
|||
{{Video|name=browser_panel_move_shp_a.mp4|width=1000}} |
|||
<br> |
|||
<li>Rename a layer in a GPKG.<br> |
|||
<br> |
|||
{{Video|name=Animation_rename_layer_a.mp4|width=1000}} |
|||
<br> |
|||
<li>Delete a layer in a GPKG.<br> |
|||
<br> |
|||
{{Video|name=Animation_delete_layer.mp4|width=1000}} |
|||
</ol> |
|||
<br> |
|||
== Create a New Layer == |
|||
Use the TUFLOW plugin to create a new layer. |
|||
<ol> |
|||
<li>Click on the ‘Import Empty File’ symbol from the TUFLOW Plugin toolbar. <br> |
|||
<br> |
|||
[[File:import_empty_file.png]]<br> |
|||
<br> |
|||
<li>This opens the Dialog shown below. The TUFLOW plugin accesses the 'Empty Directory' created when the project was configured and provides a list of files to choose from. It appends the 'Empty Type' to the beginning of the 'RUN ID' and the 'Geometry Type' letter to the end. This becomes the name of the file.<br> |
|||
<br> |
|||
[[File:import_empty_dialogue.png]]<br> |
|||
<br> |
|||
<li>In the 'Spatial Database Options' section, there are the following options: |
|||
<ol> |
|||
<li>'''Convert to GPKG'''. This converts the imported format to a GPKG even if the empty file format is not a GPKG. The video below shows it being used for the 'Separate' option, however it can be toggled on for any of the export options. <br> |
|||
<br> |
|||
{{Video|name=Animation_import_layer_convert.mp4|width=1000}} |
|||
<br> |
|||
<li>'''Separate:''' Creates a separate GPKG for each new file.<br> |
|||
<br> |
|||
{{Video|name=Animation_import_layer_separate.mp4|width=1000}} |
|||
<br> |
|||
<li>'''Group geometry types:''' Creates a GPKG containing the new files for all selected geometry types.<br> |
|||
<br> |
|||
{{Video|name=Animation_import_layer_group_geom.mp4|width=1000}} |
|||
<br> |
|||
<li>'''All to one:''' Adds the new files to a new or existing GPKG.<br> |
|||
<br> |
|||
{{Video|name=Animation_import_layer_alltoone_preexisting.mp4|width=1000}} |
|||
<br> |
|||
<br> |
|||
{{Video|name=Animation_import_layer_alltoone_new.mp4|width=1000}} |
|||
<br> |
|||
</ol> |
|||
</ol> |
|||
For more information, see [[QGIS TUFLOW Import Empty|QGIS TUFLOW Import Empty]]. |
|||
<br> |
|||
<br> |
|||
== Increment a Layer == |
|||
This TUFLOW Plugin tool saves a copy of the active layer with a new filename. To use the tool: |
|||
<ol> |
|||
<li>Select the layer to increment in the Layers panel. |
|||
<li>Click on the 'Increment Selected Layer' symbol from the TUFLOW Plugin toolbar.<br> |
|||
<br> |
|||
:[[File:increment_layer.png]]<br> |
|||
<br> |
|||
</ol> |
|||
There are three options for incrementing a layer: |
|||
<ol> |
|||
<li>Increment layer only (default): This option increments the filename and the GPKG database by 1. It closes the old layer and opens the new one. For example, the tool increments '''M01_001.gpkg''' to '''M01_002.gpkg''' and '''2d_code_M01_001_R''' to '''2d_code_M01_002_R'''. |
|||
:*Note: In the video below, the output database is manually changed back to '''M01_001.gpkg'''. If the default settings were not changed the new layer would have been added to a new GPKG, '''M01_002.gpkg'''. <br> |
|||
<br> |
|||
{{Video|name=Animation_increment_layer_default.mp4|width=1000}}<br> |
|||
<li>Increment layer and preserve database: This option increments the filename of the selected layer and the GPKG database by 1. It also copies all other layers from the original GPKG database into the incremented GPKG database. For example, the tool makes a copy of '''M01_001.gpkg''' and increments it to '''M01_002.gpkg'''. All layers are copied across with their original filename, except the selected layer, which is incremented to '''2d_code_M01_002_R'''.<br> |
|||
<br> |
|||
{{Video|name=Animation_increment_layer_preserve_db.mp4|width=1000}}<br> |
|||
<li>Save layer out into superseded folder: This option increments the the filename of the selected layer by 1. It closes the old layer and opens the new one. The old layer gets moved into a new folder called 'ss'. For example, the tool increments '''2d_code_M01_001_R''' to '''2d_code_M01_002_R''' and moves '''2d_code_M01_001_R''' to the 'ss' folder. <br> |
|||
<br> |
|||
{{Video|name=Animation_increment_layer_ss.mp4|width=1000}} |
|||
<br> |
|||
</ol> |
|||
For more information, see the <u>[[QGIS_TUFLOW_Increment_Layer| Increment Layer Tool]].</u><br> |
|||
<br> |
|||
==Apply GeoPackage Layer Names == |
|||
This tool will change the layer name (within the Layers panel) to be the same as the layer name within the GPKG database. To use the tool: |
|||
<ol> |
|||
<li>Drag and Drop the GPKG Database from Windows File Explorer to QGIS. |
|||
<li>Click on the 'Apply GPKG Layer Names' symbol from the TUFLOW Plugin toolbar.<br> |
|||
<br> |
|||
[[File: GPKG_layer_names_a.png]]<br> |
|||
<br> |
|||
{{Video|name=Animation_apply_GPKG_layer_names_a.mp4|width=1000}}<br> |
|||
</ol> |
|||
Note: If the layers are opened from within the QGIS Browser Panel, they will automatically be named the same as within the GPKG database.<br> |
|||
<br> |
|||
For more information, see the <u>[[QGIS_TUFLOW_Apply_GPKG_Layer_Names| Updating a GPKG Layer Name]]</u> |
|||
=Tutorials= |
|||
Free TUFLOW tutorials using the GeoPackage format are availble via: <u>[[Tutorial Introduction|TUFLOW HPC Tutorials]]</u> |
|||
Latest revision as of 12:39, 6 February 2025
Introduction
This page includes tips and tricks for working with the GPKG vector format (supported since the TUFLOW 2023-03-AA Release). GPKG is a widely supported, open GIS database format, built upon an SQLite database (data is stored as a single file with the extension .gpkg).
This database format has several benefits, including:
- Multiple GIS layers can be stored in the single file database. For example, all GIS input layers can be stored in a single GPKG file.
- Supports spatial indexing, greatly reducing loading and viewing times, making it much faster to work within GIS packages.
- Faster to write from TUFLOW than the shapefile format.
For more information, refer to Section 4.4.3 of the TUFLOW Manual.
Database Organisation
There are many ways to organise model inputs when using GPKG. This allows modellers to decide how they structure their inputs files, for example some options include:
- Single database for an entire project
- Separate database for each control file (e.g. geometry, boundary control file)
- Separate database for an existing or developed case
- Separate databases for each type of input (e.g. elevation, materials, culverts)
Referencing a GeoPackage Database
To reference a GPKG Database:
- Specify a GPKG Database for the entire model by adding the following command to the beginning of the .tcf. This database will be the default for all inputs in all control files. There is no need to reference the database again in the other control files.
Spatial Database == <path_to_database> - Specify a different GPKG Database for subsequent inputs using the following command. A new database can be specified multiple times throughout control files, TUFLOW will looks into the last database referenced above the feature. The command can be used in the .tcf, .ecf, .tbc, .tgc, .qcf, .tef. For example:
Spatial Database == gis\2d_zsh.gpkg ! Sets GPKG Database
Read GIS Z Shape == 2d_zsh_existing_L ! References the 2d_zsh_L layer from 2d_zsh.gpkg
Read GIS Z Shape == 2d_zsh_development_L ! References the 2d_zsh_L layer from 2d_zsh.gpkg
Spatial Database == gis\2d_mat.gpkg ! Sets GPKG Database
Read GIS Mat == 2d_mat_existing_R ! References the 2d_mat_R layer from 2d_mat.gpkg
Read GIS Mat == 2d_mat_development_R ! References the 2d_mat_R layer from 2d_mat.gpkg
Note: The commands are localised to their relevant control file with the exception of the .tcf which acts as a global command (local spatial database will take precedence). If no database is referenced in the other control files, the database referenced in the .tcf will be used.
Referencing a GeoPackage Layer
There are many ways to reference a GPKG Layer. The following commands can be used in the .tcf, .ecf, .tbc, .tgc, .qcf and .tef.
- To specify a table in a GPKG, use ">>":
Read GIS Z Shape == gis\2d_zsh.gpkg >> 2d_zsh_L
- To specify more than one table in a GPKG in the same command line, use "|". The database has to be referenced for all the tables.
Read GIS Z Shape == gis\2d_zsh.gpkg >> 2d_zsh_L | gis\2d_zsh.gpkg >> 2d_zsh_P
- To specify more than one table in a GPKG in the same command line, use "&&". This is similar to "|", however there is no need to reference the database again.
Read GIS Z Shape == gis\2d_zsh.gpkg >> 2d_zsh_L && 2d_zsh_P
- "&&" can be used in conjunction with "|":
Read GIS Z Shape == gis\2d_zsh_R.gpkg | gis\2d_zsh.gpkg >> 2d_zsh_L && 2s_zsh_P
- To specify a GPKG file path only. It will assume the table name is the same as the GPKG database name. The following are equivalent:
Read GIS Z Shape == gis\2d_zsh_L.gpkg
Read GIS Z Shape == gis\2d_zsh_L.gpkg >> 2d_zsh_L
- To specify all the tables in a GPKG, use the command "USE ALL" with ">>":
Read GIS Z Shape == gis\2d_zsh.gpkg >> USE ALL
If the GPKG Database is specified to use for subsequent inputs, the commands will become:
Spatial Database == gis\2d_zsh.gpkg ! Sets GPKG Database
- To specify a table:
Read GIS Z Shape == 2d_zsh_L
- To specify more than one table in the same command line. The following are equivalent:
Read GIS Z Shape == 2d_zsh_L | 2d_zsh_P
Read GIS Z Shape == 2d_zsh_L && 2d_zsh_P
Note: If the GPKG for the model is referenced in the .tcf (using the 'Spatial Database' command), it does not need to be referenced again in the other control files. However, if the model inputs are not contained in a single GPKG, the separate databases must be referenced accordingly.
Outputs
Result and check file vector outputs can be written into separate databases or grouped, with 'grouped' being the default. Grouped databases will group by output folder location, for example, the check file folder will contain one GPKG Database that contains all check file layers within it. Separate databases will group geometries together, for example, PLOT_P, PLOT_L, PLOT_R will be written to one database. The following command can be used to set the output to either separate or grouped:
Spatial Database Output == SEPARATE | {GROUPED}
This is a huge benefit in terms of file organisation. The below shows the TUFLOW 'Check' folder from a model using the GPKG grouped and a model using the GPKG separate. The same 'Check' folder for a model using Shapefile would have 44(!) items in it.
- Grouped:
- Separate (grouped geometries):
QGIS Tips & Tricks
Convert TUFLOW Model GIS Format
The Convert TUFLOW Model GIS Format tool converts one GIS format to another for an entire model (input files and control files). For example, a model currently using the SHP vector format and FLT raster format can be converted to GPKG and TIF. This tool works both ways (to or from GPKG) for any TUFLOW supported formats and is available in the 'Processing Toolbox' once the TUFLOW Plugin is installed.
Configuring a New Project
QGIS is used to configure TUFLOW projects with the TUFLOW plugin. To configure a new TUFLOW project with GPKG as the GIS format, use the TUFLOW plugin:
- Open the 'Configure TUFLOW Project' tool by selecting Plugins > TUFLOW > Editing > Configure / Create TUFLOW Project.
- Click 'Select CRS' to select the required CRS for the project.
- Click 'Browse...' to select the folder location containing the TUFLOW folder. This creates the default TUFLOW model directory and sub-folders.
- Click 'Browse...' to select the location of the TUFLOW single precision executable file.
- Select 'GPKG' as the GIS Format.
- Select the required TUFLOW Engine.
- Select the relevent remaining options (Note: Do not select "Tutorial Model" if you are building a project model)
- Click 'OK'. This will configure the TUFLOW project using GPKG.

Setting a Browser Panel Favourite
For quick access, a project folder can be set as a favourite in the QGIS Browser Panel.
- Right click in the Toolbar panel and tick on 'Browser Panel' from the 'Panels' options.
- Within the QGIS Browser Panel, right click on 'Favorites' and select 'Add a Directory...'.
- Navigate to the project folder and select it.
QGIS Browser Panel
The QGIS Browser Panel is the recommended location to view, access, open and edit GPKG layers. It is possible to:
- View layers inside a GPKG.
- Move a layer from one GPKG to another.
- Move a shapefile into a GPKG. QGIS automatically converts it to a GPKG layer.
- Rename a layer in a GPKG.
- Delete a layer in a GPKG.
Create a New Layer
Use the TUFLOW plugin to create a new layer.
- Click on the ‘Import Empty File’ symbol from the TUFLOW Plugin toolbar.

- This opens the Dialog shown below. The TUFLOW plugin accesses the 'Empty Directory' created when the project was configured and provides a list of files to choose from. It appends the 'Empty Type' to the beginning of the 'RUN ID' and the 'Geometry Type' letter to the end. This becomes the name of the file.
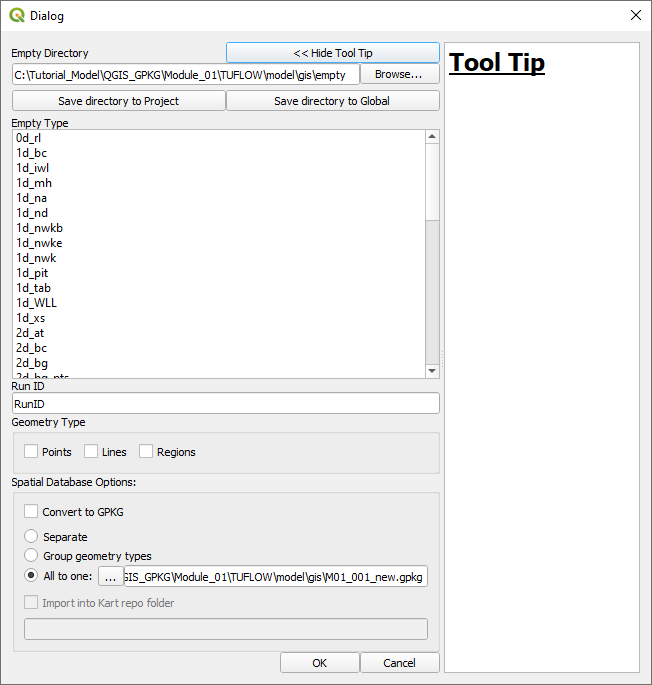
- In the 'Spatial Database Options' section, there are the following options:
- Convert to GPKG. This converts the imported format to a GPKG even if the empty file format is not a GPKG. The video below shows it being used for the 'Separate' option, however it can be toggled on for any of the export options.
- Separate: Creates a separate GPKG for each new file.
- Group geometry types: Creates a GPKG containing the new files for all selected geometry types.
- All to one: Adds the new files to a new or existing GPKG.
- Convert to GPKG. This converts the imported format to a GPKG even if the empty file format is not a GPKG. The video below shows it being used for the 'Separate' option, however it can be toggled on for any of the export options.
For more information, see QGIS TUFLOW Import Empty.
Increment a Layer
This TUFLOW Plugin tool saves a copy of the active layer with a new filename. To use the tool:
- Select the layer to increment in the Layers panel.
- Click on the 'Increment Selected Layer' symbol from the TUFLOW Plugin toolbar.

There are three options for incrementing a layer:
- Increment layer only (default): This option increments the filename and the GPKG database by 1. It closes the old layer and opens the new one. For example, the tool increments M01_001.gpkg to M01_002.gpkg and 2d_code_M01_001_R to 2d_code_M01_002_R.
- Note: In the video below, the output database is manually changed back to M01_001.gpkg. If the default settings were not changed the new layer would have been added to a new GPKG, M01_002.gpkg.
- Note: In the video below, the output database is manually changed back to M01_001.gpkg. If the default settings were not changed the new layer would have been added to a new GPKG, M01_002.gpkg.
- Increment layer and preserve database: This option increments the filename of the selected layer and the GPKG database by 1. It also copies all other layers from the original GPKG database into the incremented GPKG database. For example, the tool makes a copy of M01_001.gpkg and increments it to M01_002.gpkg. All layers are copied across with their original filename, except the selected layer, which is incremented to 2d_code_M01_002_R.
- Save layer out into superseded folder: This option increments the the filename of the selected layer by 1. It closes the old layer and opens the new one. The old layer gets moved into a new folder called 'ss'. For example, the tool increments 2d_code_M01_001_R to 2d_code_M01_002_R and moves 2d_code_M01_001_R to the 'ss' folder.
For more information, see the Increment Layer Tool.
Apply GeoPackage Layer Names
This tool will change the layer name (within the Layers panel) to be the same as the layer name within the GPKG database. To use the tool:
- Drag and Drop the GPKG Database from Windows File Explorer to QGIS.
- Click on the 'Apply GPKG Layer Names' symbol from the TUFLOW Plugin toolbar.


Note: If the layers are opened from within the QGIS Browser Panel, they will automatically be named the same as within the GPKG database.
For more information, see the Updating a GPKG Layer Name
Tutorials
Free TUFLOW tutorials using the GeoPackage format are availble via: TUFLOW HPC Tutorials